Makefile Tutorial
CS 0449: Introduction to System Software
Background 
Tutorial adapted from Dr. Jonathan Misurda’s CS0449 Makefiles Lab Up to this point, you’ve been writing your entire program in a single file. However, that is not something very practical. Good programing practices suggest that you should group similar code (such as all of your code for data structures) into their own files. This improves the readbility of your code, keeps it neat, and ultimately makes it easier to debug.
In this tutorial, you will learn how to manage a project that is split up across several files. As you’ve seen in lecture, multiple files can be compiled independently and then merged together in a process called linking. Technically, these two phases use different tools behind the scenes. However, though, the compilers will often hide that process and invoke it for us.
Here, you will create some utility functions in a separate file and then call them from a main C file. You will learn how to compile each independently, and then learn how to use make which is a tool which helps us manage and simplify the build process. You should already be familiar with using make from past programming assignments. However, now, you will learn to write your own Makefiles.
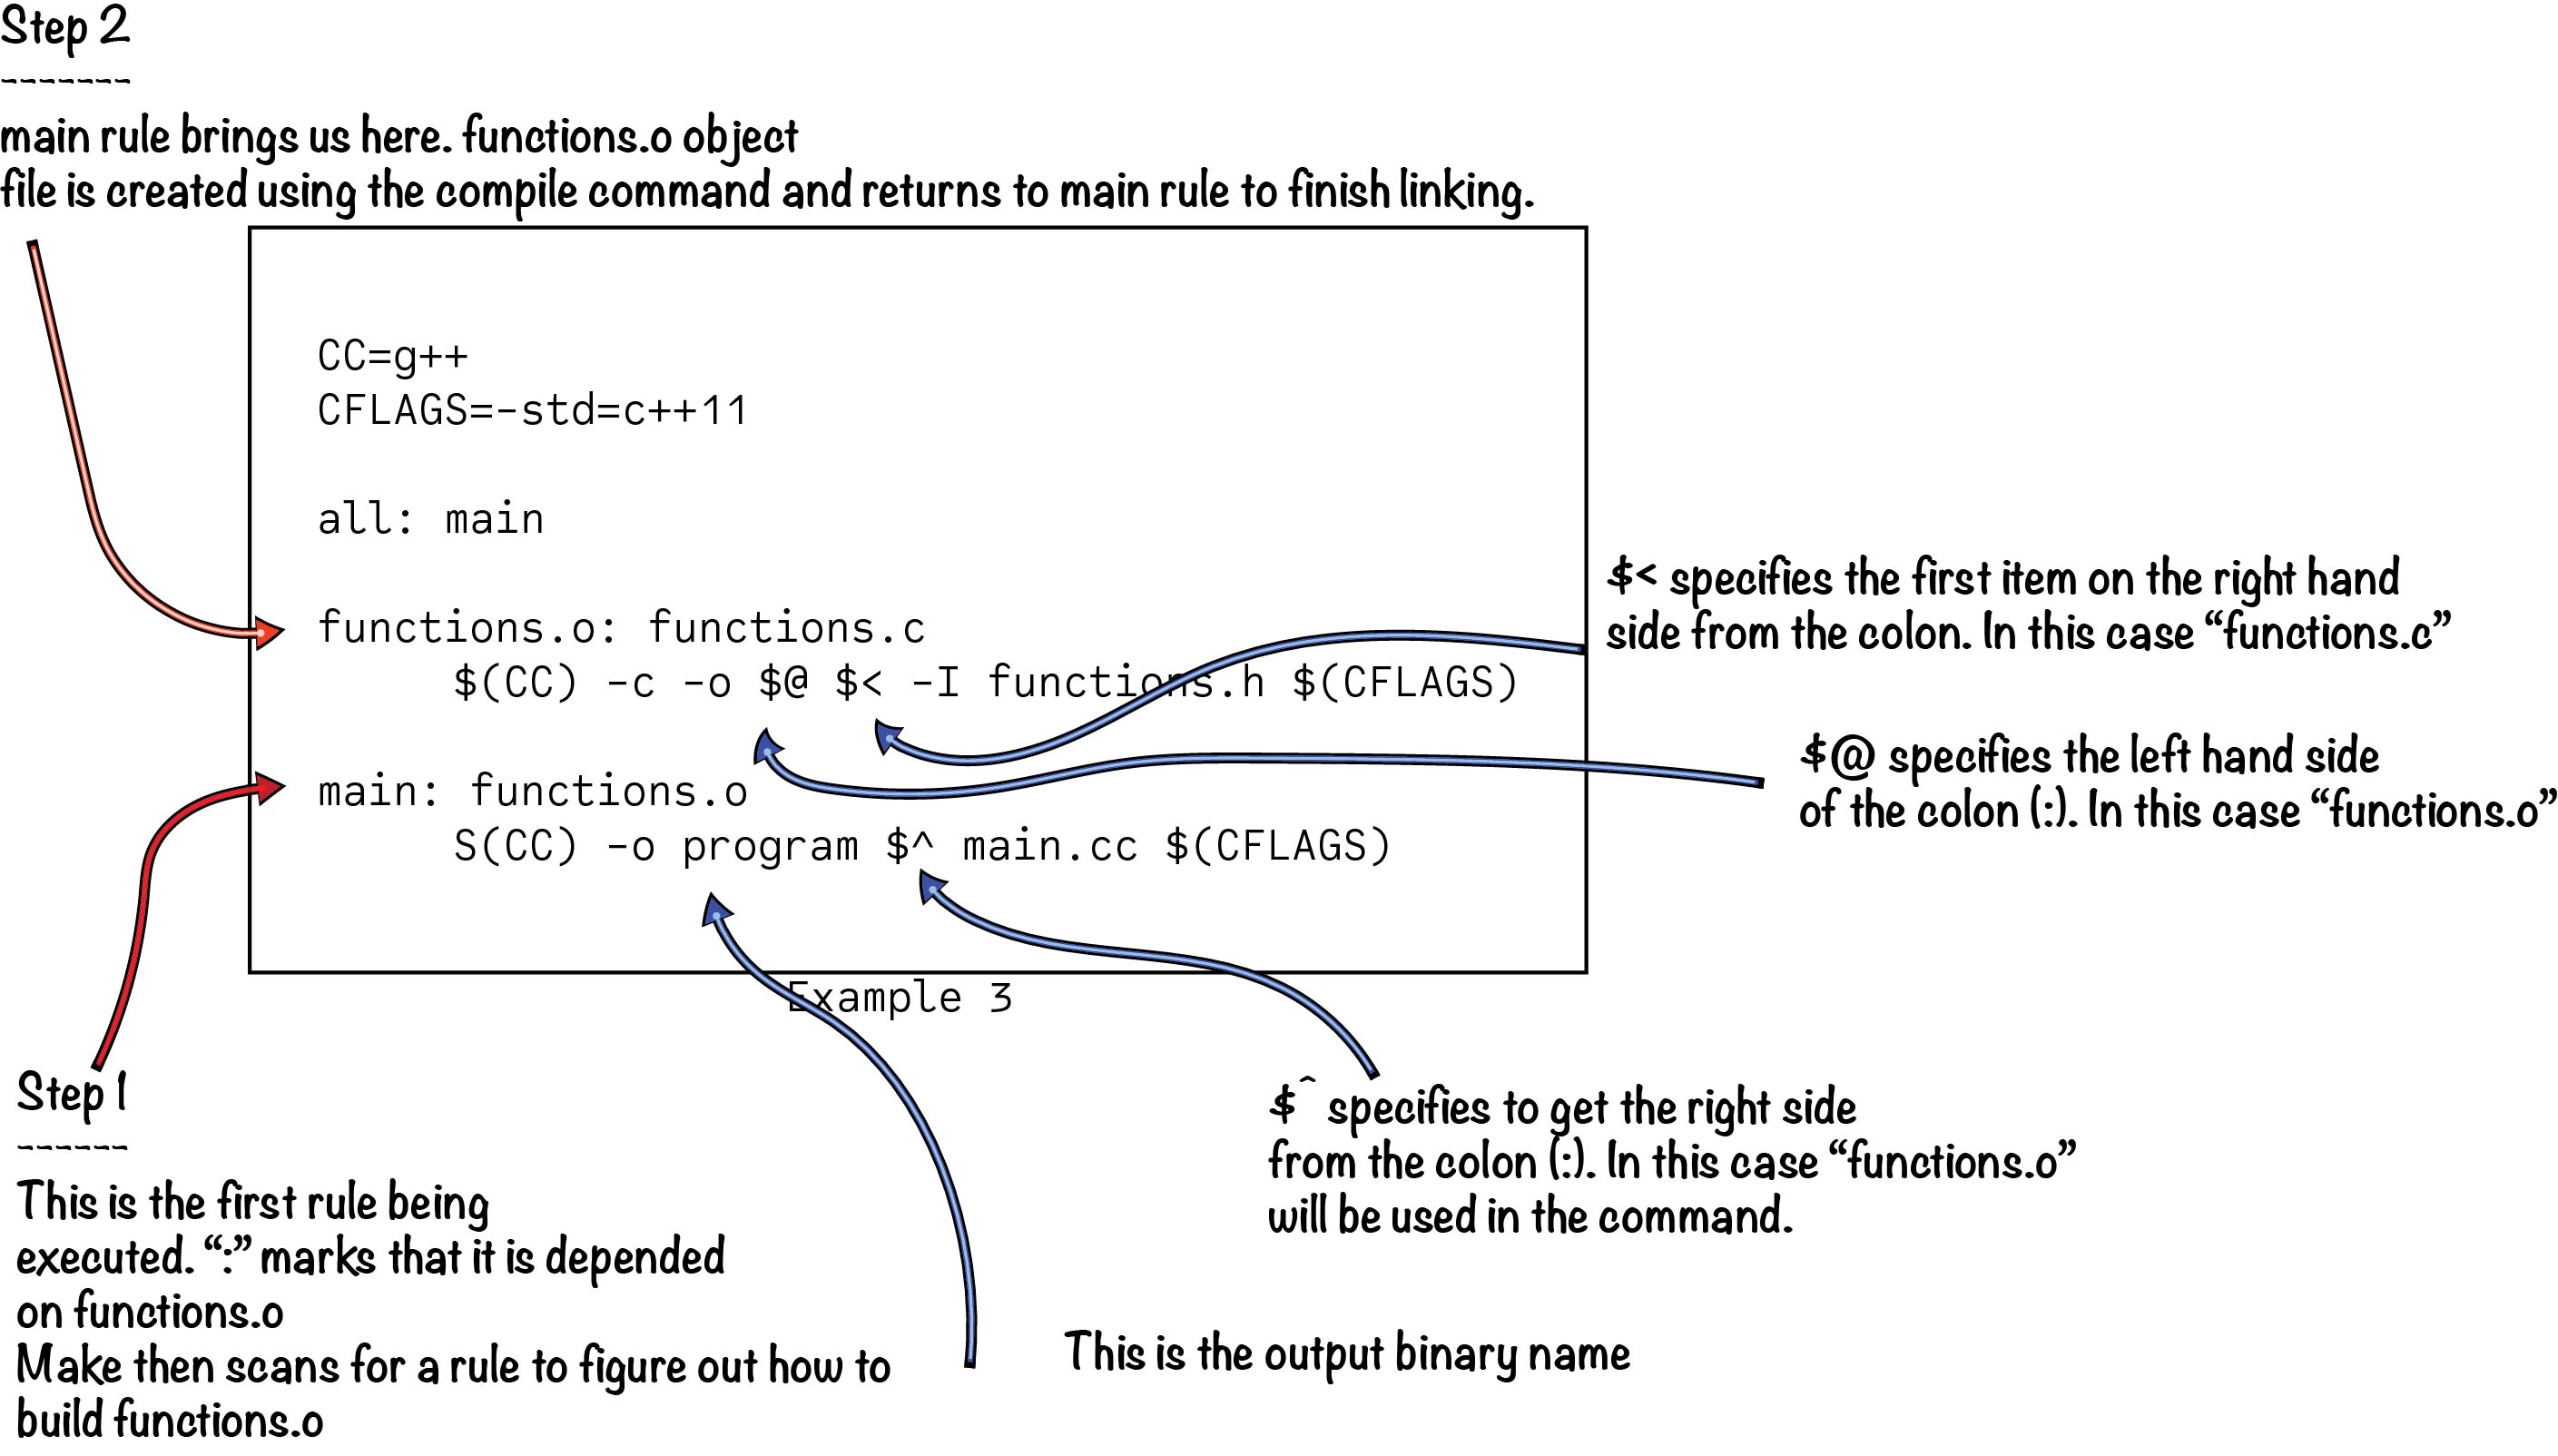
Makefile Cheat Sheet
Objective 
- Create a C program (
main.c) which prints out $5!$. - The logic for $!$ should be defined as a function
factorial(int n)stored inutil.c. - Your
main.cshould link to theutil.c - You should create a
Makefilewhich allows for easy compilation of your program.
Procedure 
- Login to
thoth.cs.pitt.eduvia SSHssh <username>@thoth.cs.pitt.edu - Move into your private directory where you store all your work for this class
cd private/DIRECTORY. - Then, create a directory for this worksheet and navigate to it:
mkdir makefile-lab cd makefile-lab - The first step will be to create our main C file (using the terminal editor of your choice):
nano main.c - Now enter the initial skeleton code:Notice that this program will not do anything meaningful (just yet)
int main(void)
{
 return 0;
}
and save the file.
- We now need to compile this. This is a rather straightforward process since it is just a single file. However we want to compile and link in separate steps for now:
gcc -c main.c - The “
-c” argument to gcc will create amain.oobject file instead of linking an entire executable. You can see it if you use thelscommand to list the directory. We can now link the object file with the C standard library and create an executable called main by using the following:gcc -o main main.o - Now, what if we had another file? Let’s create a
util.cfile that contains some functions we would like to use. Create the following file and fill it with the provided code:nano util.cint factorial(int n) { if (n <= 1) { return 1; } return n * factorial(n - 1); } - We don’t need to do much inside this C file. However, how do we call it from our
main.cfile? Well, it has to know what is defined inutil.c. So, we have to write a separate file that contains a listing of functions and definitions useful to our second fileThis file is often called a header file as include statements often appear towards the head in source files . So, let’s create autil.hfile:nano util.h - Place this code inside:
int factorial(int n);Notice that this “header file” only needs the strict definition of any functions you want to expose to your C files. Here, it suggests that you can call a function named factorial and it will return an
intand takes anintas input. This is called a function prototype. The rest of your code does not need to know the implementation details (such as it being recursive). - Now we can build this file as well: (Notice, we do not do anything with the header file,
util.h)gcc -c util.c - Now let’s modify our
main.cto have it call the factorial function:nano main.cAnd let’s use the following code to have it call the factorial function:
#include "util.h"
#include <stdio.h> //for printf
int main(void) {
printf("%d\n", factorial(5));
// Should print 120 to stdout
return 0;
}
Yes, we
#includetheutil.h. This effectively just copies-and-pastes the contents ofutil.hinto this file. This is why we need the separate files since copying the actual function duplicates the code for the factorial function and multiple versions of a function will cause us grief later on.Could we just type the function declaration contained in
util.hinto the top ofmain.cinstead of including the file with the preprocessor? Yes! But it sure is more annoying to change… - Finally, we can re-compile our main function:
gcc -c main.c - And then re-link our executable (including the code in util!):
gcc -o main main.o util.oNOTE: why did we not have to re-compile util.c? It did not change! You only have to recompile files that change, which is the power of linking. We will exploit this in our tooling with
make! - However, this gives us an opportunity to do something smarter. A tool called make is designed to invoke commands, such as each of the gcc commands above. Furthermore, it can be written to only run commands on files that have changed. Let’s look at the Makefile for our little project so far.
makelooks for a particular file in the current directory. Create the file we need here (note the capitalization):nano MakefileWrite the following and save the file:
main: main.o util.o gcc -o main main.o util.o main.o: main.c gcc -c main.c util.o: util.c gcc -c util.cNOTE: It is VERY important that the indentation you use are strictly tabs. That is, you must tab over the “
gcc -c util.c”, etc using your keyboard’s tab key. If you use spaces (or your editor replaces tabs with spaces) you will get errors from Make such as:Makefile:2: *** missing separator. Stop. - Back at your shell, run your makefile by typing this command:
make
Adding features to Makefiles 
Congratulations, You wrote your first Makefile! However, as you have seen in recitation, Makefiles offer a whole lot more features than we’ve just used. Here, we’ll explore how to implement some of them.
make clean 
Makefiles are great because it allows you to re-compile only the modified files (which speeds up compilation time). However, sometimes, you may want to re-compile your entire project from scratch. Sure, you can look through your file explorer to delte all the compiled binaries, and run make again. But, make offers a simply way to clean your compiled files.
Add the following rule to your Makefile:
clean:
        rm -f main main.o util.o
With those lines added, you can run make clean to remove all the compiled files automatically.
Using variables 
Often times, when we are compiling, we want to use certain flags. For example, the -g flag, which preserves debugging symbols, allows our compiled executable to be run via GDB and is particularly useful when programming.
We could modify our Makefiles and add the flags to each rule like:
main: main.o util.o
        gcc -Wall -g -o main main.o util.o
main.o: main.c
        gcc -Wall -g -c main.c
util.o: util.c
        gcc -Wall -g -c util.c
However, typing all that is tedious and modifying it even more so. Instead, we can define a $(CFLAGS) variable to make it easily modifiable.
CFLAGS := -Wall -g
main: main.o util.o
        gcc $(CFLAGS) -o main main.o util.o
main.o: main.c
        gcc $(CFLAGS) -c main.c
util.o: util.c
        gcc $(CFLAGS) -c util.c
Now, if you wanted to drop the -g flag (for instance, as your code moves to production), you can simply modify the $(CFLAGS) variable once instead of modifying all the rules.
Similarly, we can use the $(CC) variable to define the compiler we are using. This can be particularly useful if you are distributing your source to multiple machines running different architecture. The user can simply modify CC := gcc to CC := clang to swap out their compiler (There are differences between gcc and clang’s falgs so this is not always guaranteed to work).
More features 
Makefiles offer so much more functionalities (some more useless than others) than what is described here. For instance, automatic variables such as * wildcards and % wildcards offer a useful way to compile hundreds or even thousands of files easily. Makefiles even support conditionals, string substitutions, and even functions!
GNU has an official documentation on how Makefiles work, however that can be a bit dense to read. 
The Makefile Tutorial is another great resource which provide excellent explanations as well as examples on everything you can do with Makefiles (and I mean everything!).
As you become a better programmer and your projects grow in complexity, try to keep in mind great software engineering principles (such as modularity) and learn tools (such as make) to apply those principles!