Release 8.0
A58225-01
Library |
Product |
Contents |
Index |
| Oracle8 SQL Reference Release 8.0 A58225-01 |
|
![]()
![]()
This chapter describes, in alphabetical order, Oracle SQL commands and clauses.
The description of each command or clause contains the following sections:
The tables in the following sections provide a functional summary of SQL commands and are divided into these categories:
Data definition language (DDL) commands enable you to perform these tasks:
The CREATE, ALTER, and DROP commands require exclusive access to the object being acted upon. For example, an ALTER TABLE command fails if another user has an open transaction on the specified table.
The GRANT, REVOKE, ANALYZE, AUDIT, and COMMENT commands do not required exclusive access to the object being acted upon. For example, you can analyze a table while other users are updating the table.
Oracle implicitly commits the current transaction before and after every DDL statement.
Many DDL statements may cause Oracle to recompile or reauthorize schema objects. For information on how Oracle recompiles and reauthorizes schema objects and the circumstances under which a DDL statement would cause this, see Oracle8 Concepts.
DDL commands are not directly supported by PL/SQL, but may be available using packaged procedures supplied by Oracle corporation. For more information, see PL/SQL User's Guide and Reference.
Table 4-1 lists the DDL commands.
Data manipulation language (DML) commands query and manipulate data in existing schema objects. These commands do not implicitly commit the current transaction.
All DML commands except the EXPLAIN PLAN command are supported in PL/SQL.
Transaction control commands manage changes made by DML commands.
All transaction control commands except certain forms of the COMMIT and ROLLBACK commands are supported in PL/SQL. For information on the restrictions, see COMMIT and ROLLBACK.
Session control commands dynamically manage the properties of a user session. These commands do not implicitly commit the current transaction.
PL/SQL does not support session control commands.
The single system control command dynamically manages the properties of an Oracle instance. This command does not implicitly commit the current transaction.
ALTER SYSTEM is not supported in PL/SQL.
| Command | Purpose |
|---|---|
|
|
Alter the Oracle instance by performing a specialized function. |
Embedded SQL commands place DDL, DML, and transaction control statements within a procedural language program. Embedded SQL is supported by the Oracle precompilers and is documented in the following books:
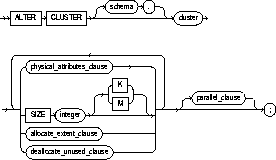
Redefines storage and parallelism characteristics of a cluster. See also "Altering Clusters".
The cluster must be in your own schema or you must have ALTER ANY CLUSTER system privilege.

|
schema |
is the schema containing the cluster. If you omit schema, Oracle assumes the cluster is in your own schema. |
|
|
cluster |
is the name of the cluster to be altered. |
|
|
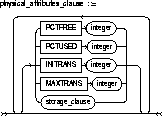
physical_attributes_clause |
changes the values of the PCTUSED, PCTFREE, INITRANS, and MAXTRANS parameters of the cluster. See CREATE CLUSTER. |
|
|
|
storage_clause |
changes the storage characteristics for the cluster. See the STORAGE clause. |
|
SIZE |
determines how many cluster keys will be stored in data blocks allocated to the cluster. You can change the SIZE parameter only for an indexed cluster, not for a hash cluster. For a description of the SIZE parameter, see CREATE CLUSTER. |
|
|
allocate_extent_clause |
explicitly allocates a new extent for the cluster. |
|
|
|
SIZE |
specifies the size of the extent in bytes. Use K or M to specify the extent size in kilobytes or megabytes. If you omit this parameter, Oracle determines the size based on the values of the cluster's STORAGE parameters. |
|
|
DATAFILE |
specifies one of the datafiles in the cluster's tablespace to contain the new extent. If you omit this parameter, Oracle chooses the datafile. |
|
|
INSTANCE |
makes the new extent available to the specified instance. An instance is identified by the value of its initialization parameter INSTANCE_NUMBER. If you omit this parameter, the extent is available to all instances. Use this parameter only if you are using Oracle with the Parallel Server option in parallel mode. Explicitly allocating an extent with this clause does not cause Oracle to evaluate the cluster's storage parameters and determine a new size for the next extent to be allocated. You can allocate a new extent only for an indexed cluster, not a hash cluster. |
|
deallocate_unused_clause |
explicitly deallocates unused space at the end of the cluster and makes the freed space available for other segments. Only unused space above the high-water mark can be freed. If KEEP is omitted, all unused space is freed. For syntax and complete information, see the DEALLOCATE UNUSED clause. |
|
|
|
KEEP |
specifies the number of bytes above the high-water mark that the cluster will have after deallocation. If the number of remaining extents are less than MINEXTENTS, then MINEXTENTS is set to the current number of extents. If the initial extent becomes smaller than INITIAL, then INITIAL is set to the value of the current initial extent. |
|
parallel_clause |
specifies the degree of parallelism for creating the cluster and the default degree of parallelism for queries on the cluster once created. For syntax and complete information, see the PARALLEL clause. |
|
You can perform these tasks with the ALTER CLUSTER command:
You cannot perform these tasks with the ALTER CLUSTER command:
The following statement alters the CUSTOMER cluster in the schema SCOTT:
ALTER CLUSTER scott.customer
    SIZE 512
    STORAGE (MAXEXTENTS 25);
Oracle allocates 512 bytes for each cluster key value. Assuming a data block size of 2 kilobytes, future data blocks within this cluster contain 4 cluster keys per data block, or 2 kilobytes divided by 512 bytes.
The cluster can have a maximum of 25 extents.
The following statement deallocates unused space from CUSTOMER cluster, keeping 30 kilobytes of unused space for future use:
ALTER CLUSTER scott.customer
    DEALLOCATE UNUSED KEEP 30 K;
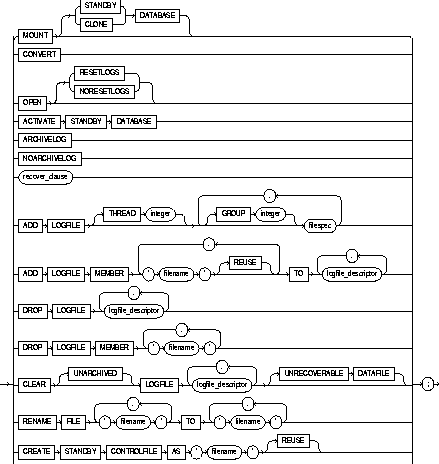
To alter an existing database in one of these ways:
For illustrations of some of these purposes, see "Examples".
You must have ALTER DATABASE system privilege.

logfile_descriptor::=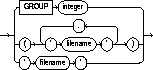
autoextend_clause::=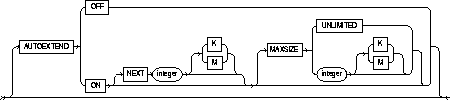
recover_clause: See the RECOVER clause.
|
database |
identifies the database to be altered. The database name can contain only ASCII characters. If you omit database, Oracle alters the database identified by the value of the initialization parameter DB_NAME. You can alter only the database whose control files are specified by the initialization parameter CONTROL_FILES. Note that the database identifier is not related to the Net8 database specification. |
|
|
You can use the following options only when the database is not mounted by your instance: |
||
|
MOUNT |
mounts the database. |
|
|
|
STANDBY DATABASE |
mounts the standby database. For more information, see the Oracle8 Administrator's Guide. |
|
|
CLONE DATABASE |
mounts the clone database. For more information, see the Oracle8 Backup and Recovery Guide. |
|
CONVERT |
completes the conversion of the Oracle7 data dictionary. After you use this option, the Oracle7 data dictionary no longer exists in the Oracle database. Use this option only when you are migrating to Oracle8. For more information on using this option, see Oracle8 Migration. |
|
|
OPEN |
opens the database, making it available for normal use. You must mount the database before you can open it. You cannot open a standby database that has not been activated. |
|
|
|
RESETLOGS |
resets the current log sequence number to 1 and discards any redo information that was not applied during recovery, ensuring that it will never be applied. This effectively discards all changes that are in the redo log, but not in the database. You must use this option to open the database after performing media recovery with an incomplete recovery using the RECOVER UNTIL clause (see RECOVER clause) or with a backup control file. After opening the database with this option, you should perform a complete database backup. |
|
|
NORESETLOGS |
leaves the log sequence number and redo log files in their current state. |
|
|
You can specify the above options only after performing incomplete media recovery or complete media recovery with a backup control file. In any other case, Oracle uses the NORESETLOGS automatically. |
|
|
ACTIVATE STANDBY DATABASE |
changes the state of a standby database to an active database. For more information, see Oracle8 Administrator's Guide.. |
|
|
Use the following options only if your instance has the database mounted in parallel server disabled mode, but not open: |
||
|
ARCHIVELOG |
establishes ARCHIVELOG mode for redo log file groups. In this mode, the contents of a redo log file group must be archived before the group can be reused. This option prepares for the possibility of media recovery. You can use this option only after shutting down your instance normally or immediately with no errors and then restarting it, mounting the database in parallel server disabled mode. |
|
|
NOARCHIVELOG |
establishes NOARCHIVELOG mode for redo log files. In this mode, the contents of a redo log file group need not be archived so that the group can be reused. This mode does not prepare for recovery after media failure. |
|
|
You can use any of the following options when your instance has the database mounted, open or closed, and the files involved are not in use: |
||
|
recover_clause |
performs media recovery. For syntax and more information, see the RECOVER clause. You recover the entire database only when the database is closed. You can recover tablespaces or datafiles when the database is open or closed, provided the tablespaces or datafiles to be recovered are offline. You cannot perform media recovery if you are connected to Oracle through the multithreaded server architecture. You can also perform media recovery with the Server Manager recovery dialog box. |
|
|
ADD LOGFILE |
adds one or more redo log file groups to the specified thread, making them available to the instance assigned the thread. |
|
|
|
THREAD |
is required only if you are using Oracle with the Parallel Server option in parallel mode. If you omit the THREAD parameter, the redo log file group is added to the thread assigned to your instance. |
|
|
GROUP |
uniquely identifies the redo log file group among all groups in all threads and can range from 1 to the MAXLOGFILES value. You cannot add multiple redo log file groups having the same GROUP value. If you omit this parameter, Oracle generates its value automatically. You can examine the GROUP value for a redo log file group through the dynamic performance view V$LOG. |
|
|
filespec |
Each filespec specifies a redo log file group containing one or more members, or copies. See the syntax description of filespec in "Filespec". |
|
ADD LOGFILE MEMBER |
adds new members to existing redo log file groups. Each new member is specified by 'filename'. If the file already exists, it must be the same size as the other group members, and you must specify the REUSE option. If the file does not exist, Oracle creates a file of the correct size. You cannot add a member to a group if all of the group's members have been lost through media failure. |
|
|
|
You can specify an existing redo log file group in one of these ways: |
|
|
|
GROUP |
Specify the value of the GROUP parameter that identifies the redo log file group. |
|
|
list of filenames |
List all members of the redo log file group. You must fully specify each filename according to the conventions of your operating system. |
|
DROP LOGFILE |
drops all members of a redo log file group. You can specify a redo log file group in the same manner as the ADD LOGFILE MEMBER clause. You cannot drop a redo log file group if it needs archiving or is the currently active group; nor can you drop a redo log file group if doing so would cause the redo thread to contain less than two redo log file groups. |
|
|
DROP LOGFILE MEMBER |
drops one or more redo log file members. Each 'filename' must fully specify a member using the conventions for filenames on your operating system. |
|
|
|
You cannot use this clause to drop all members of a redo log file group that contains valid data. To perform this operation, use the DROP LOGFILE clause. |
|
|
CLEAR LOGFILE |
reinitializes an online redo log, optionally without archiving the redo log. CLEAR LOGFILE is similar to adding and dropping a redo log, except that the command may be issued even if there are only two logs for the thread and also may be issued for the current redo log of a closed thread. |
|
|
|
UNARCHIVED |
You must specify UNARCHIVED if you want to reuse a redo log that was not archived. |
|
|
|
WARNING: Specifying UNARCHIVED makes backups unusable if the redo log is needed for recovery. |
|
|
You cannot use CLEAR LOGFILE to clear a log needed for media recovery. If it is necessary to clear a log containing redo after the database checkpoint, you must first perform incomplete media recovery. The current redo log of an open thread can be cleared. The current log of a closed thread can be cleared by switching logs in the closed thread. |
|
|
|
If the CLEAR LOGFILE command is interrupted by a system or instance failure, then the database may hang. If so, this command must be reissued once the database is restarted. If the failure occurred because of I/O errors accessing one member of a log group, then that member can be dropped and other members added. |
|
|
|
UNRECOVERABLE DATAFILE |
You must specify UNRECOVERABLE DATAFILE if the database has a datafile that is offline (not for drop) and if the unarchived log to be cleared is needed to recover the datafile before bringing it back online. In this case, you must drop the datafile and the entire tablespace once the CLEAR LOGFILE command completes. |
|
RENAME FILE |
renames datafiles or redo log file members. This clause renames only files in the control file; it does not actually rename them on your operating system. You must specify each filename using the conventions for filenames on your operating system. |
|
|
CREATE STANDBY CONTROLFILE |
creates a control file to be used to maintain a standby database. For more information, see Oracle8 Administrator's Guide. |
|
|
BACKUP CONTROLFILE |
backs up the current control file. |
|
|
|
TO 'filename' |
specifies the file to which the control file is backed up. You must fully specify the filename using the conventions for your operating system. If the specified file already exists, you must specify the REUSE option. |
|
|
TO TRACE |
writes SQL statements to the database's trace file rather than making a physical backup of the control file. The SQL commands can be used to start up the database, re-create the control file, and recover and open the database appropriately, based on the created control file. |
|
|
|
You can copy the commands from the trace file into a script file, edit the commands as necessary, and use the database if all copies of the control file are lost (or to change the size of the control file). |
|
|
RESETLOGS |
specifies that the SQL statement written to the trace file for starting the database is ALTER DATABASE OPEN RESETLOGS. |
|
|
NORESETLOGS |
specifies that the SQL statement written to the trace file for starting the database is ALTER DATABASE OPEN NORESETLOGS. |
|
RENAME GLOBAL_NAME |
changes the global name of the database. The database is the new database name and can be as long as eight bytes. The optional domain specifies where the database is effectively located in the network hierarchy. Note: Renaming your database does not change global references to your database from existing database links, synonyms, and stored procedures and functions on remote databases. Changing such references is the responsibility of the administrator of the remote databases. |
|
|
|
For more information on global names, see Oracle8 Distributed Database Systems. |
|
|
RESET COMPATIBILITY |
marks the database to be reset to an earlier version of Oracle when the database is next restarted. |
|
|
|
Note: RESET COMPATIBILITY works only if you have successfully disabled Oracle features that affect backward compatibility. For more information on downgrading to an earlier version of Oracle, see Oracle8 Migration. |
|
|
You can use the following options only when your instance has the database open: |
||
|
ENABLE THREAD |
in a parallel server, enables the specified thread of redo log file groups. The thread must have at least two redo log file groups before you can enable it. |
|
|
|
PUBLIC |
makes the enabled thread available to any instance that does not explicitly request a specific thread with the initialization parameter THREAD. If you omit the PUBLIC option, the thread is available only to the instance that explicitly requests it with the initialization parameter THREAD. |
|
DISABLE THREAD |
disables the specified thread, making it unavailable to all instances. You cannot disable a thread if an instance using it has the database mounted. |
|
|
You can use any of the following options when your instance has the database mounted, open or closed, and the files involved are not in use: |
||
|
CREATE DATAFILE |
creates a new empty datafile in place of an old one. You can use this option to re-create a datafile that was lost with no backup. The 'filename' must identify a file that is or was once part of the database. The filespec specifies the name and size of the new datafile. If you omit the AS clause, Oracle creates the new file with the name and size as the file specified by 'filename'. |
|
|
|
During recovery, all archived redo logs written to since the original datafile was created must be applied to the new, empty version of the lost datafile. |
|
|
|
Oracle creates the new file in the same state as the old file when it was created. You must perform media recovery on the new file to return it to the state of the old file at the time it was lost. |
|
|
|
You cannot create a new file based on the first datafile of the SYSTEM tablespace. |
|
|
DATAFILE |
affects your database files as follows: |
|
|
|
ONLINE |
brings the datafile online. |
|
|
OFFLINE |
takes the datafile offline. If the database is open, you must perform media recovery on the datafile before bringing it back online, because a checkpoint is not performed on the datafile before it is taken offline. |
|
|
|
DROP takes a datafile offline when the database is in NOARCHIVELOG mode. |
|
|
RESIZE |
attempts to change the size of the datafile to the specified absolute size in bytes. You can also use K or M to specify this size in kilobytes or megabytes. There is no default, so you must specify a size. |
|
|
autoextend_clause |
enables or disables the automatic extension of a datafile. If you do not specify this clause, datafiles are not automatically extended. |
|
|
|
OFF disables autoextend if it is turned on. NEXT and MAXSIZE are set to zero. Values for NEXT and MAXSIZE must be respecified in further ALTER DATABASE AUTOEXTEND commands. |
|
|
|
ON enables autoextend. |
|
|
|
NEXT specifies the size in bytes of the next increment of disk space to be automatically allocated to the datafile when more extents are required. You can also use K or M to specify this size in kilobytes or megabytes. The default is one data block. |
|
|
|
MAXSIZE specifies the maximum disk space allowed for automatic extension of the datafile. |
|
|
|
UNLIMITED sets no limit on allocating disk space to the datafile. |
|
|
END BACKUP |
avoids media recovery on database startup after an online tablespace backup was interrupted by a system failure or instance failure or SHUTDOWN ABORT. |
|
|
WARNING: Do not use ALTER TABLESPACE ... END BACKUP if you have restored any of the files affected from a backup. Media recovery is fully described in the Oracle8 Backup and Recovery Guide andOracle8 Administrator's Guide.. |
|
For more information on using the ALTER DATABASE command for database maintenance, see the Oracle8 Administrator's Guide.
The following statement adds a redo log file group with two members and identifies it with a GROUP parameter value of 3:
ALTER DATABASE stocks
  ADD LOGFILE GROUP 3
    ('diska:log3.log' ,
     'diskb:log3.log') SIZE 50K;
The following statement adds a member to the redo log file group added in the previous example:
ALTER DATABASE stocks
   ADD LOGFILE MEMBER 'diskc:log3.log'
   TO GROUP 3;
The following statement drops the redo log file member added in the previous example:
ALTER DATABASE stocks
    DROP LOGFILE MEMBER 'diskc:log3.log';
The following statement renames a redo log file member:
ALTER DATABASE stocks
    RENAME FILE 'diskb:log3.log' TO 'diskd:log3.log';
The above statement only changes the member of the redo log group from one file to another. The statement does not actually change the name of the file 'DISKB:LOG3.LOG' to 'DISKD:LOG3.LOG'. You must perform this operation through your operating system.
The following statement drops all members of the redo log file group 3:
ALTER DATABASE stocks DROP LOGFILE GROUP 3;
The following statement adds a redo log file group containing three members to thread 5 and assigns it a GROUP parameter value of 4:
ALTER DATABASE stocks
    ADD LOGFILE THREAD 5 GROUP 4
        ('diska:log4.log',
        'diskb:log4:log',
        'diskc:log4.log' );
The following statement disables thread 5 in a parallel server:
ALTER DATABASE stocks
    DISABLE THREAD 5;
The following statement enables thread 5 in a parallel server, making it available to any Oracle instance that does not explicitly request a specific thread:
ALTER DATABASE stocks
    ENABLE PUBLIC THREAD 5;
The following statement creates a new datafile 'DISK1:DB1.DAT' based on the file 'DISK2:DB1.DAT':
ALTER DATABASE
    CREATE DATAFILE 'disk1:db1.dat' AS 'disk2:db1.dat';
The following statement changes the global name of the database and includes both the database name and domain:
ALTER DATABASE
    RENAME GLOBAL_NAME TO sales.australia.acme.com;
The following statement attempts to change the size of datafile 'DISK1:DB1.DAT':
ALTER DATABASE
    DATAFILE 'disk1:db1.dat' RESIZE 10 M;
For examples of performing media recovery, see Oracle8 Administrator's Guide and Oracle8 Backup and Recovery Guide.
The following statement clears a log file:
ALTER DATABASE
    CLEAR LOGFILE 'disk3:log.dbf';
To recompile a standalone stored function. See also "Recompiling Standalone Functions".
The function must be in your own schema or you must have ALTER ANY PROCEDURE system privilege.

You can use the ALTER FUNCTION command to explicitly recompile a function that is invalid. Explicit recompilation eliminates the need for implicit run-time recompilation and prevents associated run-time compilation errors and performance overhead.
The ALTER FUNCTION command is similar to ALTER PROCEDURE. For information on how Oracle recompiles functions and procedures, see Oracle8 Concepts.
|
Note: This command does not change the declaration or definition of an existing function. To redeclare or redefine a function, use the CREATE FUNCTION command with the OR REPLACE option; see CREATE FUNCTION. |
To explicitly recompile the function GET_BAL owned by the user MERRIWEATHER, issue the following statement:
ALTER FUNCTION merriweather.get_bal
COMPILE;
If Oracle encounters no compilation errors while recompiling GET_BAL, GET_BAL becomes valid. Oracle can subsequently execute it without recompiling it at run time. If recompiling GET_BAL results in compilation errors, Oracle returns an error message and GET_BAL remains invalid.
Oracle also invalidates all objects that depend upon GET_BAL. If you subsequently reference one of these objects without explicitly recompiling it first, Oracle recompiles it implicitly at run time.
Use ALTER INDEX to:
 modify a nested table index
For illustrations of some of these purposes, see "Examples".
The index must be in your own schema or you must have ALTER ANY INDEX system privilege.
Schema object privileges are granted on the parent index, not on individual index partitions. The following index partition operations require tablespace quota:
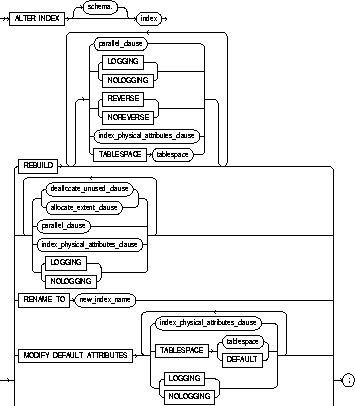
parallel_clause: See PARALLEL clause.
storage_clause: See STORAGE clause.
deallocate_unused_clause: See DEALLOCATE UNUSED clause.
|
schema |
is the schema containing the index. If you omit schema, Oracle assumes the index is in your own schema. |
|
|
index |
is the name of the index to be altered. |
|
|
|
The following operations can be performed only on partitioned indexes: Of these, drop partition and split partition can be performed only on global indexes. |
|
|
REBUILD |
re-creates an existing index. |
|
|
|
parallel_clause |
specifies that rebuilding the index, or some queries against the index or the index partition, are performed either in serial or parallel execution. For information about the syntax of this option and this clause, see the PARALLEL clause. For more information about parallelized operations see Oracle8 Parallel Server Concepts and Administration. |
|
|
LOGGING/NOLOGGING |
specifies whether ALTER INDEX...REBUILD (and ALTER INDEX...SPLIT) operations will be logged. |
|
|
REVERSE |
stores the bytes of the index block in reverse order, excluding the ROWID when the index is rebuilt. |
|
|
NOREVERSE |
stores the bytes of the index block without reversing the order when the index is rebuilt. Rebuilding a REVERSE index without the NOREVERSE keyword produces a rebuilt, reverse keyed index. |
|
|
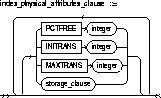
index_physical_attributes_clause |
changes the values of the PCTFREE, INITRANS, and MAXTRANS parameters for a nonpartitioned index, index partition, or all partitions of a partitioned index, or default values of these parameters for a partitioned index. See these parameters in CREATE TABLE. Note: You cannot change the value of the PCTFREE parameter for the index as a whole (ALTER INDEX) or to modify a partition (ALTER INDEX ... MODIFY PARTITION). You can change it in all other forms of the ALTER INDEX command. |
|
|
storage_clause |
changes the storage parameters for a nonpartitioned index, index partition, or all partitions of a partitioned index, or default values of these parameters for a partitioned index. See the STORAGE clause. |
|
|
TABLESPACE |
specifies the tablespace where the rebuilt index or index partition will be stored. The default is the default tablespace of the user issuing the command. |
|
deallocate_unused_clause |
explicitly deallocates unused space at the end of the index and make the freed space available for other segments. Only unused space above the high-water mark can be freed. If KEEP is omitted, all unused space is freed. See the DEALLOCATE UNUSED clause. |
|
|
|
KEEP |
specifies the number of bytes above the high-water mark that the index will have after deallocation. If the number of remaining extents are less than MINEXTENTS, then MINEXTENTS is set to the current number of extents. If the initial extent becomes smaller than INITIAL, then INITIAL is set to the value of the current initial extent. |
|
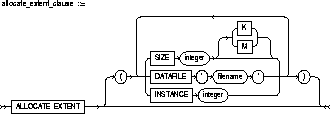
allocate_extent_clause |
explicitly allocates a new extent for the index. |
|
|
|
SIZE |
specifies the size of the extent in bytes. Use K or M to specify the extent size in kilobytes or megabytes. If you omit this parameter, Oracle determines the size based on the values of the index's STORAGE parameters. |
|
|
DATAFILE |
specifies one of the data files in the index's tablespace to contain the new extent. If you omit this parameter, Oracle chooses the data file. |
|
|
INSTANCE |
makes the new extent available to the specified instance. An instance is identified by the value of its initialization parameter INSTANCE_NUMBER. If you omit this parameter, the extent is available to all instances. Use this parameter only if you are using Oracle with the Parallel Server option in parallel mode. |
|
|
Explicitly allocating an extent with this clause does affect the size for the next extent to be allocated as specified by the NEXT and PCTINCREASE storage parameters. |
|
|
LOGGING/NOLOGGING |
LOGGING/NOLOGGING specifies that subsequent Direct Loader (SQL*Loader) and direct-load INSERT operations against a nonpartitioned index, index partition, or all partitions of a partitioned index will be logged (LOGGING) or not logged (NOLOGGING) in the redo log file. |
|
|
|
In NOLOGGING mode, data is modified with minimal logging (to mark new extents invalid and to record dictionary changes). When applied during media recovery, the extent invalidation records mark a range of blocks as logically corrupt, because the redo data is not logged. Therefore, if you cannot afford to lose this index, you must take a backup after the operation in NOLOGGING mode. |
|
|
|
If the database is run in ARCHIVELOG mode, media recovery from a backup taken before the an operation in LOGGING mode will re-create the index. However, media recovery from a backup taken before an operation in NOLOGGING mode will not re-create the index. |
|
|
|
An index segment can have logging attributes different from those of the base table and different from those of other index segments for the same base table. |
|
|
|
For more information about the LOGGING option and parallel DML, see Oracle8 Concepts and the Oracle8 Parallel Server Concepts and Administration. |
|
|
|
Note: The LOGGING/NOLOGGING keywords replace the RECOVERABLE/UNRECOVERABLE option. That option is still available as a valid keyword in Oracle8 when altering or rebuilding nonpartitioned indexes, but its use is not recommended. |
|
|
RENAME TO |
renames index to new_index_name. The new_index_name is a single identifier and does not include the schema name. |
|
|
MODIFY DEFAULT ATTRIBUTES |
is a valid option only for a partitioned index. Use this option to specify new values for the default attributes of a partitioned index. |
|
|
|
TABLESPACE |
specifies the tablespace where the default tablespace of a partitioned index will be stored. The default is the default tablespace of the user issuing the command. |
|
|
LOGGING/NOLOGGING |
specifies the default logging attribute of a partitioned index. |
|
Note: You can combine several operations on the base index into one ALTER INDEX statement (except RENAME and REBUILD), but you cannot combine partition operations with other partition operations or with operations on the base index. |
||
|
MODIFY PARTITION |
modifies the real physical attributes, logging option, or storage characteristics of index partition partition_name; partition_name is the name of the index partition to be altered. It must be a partition in index. |
|
|
UNUSABLE |
marks the index or index partition(s) as unusable. An unusable index must be rebuilt, or dropped and re-created, before it can be used. While one partition is marked unusable, the other partitions of the index are still valid; you can execute statements that require the index if the statements do not access the unusable partition. You can also split or rename the unusable partition before rebuilding it. |
|
|
RENAME PARTITION |
renames index partition_name to new_partition_name. |
|
|
DROP PARTITION |
removes a partition and the data in it from a partitioned global index. Dropping a partition of a global index marks the index's next partition as unusable. You cannot drop the highest partition of a global index. |
|
|
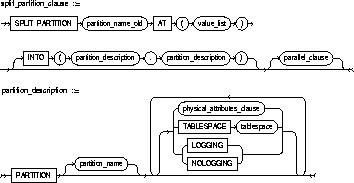
split_partition_clause |
splits a global partitioned index into two partitions, adding a new partition to the index. Splitting a partition marked as unusable results in two partitions, both marked as unusable. You must rebuild the partitions before you can use them. |
|
|
|
Splitting a usable partition results in two partitions populated with index data, both marked as usable. |
|
|
|
AT (value_list) |
specifies the new noninclusive upper bound for split_partition_1. The value_list must compare less than the presplit partition bound for partition_name_old and greater than the partition bound for the next lowest partition (if there is one). |
|
|
INTO |
describes the two partitions resulting from the split. |
|
|
partition_description, partition_description |
specifies the names and physical attributes of the two partitions resulting from the split. |
|
REBUILD PARTITION |
rebuilds one partition of an index. You can also use this option to move an index partition to another tablespace or to change a create-time physical attribute. For more information about partition maintenance operations, see the Oracle8 Administrator's Guide. |
|
This statement alters SCOTT'S CUSTOMER index so that future data blocks within this index use 5 initial transaction entries and an incremental extent of 100 kilobytes:
ALTER INDEX scott.customer
    INITRANS 5
    STORAGE (NEXT 100K);
The following example drops index partition IX_ANTARTICA:
ALTER INDEX sales_area_ix
  DROP PARTITION ix_antarctica;
This statement alters the real attributes of every partition of local partitioned index SALES_IX3. New partitions added in the future will use 5 initial transaction entries and an incremental extent of 100 K:
ALTER INDEX sales_ix3 INITRANS 5 STORAGE ( NEXT 100K );
This statement alters the default attributes of local partitioned index SALES_IX3. New partitions added in the future will use 5 initial transaction entries and an incremental extent of 100 K:
ALTER INDEX sales_ix3
  MODIFY DEFAULT ATTRIBUTES INITRANS 5 STORAGE ( NEXT 100K );
The following statement marks the IDX_ACCTNO index as UNUSABLE:
ALTER INDEX idx_acctno UNUSABLE;
The following statement changes the maximum number of extents for partition BRIX_NY:
ALTER INDEX branch_ix MODIFY PARTITION brix_ny
  STORAGE( MAXEXTENTS 30 ) LOGGING;
The following example marks partition IDX_FEB96 of index IDX_ACCTNO as UNUSABLE:
ALTER INDEX idx_acctno MODIFY PARTITION idx_feb96 UNUSABLE;
The following statement sets the parallel attributes for index ARTIST_IX:
ALTER INDEX artist_ix PARALLEL (DEGREE 4, INSTANCES 3);
The following statement sets the parallel attributes for index ARTIST_IX so that scans on the index will not be parallelized:
ALTER INDEX artist_ix NOPARALLEL;
The following statement rebuilds partition P063 in index ARTIST_IX. The rebuilding of the index partition will not be logged:
ALTER INDEX artist_ix
  REBUILD PARTITION p063 NOLOGGING;
The following example renames an index:
ALTER INDEX emp_ix1 RENAME TO employee_ix1;
The following example renames an index partition:
ALTER INDEX employee_ix2 RENAME PARTITION emp_ix2_p3
  TO employee_ix2_p3;
The following example splits partition PARTNUM_IX_P6 in partitioned index PARTNUM_IX into PARTNUM_IX_P5 and PARTNUM_IX_P6:
ALTER INDEX partnum_ix
  SPLIT PARTITION partnum_ix_p6 AT ( 5001 )
  INTO ( PARTITION partnum_ix_p5 TABLESPACE ts017 LOGGING,
         PARTITION partnum_ix_p6 TABLESPACE ts004 );
Note that the second partition retains the name of the old partition.
The following statement rebuilds index EMP_IX so that the bytes of the index block are stored in REVERSE order:
ALTER INDEX emp_ix REBUILD REVERSE;
To recompile a stored package. See also "Recompiling Stored Packages".
The package must be in your own schema or you must have ALTER ANY PROCEDURE system privilege.

You can use the ALTER PACKAGE command to explicitly recompile either a package specification and body or only a package body. Explicit recompilation eliminates the need for implicit run-time recompilation and prevents associated run-time compilation errors and performance overhead.
Because all objects in a package are stored as a unit, the ALTER PACKAGE command recompiles all package objects together. You cannot use the ALTER PROCEDURE command or ALTER FUNCTION command to individually recompile a procedure or function that is part of a package.
You might want to recompile a package specification to check for compilation errors after modifying the specification. When you issue an ALTER PACKAGE statement with the COMPILE PACKAGE option, Oracle recompiles the package specification and body regardless of whether it is invalid. When you recompile a package specification, Oracle invalidates any local objects that depend on the specification, such as procedures that call procedures or functions in the package. Note that the body of a package also depends on its specification. If you subsequently reference one of these dependent objects without first explicitly recompiling it, Oracle recompiles it implicitly at run time.
You might want to recompile a package body after modifying it. When you issue an ALTER PACKAGE statement with the COMPILE BODY option, Oracle recompiles the package body regardless of whether it is invalid. When you recompile a package body, Oracle first recompiles the objects on which the body depends, if any of those objects are invalid. If Oracle recompiles the body successfully, the body becomes valid. If recompiling the body results in compilation errors, Oracle returns an error and the body remains invalid. You can then debug the body using the predefined package DBMS_OUTPUT. Note that recompiling a package body does not invalidate objects that depend upon the package specification.
For more information on debugging packages, see Oracle8 Application Developer's Guide. For information on how Oracle maintains dependencies among schema objects, including remote objects, see Oracle8 Concepts.
This statement explicitly recompiles the specification and body of the ACCOUNTING package in the schema BLAIR:
ALTER PACKAGE blair.accounting
COMPILE PACKAGE;
If Oracle encounters no compilation errors while recompiling the ACCOUNTING specification and body, ACCOUNTING becomes valid. BLAIR can subsequently call or reference all package objects declared in the specification of ACCOUNTING without run-time recompilation. If recompiling ACCOUNTING results in compilation errors, Oracle returns an error message and ACCOUNTING remains invalid.
Oracle also invalidates all objects that depend upon ACCOUNTING. If you subsequently reference one of these objects without explicitly recompiling it first, Oracle recompiles it implicitly at run time.
To recompile the body of the ACCOUNTING package in the schema BLAIR, issue the following statement:
ALTER PACKAGE blair.accounting
COMPILE BODY;
If Oracle encounters no compilation errors while recompiling the package body, the body becomes valid. BLAIR can subsequently call or reference all package objects declared in the specification of ACCOUNTING without run-time recompilation. If recompiling the body results in compilation errors, Oracle returns an error message and the body remains invalid.
Because this statement recompiles the body and not the specification of ACCOUNTING, Oracle does not invalidate dependent objects.
To recompile a stand-alone stored procedure. See also "Recompiling Stored Procedures".
The procedure must be in your own schema or you must have ALTER ANY PROCEDURE system privilege.

The ALTER PROCEDURE command is quite similar to the ALTER FUNCTION command. The following discussion of explicitly recompiling procedures also applies to functions.
You can use the ALTER PROCEDURE command to explicitly recompile a procedure that is invalid. Explicit recompilation eliminates the need for implicit run-time recompilation and prevents associated run-time compilation errors and performance overhead.
When you issue an ALTER PROCEDURE statement, Oracle recompiles the procedure regardless of whether it is valid or invalid.
You can use the ALTER PROCEDURE command only to recompile a standalone procedure. To recompile a procedure that is part of a package, recompile the entire package using the ALTER PACKAGE command.
When you recompile a procedure, Oracle first recompiles objects upon which the procedure depends, if any of those objects are invalid. Oracle also invalidates any local objects that depend upon the procedure, such as procedures that call the recompiled procedure or package bodies that define procedures that call the recompiled procedure. If Oracle recompiles the procedure successfully, the procedure becomes valid. If recompiling the procedure results in compilation errors, then Oracle returns an error and the procedure remains invalid. You can then debug procedures using the predefined package DBMS_OUTPUT. For information on debugging procedures, see Oracle8 Application Developer's Guide. For information on how Oracle maintains dependencies among schema objects, including remote objects, see Oracle8 Concepts.
To explicitly recompile the procedure CLOSE_ACCT owned by the user HENRY, issue the following statement:
ALTER PROCEDURE henry.close_acct
COMPILE;
If Oracle encounters no compilation errors while recompiling CLOSE_ACCT, CLOSE_ACCT becomes valid. Oracle can subsequently execute it without recompiling it at run time. If recompiling CLOSE_ACCT results in compilation errors, Oracle returns an error and CLOSE_ACCT remains invalid.
Oracle also invalidates all dependent objects. These objects include any procedures, functions, and package bodies that call CLOSE_ACCT. If you subsequently reference one of these objects without first explicitly recompiling it, Oracle recompiles it implicitly at run time.
To add, modify, or remove a resource limit or password management in a profile. See also "Examples".
You must have ALTER PROFILE system privilege to change profile resource limits. To modify password limits and protection, you must have ALTER PROFILE and ALTER USER system privileges. See also "Using Password History".
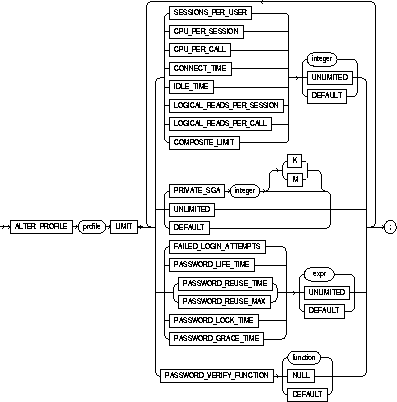
|
profile |
is the name of the profile to be altered. |
|
|
integer |
defines a new limit for a resource in this profile. |
|
|
|
For information on parameter resource limits for ALTER PROFILE, see CREATE PROFILE. |
|
|
Note: |
||
Changes made to a profile with an ALTER PROFILE statement affect users only in their subsequent sessions, not in their current sessions.
The following restrictions apply when specifying password history parameters:
The following example makes a password unavailable for reuse for 90 days:
ALTER PROFILE prof
LIMIT PASSWORD_REUSE_TIME 90
PASSWORD_REUSE_MAX UNLIMITED;
The following statement defaults the PASSWORD_REUSE_TIME value to its defined value in the DEFAULT profile:
ALTER PROFILE prof
LIMIT PASSWORD_REUSE_TIME DEFAULT
PASSWORD_REUSE_MAX UNLIMITED;
The following example alters profile PROF with FAILED_LOGIN_ATTEMPTS set to 5 and PASSWORD_LOCK_TIME set to 1:
ALTER PROFILE prof LIMIT
FAILED_LOGIN_ATTEMPTS 5
PASSWORD_LOCK_TIME 1;
This command causes PROF's account to become locked for 1 day after 5 unsuccessful login attempts.
The following example modifies profile PROF's PASSWORD_LIFE_TIME to 60 days and PASSWORD_GRACE_TIME to 10 days:
ALTER PROFILE prof LIMIT
PASSWORD_LIFE_TIME 60
PASSWORD_GRACE_TIME 10;
This statement defines a new limit of 5 concurrent sessions for the ENGINEER profile:
ALTER PROFILE engineer LIMIT SESSIONS_PER_USER 5;
If the ENGINEER profile does not currently define a limit for SESSIONS_PER_USER, the above statement adds the limit of 5 to the profile. If the profile already defines a limit, the above statement redefines it to 5. Any user assigned the ENGINEER profile is subsequently limited to 5 concurrent sessions.
This statement defines unlimited idle time for the ENGINEER profile:
ALTER PROFILE engineer LIMIT IDLE_TIME UNLIMITED;
Any user assigned the ENGINEER profile is subsequently permitted unlimited idle time.
This statement removes the IDLE_TIME limit from the ENGINEER profile:
ALTER PROFILE engineer LIMIT IDLE_TIME DEFAULT;
Any user assigned the ENGINEER profile is subject in their subsequent sessions to the IDLE_TIME limit defined in the DEFAULT profile.
This statement defines a limit of 2 minutes of idle time for the DEFAULT profile:
ALTER PROFILE default LIMIT IDLE_TIME 2;
This IDLE_TIME limit applies to these users:
To specify a formula to calculate the total resource cost used in a session. For any session, this cost is limited by the value of the COMPOSITE_LIMIT parameter in the user's profile. See also "Altering Resource Costs".
You must have ALTER RESOURCE COST system privilege.
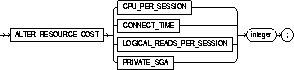
The ALTER RESOURCE COST command specifies the formula by which Oracle calculates the total resource cost used in a session. Oracle calculates the total resource cost by multiplying the amount of each resource used in the session by the resource's weight and summing the products for all four resources. Both the products and the total cost are expressed in units called service units.
Although Oracle monitors the use of other resources, only these four can contribute to the total resource cost for a session. For information on all resources, see CREATE PROFILE.
The weight that you assign to each resource determines how much the use of that resource contributes to the total resource cost. Using a resource with a lower weight contributes less to the cost than using a resource with a higher weight. If you do not assign a weight to a resource, the weight defaults to 0 and use of the resource subsequently does not contribute to the cost. The weights you assign apply to all subsequent sessions in the database.
Once you have specified a formula for the total resource cost, you can limit this cost for a session with the COMPOSITE_LIMIT parameter of the CREATE PROFILE command. If a session's cost exceeds the limit, Oracle aborts the session and returns an error. For information on establishing resource limits, see CREATE PROFILE. If you use the ALTER RESOURCE COST command to change the weight assigned to each resource, Oracle uses these new weights to calculate the total resource cost for all current and subsequent sessions.
The following statement assigns weights to the resources CPU_PER_SESSION and CONNECT_TIME:
ALTER RESOURCE COST
CPU_PER_SESSION 100
CONNECT_TIME      1;
The weights establish this cost formula for a session:
T = (100 * CPU) + CON
where:
Because the above statement assigns no weight to the resources LOGICAL_READS_PER_SESSION and PRIVATE_SGA, these resources do not appear in the formula.
If a user is assigned a profile with a COMPOSITE_LIMIT value of 500, a session exceeds this limit whenever T exceeds 500. For example, a session using 0.04 seconds of CPU time and 101 minutes of elapsed time exceeds the limit. A session 0.0301 seconds of CPU time and 200 minutes of elapsed time also exceeds the limit.
You can subsequently change the weights with another ALTER RESOURCE statement:
ALTER RESOURCE COST
LOGICAL_READS_PER_SESSION 2
CONNECT_TIME 0;
These new weights establish a new cost formula:
T = (100 * CPU) + (2 * LOG)
where:
|
T CPU |
are the same as in the previous formula. |
|
LOG |
is the number of data blocks read during the session. |
This ALTER RESOURCE COST statement changes the formula in these ways:
To change the authorization needed to enable a role. See also "Changing Authorizations".
You must either have been granted the role with the ADMIN OPTION or have ALTER ANY ROLE system privilege.
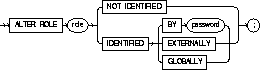
The keywords and parameters in the ALTER ROLE command all have the same meaning as in the CREATE ROLE command; see CREATE ROLE.
Before you alter a role to IDENTIFIED GLOBALLY, you must:
The one exception to this rule is that you should not revoke the role from the user who is currently altering the role.
If a user with ALTER ANY ROLE changes a role that is IDENTIFIED GLOBALLY to any of the following, then Oracle grants the role with the ADMIN OPTION:
The following example changes the role ANALYST to IDENTIFIED GLOBALLY:
ALTER ROLE analyst IDENTIFIED GLOBALLY;
This statement changes the password on the TELLER role to LETTER:
ALTER ROLE teller
IDENTIFIED BY letter;
Users granted the TELLER role must subsequently enter the new password "letter" to enable the role.
To alter a rollback segment by
For more information, see "Altering Rollback Segments".
You must have ALTER ROLLBACK SEGMENT system privilege.
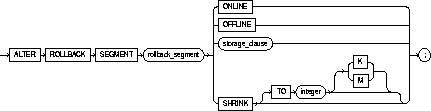
storage_clause: See STORAGE clause.
|
rollback_segment |
specifies the name of an existing rollback segment. |
|
ONLINE |
brings the rollback segment online. |
|
OFFLINE |
takes the rollback segment offline. |
|
storage_clause |
changes the rollback segment's storage characteristics. See the STORAGE clause for syntax and additional information. |
|
SHRINK |
attempts to shrink the rollback segment to an optimal or given size. |
When you create a rollback segment, it is initially offline. An offline rollback segment is not available for transactions.
The ONLINE option brings the rollback segment online, making it available for transactions by your instance. You can also bring a rollback segment online when you start your instance with the initialization parameter ROLLBACK_SEGMENTS.
The OFFLINE option takes the rollback segment offline. If the rollback segment does not contain information necessary to roll back any active transactions, Oracle takes it offline immediately. If the rollback segment does contain information for active transactions, Oracle makes the rollback segment unavailable for future transactions and takes it offline after all the active transactions are committed or rolled back. Once the rollback segment is offline, it can be brought online by any instance.
You cannot take the SYSTEM rollback segment offline.
You can tell whether a rollback segment is online or offline by querying the data dictionary view DBA_ROLLBACK_SEGS. Online rollback segments are indicated by a STATUS value of IN_USE. Offline rollback segments are indicated by a STATUS value of AVAILABLE.
For more information on making rollback segments available and unavailable, see Oracle8 Administrator's Guide.
The STORAGE clause of the ALTER ROLLBACK SEGMENT command affects future space allocation in the rollback segment. You cannot change the values of the INITIAL and MINEXTENTS for an existing rollback segment.
The SHRINK clause of the ALTER ROLLBACK SEGMENT command initiates an attempt to reduce the specified rollback segment to an optimum size. If size is not specified, then the size defaults to the OPTIMAL value of the STORAGE clause of the CREATE ROLLBACK SEGMENT command that created the rollback segment. If the OPTIMAL value was not specified, then the size defaults to the MINEXTENTS value of the STORAGE clause of the CREATE ROLLBACK SEGMENT command. The specified size in a SHRINK clause is valid for the execution of the command; thereafter, OPTIMAL reverts to the OPTIMAL value of the CREATE ROLLBACK SEGMENT command. Regardless of whether a size is specified or not, the rollback segment cannot shrink to less than two extents.
You can query the DBA_ROLLBACK_SEGS view to determine the actual size of a rollback segment after attempting to shrink a rollback segment.
For a parallel server, you can shrink only rollback segments that are online to your instance.
The SHRINK option is an attempt to shrink the size of the rollback segment; the success and amount of shrinkage depends on the following:
This statement brings the rollback segment RSONE online:
ALTER ROLLBACK SEGMENT rsone ONLINE;
This statement changes the STORAGE parameters for RSONE:
ALTER ROLLBACK SEGMENT rsone
STORAGE (NEXT 1000 MAXEXTENTS 20);
This statement attempts to resize a rollback segment to an optimum size of 100 megabytes:
ALTER ROLLBACK SEGMENT rsone
SHRINK TO 100 M;
To change the sequence by
For illustrations of some of these purposes, see "Examples".
The sequence must be in your own schema or you must have ALTER privilege on the sequence or you must have ALTER ANY SEQUENCE system privilege.
The keywords and parameters in this command serve the same purpose that they do in CREATE SEQUENCE.
Note:
This statement sets a new maximum value for the ESEQ sequence:
ALTER SEQUENCE eseq
MAXVALUE 1500;
This statement turns on CYCLE and CACHE for the ESEQ sequence:
ALTER SEQUENCE eseq
CYCLE
CACHE 5;
To alter your current session in one of the following ways:
To enable and disable the SQL trace facility or to change the default label format, you must have ALTER SESSION system privilege.
To perform the other operations of this command, you do not need any privileges.
|
ADVISE |
sends advice to a remote database to force a distributed transaction. This advice appears on the remote database in the ADVICE column of the DBA_2PC_PENDING data dictionary view in the event of an in-doubt distributed transaction. (See also "Forcing In-Doubt Distributed Transactions".)The following are advice options: |
|
|
|
COMMIT |
places the value 'C' in DBA_2PC_PENDING.ADVICE. |
|
|
ROLLBACK |
places the value 'R' in DBA_2PC_PENDING.ADVICE. |
|
|
NOTHING |
places the value ' ' in DBA_2PC_PENDING.ADVICE. |
|
CLOSE DATABASE LINK |
closes the database link dblink, eliminating your session's connection to the remote database. The database link cannot be currently in use by an active transaction or an open cursor. For more information, see "Closing Database Links". |
|
|
COMMIT IN PROCEDURE |
ENABLE |
permits procedures and stored functions to issue these statements. |
|
|
DISABLE |
prohibits procedures and stored functions from issuing these statements. |
|
|
See also "Transaction Control in Procedures and Stored Functions". |
|
|
PARALLEL DML |
specifies whether all subsequent DML transactions in the session will be considered for parallel execution. (See also "Parallel DML".) |
|
|
|
You can execute this option only between committed transactions. Uncommitted transactions must either be committed or rolled back prior to executing this command. |
|
|
|
ENABLE |
executes the session's DML statements in parallel mode if a parallel hint or a parallel clause is specified. |
|
|
DISABLE |
executes the session's DML statements serially. This is the default mode. |
|
|
FORCE |
forces parallel execution of subsequent DML statements in the session if none of the parallel DML restrictions are violated. If no parallel clause or hint is specified, then a default level of parallelism (for both degree and instances) is used. Note: Using FORCE automatically causes all tables created in this session to be created with a default level of parallelism. The effect is the same as if you had specified the parallel clause (with default degree and default instances) with the CREATE TABLE statement. |
|
SET |
sets the session parameters that follow. |
|
|
CLOSE_OPEN_CACHED_CURSORS |
controls whether cursors opened and cached in memory by PL/SQL are automatically closed at each COMMIT or ROLLBACK. |
|
|
|
TRUE |
causes open cursors to be closed at each COMMIT or ROLLBACK. |
|
|
FALSE |
signifies that cursors opened by PL/SQL are held open so that subsequent executions need not open a new cursor. |
|
CONSTRAINT[S] |
determines when conditions specified by a deferrable constraint are enforced. |
|
|
|
IMMEDIATE |
indicates that the conditions specified by the deferrable constraint are checked immediately after each DML statement; equivalent to issuing the SET CONSTRAINTS ALL IMMEDIATE command at the beginning of each transaction in your session. See the IMMEDIATE parameter of SET CONSTRAINT(S). |
|
|
DEFERRED |
indicates that the conditions specified by the deferrable constraint are checked when the transaction is committed; equivalent to issuing the SET CONSTRAINTS ALL DEFERRED command at the beginning of each transaction in your session. See the DEFERRED parameter of SET CONSTRAINT(S). |
|
|
DEFAULT |
restores all constraints at the beginning of each transaction to their initial state of DEFERRED or IMMEDIATE. |
|
FLAGGER |
specifies FIPS flagging. See also "FIPS Flagging". |
|
|
|
ENTRY |
flags for SQL92 Entry level. |
|
|
INTERMEDIATE |
flags for SQL92 Intermediate level. |
|
|
FULL |
flags for SQL92 Full level. |
|
|
OFF |
turns off flagging |
|
GLOBAL_NAMES |
controls the enforcement of global name resolution for your session. For information on enabling and disabling global name resolution with this parameter, see ALTER SYSTEM. |
|
|
|
TRUE |
enables global name resolution. |
|
|
FALSE |
disables global name resolution. |
|
HASH_JOIN_ENABLED |
enables or disables the use of the hash join operation in queries. The default is TRUE, which enables hash joins. |
|
|
HASH_AREA_SIZE |
specifies in bytes the amount of memory to use for hash join operations. The default is twice the value of the SORT_AREA_SIZE initialization parameter. |
|
|
HASH_MULTIBLOCK_IO_COUNT |
specifies the number of data blocks to read and write during a hash join operation. The value multiplied by the DB_BLOCK_SIZE initialization parameter should not exceed 64 K. The default value for this parameter is 1. If the multithreaded server is used, the value is always 1, and any value given here is ignored. |
|
|
INSTANCE |
in a parallel server, accesses database files as if the session were connected to the instance specified by integer. For more information, see "Accessing the Database as if Connected to Another Instance in a Parallel Server". |
|
|
ISOLATION_LEVEL |
specifies how transactions containing database modifications are handled. |
|
|
|
SERIALIZABLE |
Transactions in the session use the serializable transaction isolation mode as specified in SQL92. That is, if a serializable transaction attempts to execute a DML statement that updates rows that are updated by another uncommitted transaction at the start of the serializable transaction, then the DML statement fails. A serializable transaction can see its own updates. The COMPATIBLE initialization parameter must be set to 7.3.0 or higher for SERIALIZABLE mode to work. |
|
|
READ COMMITTED |
Transactions in the session will use the default Oracle transaction behavior. Thus, if the transaction contains DML that requires row locks held by another transaction, then the DML statement will wait until the row locks are released. |
|
MAX_DUMP_FILE_SIZE |
specifies the upper limit of trace dump file size. Specify the maximum size as either a nonnegative integer that represents the number of blocks, or as 'UNLIMITED'. If 'UNLIMITED' is specified, no upper limit is imposed. |
|
|
For more information on the following NLS parameters, see "Using NLS Parameters". |
||
|
NLS_LANGUAGE |
changes the language in which Oracle returns errors and other messages. This parameter also implicitly specifies new values for these items: |
|
|
|
||
|
NLS_TERRITORY |
implicitly specifies new values for these items: |
|
|
|
||
|
NLS_DATE_FORMAT |
explicitly specifies a new default date format. The 'fmt' value must be a date format model as specified in the section "Date Format Models". |
|
|
NLS_DATE_LANGUAGE |
explicitly changes the language for day and month names and abbreviations and spelled values of other date format elements. |
|
|
NLS_NUMERIC_CHARACTERS |
explicitly specifies a new decimal character and group separator. The 'text' value must have this form: dg' where: d is the new decimal character, and g is the new group separator. |
|
|
|
The decimal character and the group separator must be two different single-byte characters, and cannot be a numeric value or any of the following characters: "+" plus, "-" minus (or hyphen), "<" less-than, or ">" greater-than. |
|
|
NLS_ISO_CURRENCY |
explicitly specifies the territory whose ISO currency symbol should be used. |
|
|
NLS_CURRENCY |
explicitly specifies a new local currency symbol. The symbol cannot exceed 10 characters. |
|
|
NLS_SORT |
changes the sequence into which Oracle sorts character values. |
|
|
|
sort |
specifies the name of a linguistic sort sequence. |
|
|
BINARY |
specifies a binary sort. |
|
|
The default sort for all character sets is binary. |
|
|
NLS_CALENDAR |
explicitly specifies a new calendar type. |
|
|
OPTIMIZER_MODE |
specifies the approach and mode of the optimizer for your session. For more information on optimizer mode, see "Changing the Optimization Approach and Mode". |
|
|
|
ALL_ROWS |
specifies the cost-based approach and optimizes for best throughput. |
|
|
FIRST_ROWS |
specifies the cost-based approach and optimizes for best response time. |
|
|
RULE |
specifies the rule-based approach. |
|
|
CHOOSE |
causes the optimizer to choose an optimization approach based on the presence of statistics in the data dictionary. |
|
PARTITION_VIEW_ENABLED |
When set to TRUE, this parameter causes the optimizer to skip unnecessary table accesses in a partition view. For more information, see Oracle8 Reference. |
|
|
PLSQL_V2_COMPATABILITY |
modifies the compile-time behavior of PL/SQL programs to allow language constructs that are illegal in Oracle8 (PL/SQL V3), but were legal in Oracle7 (PL/SQL V2). See the PL/SQL User's Guide and Reference and Oracle8 Reference for more information about this session parameter. |
|
|
|
TRUE |
enables Oracle8 PL/SQL V3 programs to execute Oracle7 PL/SQL V2 constructs. |
|
|
FALSE |
disallows illegal Oracle7 PL/SQL V2 constructs. This is the default. |
|
REMOTE_DEPENDENCIES_MODE |
specifies how dependencies of remote stored procedures are handled by the session. For more information, refer Oracle8 Application Developer's Guide. |
|
|
SESSION_CACHED_CURSORS |
specifies the size of the session cache for holding frequently used cursors. integer specifies how many cursors can be retained in the cache. For more information on this parameter, see "Caching Session Cursors". |
|
|
SKIP_UNUSABLE_INDEXES |
|
|
|
|
controls the use and reporting of tables with unusable indexes or index partitions. |
|
|
|
TRUE |
disables error reporting of indexes marked as unusable. Allows inserts, deletes, and updates to tables with unusable indexes or index partitions. |
|
|
FALSE |
enables error reporting of indexes marked as unusable. Does not allow inserts, deletes, and updates to tables with unusable indexes or index partitions. This is the default. |
|
SQL_TRACE |
controls the SQL trace facility for your session. See also "Enabling and Disabling the SQL Trace Facility". |
|
|
|
TRUE |
enables the SQL trace facility. |
|
|
FALSE |
disables the SQL trace facility. |
The SQL trace facility generates performance statistics for the processing of SQL statements. You can enable and disable the SQL trace facility for all sessions on an Oracle instance with the initialization parameter SQL_TRACE. When you begin a session, Oracle enables or disables the SQL trace facility based on the value of this parameter. You can subsequently enable or disable the SQL trace facility for your own session with the SQL_TRACE option of the ALTER SESSION command.
For more information on the SQL trace facility, including how to format and interpret its output, see Oracle8 Tuning.
To enable the SQL trace facility for your session, issue the following statement:
ALTER SESSION
SET SQL_TRACE = TRUE;
Oracle contains support for use in different nations and with different languages. When you start an instance, Oracle establishes support based on the values of initialization parameters that begin with "NLS". For information on these parameters, see Oracle8 Reference. You use the NLS clauses of the ALTER SESSION command to change NLS characteristics dynamically for your session. You can query the dynamic performance table V$NLS_PARAMETERS to see the current NLS attributes for your session. The sections that follow describe the use of specific NLS parameters.
You can specify a new language for error messages with the NLS_LANGUAGE parameter. Note that this parameter also implicitly changes other language-related items. Oracle provides error messages in a wide range of languages on many platforms.
The following statement changes the language for error messages to the French:
ALTER SESSION
  SET NLS_LANGUAGE = French
Oracle returns error messages in French:
SELECT * FROM emp ORA-00942: Table ou vue n'existe pas
You can specify a new default date format either explicitly with the NLS_DATE_FORMAT parameter or implicitly with the NLS_TERRITORY parameter. For information on the default date format models, see the section "Date Format Models".
The following statement dynamically changes the default date format for your session to 'YYYY MM DD-HH24:MI:SS':
ALTER SESSION
SET NLS_DATE_FORMAT = 'YYYY MM DD HH24:MI:SS'
Oracle uses the new default date format:
SELECT TO_CHAR(SYSDATE) Today
FROM DUAL
TODAY
-------------------
1997 08 12 14:25:56
You can specify a new language for names and abbreviations of months and days either explicitly with the NLS_DATE_LANGUAGE parameter or implicitly with the NLS_LANGUAGE parameter.
The following statement changes the language for date format elements to the French:
ALTER SESSIONSET NLS_DATE_LANGUAGE = FrenchSELECT TO_CHAR(SYSDATE, 'Day DD Month YYYY') TodayFROM DUALTODAY---------------------------Mardi 28 Février 1997
You can specify new values for these number format elements either explicitly with the NLS_NUMERIC_CHARACTERS parameter or implicitly with the NLS_TERRITORY parameter:
For information on how to use number format models, see "Number Format Models".
The decimal character and the group separator must be single-byte character and cannot be the same character. If the decimal character is not a period (.), you must use single quotation marks to enclose to enclose all number values that appear in expressions in your SQL statements. When not using a period for the decimal point, you should always use the TO_NUMBER function to ensure that a valid number is retrieved.
The following statement dynamically changes the decimal character to comma (,) and the group separator to period (.):
ALTER SESSION SET NLS_NUMERIC_CHARACTERS = ',.' ;
Oracle returns these new characters when you use their number format elements:
SELECT TO_CHAR( SUM(sal), 'L999G999D99') Total FROM emp ;

TOTAL
-------------
FF29.025,00
You can specify a new value for the C number format element (the ISO currency symbol) either explicitly with the NLS_ISO_CURRENCY parameter or implicitly with the NLS_TERRITORY parameter. The value that you specify for these parameters is a territory whose ISO currency symbol becomes the value of the C number format element.
The following statement dynamically changes the ISO currency symbol to the ISO currency symbol for the territory America:
ALTER SESSION
SET NLS_ISO_CURRENCY = America;

SELECT TO_CHAR( SUM(sal), 'L999G999D99') Total
FROM emp;

TOTAL
-------------
USD29,025.00
You can specify a new value for the L number format element, (the local currency symbol) either explicitly with the NLS_CURRENCY parameter or implicitly with the NLS_TERRITORY parameter.
The following statement dynamically changes the local currency symbol to 'DM':
ALTER SESSION
SET NLS_CURRENCY = 'DM';

SELECT TO_CHAR( SUM(sal), 'L999G999D99') Total
FROM emp;

TOTAL
-------------
DM29.025,00
You can specify a new linguistic sort sequence or a binary sort either explicitly with the NLS_SORT parameter or implicitly with the NLS_LANGUAGE parameter.
The following statement dynamically changes the linguistic sort sequence to Spanish:
ALTER SESSION
SET NLS_SORT = XSpanish;
Oracle sorts character values based on their position in the Spanish linguistic sort sequence.
The Oracle optimizer can use either of these approaches to optimize a SQL statement:
With the cost-based approach, the optimizer can optimize a SQL statement with one of these goals:
|
best throughput |
is the minimal time necessary to return all rows accessed by the statement. |
|
best response time |
is the minimal time necessary to return the first row accessed by the statement. |
When you start your instance, the optimization approach is established by the initialization parameter OPTIMIZER_MODE. If this parameter establishes the cost-based approach, the default goal is best throughput.
For information on how to choose a goal for the cost-based approach based on the characteristics of your application, see the Oracle8 Tuning.
FIPS flagging causes an error message to be generated when a SQL statement is issued that is an extension of ANSI SQL92. In Oracle, there is currently no difference between Entry, Intermediate, or Full level flagging. Once flagging is set in a session, a subsequent ALTER SESSION SET FLAGGER command will work, but generates the message, ORA-00097. This allows FIPS flagging to be altered without disconnecting the session.
If an application repeatedly issues parse calls on the same set of SQL statements, the reopening of the session cursors can affect performance. The ALTER SESSION SET SESSION_CACHED_CURSORS command allows frequently used session cursors to be stored in a session cache even if they are closed. This is particularly useful for some Oracle tools. For example, Oracle Forms applications close all session cursors associated with a form when switching to another form; in this case, frequently used cursors would not have to be reparsed.
Oracle uses the shared SQL area to determine whether more than three parse requests were issued on a given statement. If so, Oracle moves the cursor into the session cursor cache. Subsequent requests to parse that SQL statement by the same session will find the cursor in the session cursor cache.
Session cursors are cached automatically if the initialization parameter SESSION_CACHED_CURSORS is set to a positive value. This parameter specifies the maximum number of session cursors to be kept in the cache. A least recently used algorithm ages out entries in the cache to make room for new entries when needed. You use the ALTER SESSION SET SESSION_CACHED_CURSORS command to dynamically enable session cursor caching.
For more information on session cursor caching, see Oracle8 Tuning.
For optimum performance, each instance of a parallel server uses its own private rollback segments, freelist groups, and so on. A database is usually designed for a parallel server so that users connect to a particular instance and access data that is partitioned primarily for their use. If the users for that instance must connect to another instance, the data partitioning can be lost. The ALTER SESSION SET INSTANCE command allows users to access an instance as if they were connected to their usual instance.
A database link allows you to access a remote database in DELETE, INSERT, LOCK TABLE, SELECT, and UPDATE statements. When you issue a statement that uses a database link, Oracle creates a session for you on the remote database using the database link. The connection remains open until you end your local session or until the number of database links for your session exceeds the value of the initialization parameter OPEN_LINKS.
You can use the CLOSE DATABASE LINK clause of the ALTER SESSION command to close a database link explicitly if you do not plan to use it again in your session. You may want to close a database link explicitly if the network overhead associated with leaving it open is costly. Before closing a database link, you must first close all cursors that use the link and then end your current transaction if it uses the link.
This example updates the employee table on the SALES database using a database link, commits the transaction, and explicitly closes the database link:
UPDATE emp@sales
SET sal = sal + 200
WHERE empno = 9001;
COMMIT;
ALTER SESSION
CLOSE DATABASE LINK sales;
If a network or machine failure occurs during the commit process for a distributed transaction, the state of the transaction may be unknown or in doubt. The transaction can be manually committed or rolled back on each database involved in the transaction with the FORCE clause of the COMMIT or ROLLBACK commands.
Before committing a distributed transaction, you can use the ADVISE clause of the ALTER SESSION command to send advice to a remote database in the event a distributed transaction becomes in doubt. If the transaction becomes in doubt, the advice appears in the ADVICE column of the DBA_2PC_PENDING view on the remote database. The administrator of that database can then use this advice to decide whether to commit or roll back the transaction on the remote database. For more information on distributed transactions and how to decide whether to commit or roll back in-doubt distributed transactions, see Oracle8 Distributed Database Systems.
You issue multiple ALTER SESSION statements with the ADVISE clause in a single transaction. Each such statement sends advice to the databases referenced in the following statements in the transaction until another such statement is issued. This allows you to send different advice to different databases.
This transaction inserts an employee record into the EMP table on the database identified by the database link SITE1 and deletes an employee record from the EMP table on the database identified by SITE2:
ALTER SESSION
ADVISE COMMIT

INSERT INTO emp@site1
VALUES (8002, 'FERNANDEZ', 'ANALYST', 7566,
TO_DATE('04-OCT-1992', 'DD-MON-YYYY'), 3000, NULL, 20)

ALTER SESSION
ADVISE ROLLBACK;
DELETE FROM emp@site2
WHERE empno = 8002;
COMMIT;
This transaction has two ALTER SESSION statements with the ADVISE clause. If the transaction becomes in-doubt, SITE1 is sent the advice 'COMMIT' by virtue of the first ALTER SESSION statement and SITE2 is sent the advice 'ROLLBACK' by virtue of the second.
Procedures and stored functions are written in PL/SQL, and they can issue COMMIT and ROLLBACK statements. If your application performs record management that would be disrupted by a COMMIT or ROLLBACK statement not issued directly by the application itself, you may want to prevent procedures and stored functions called during your session from issuing these statements. You can do this with the following statement:
ALTER SESSION DISABLE COMMIT IN PROCEDURE;
If you subsequently call a procedure or a stored function that issues a COMMIT or ROLLBACK statement, Oracle returns an error and does not commit or roll back the transaction.
You can subsequently allow procedures and stored functions to issue COMMIT and ROLLBACK statements in your session by issuing the following statement:
ALTER SESSION ENABLE COMMIT IN PROCEDURE;
This command does not apply to database triggers. Triggers can never issue COMMIT or ROLLBACK statements.
When parallel DML is enabled for your session, all DML portions of statements issued are considered for parallel execution. Even with parallel DML enabled, however, some DML operations are restricted from parallelization, while others may still execute serially unless parallel hints and clauses are specified. For a detailed description of parallel DML features and hints, see Oracle8 Tuning.
The following restrictions apply to parallel DML operations:
Parallel DML mode can be modified only between committed transactions. Issuing this command following an uncommitted transaction will generate an error. Uncommitted transactions must be either committed or rolled back prior to issuing the ALTER SESSION ENABLE|DISABLE|FORCE PARALLEL DML command.
Issue the following statement to enable parallel DML mode for the current session:
ALTER SESSION ENABLE PARALLEL DML;
The following example modifies the current session to check all deferrable constraints immediately following each DML statement:
ALTER SESSION SET CONSTRAINTS IMMEDIATE;
The following statement modifies the current session to allow inserts into local index partitions marked as unusable:
ALTER SESSION SET SKIP_UNUSABLE_INDEXES=TRUE;
To alter a snapshot in one of the following ways:
For illustrations of some of these purposes, see "Examples".
For more information on snapshots, including refreshing snapshots, see CREATE SNAPSHOT.
To alter a snapshot's storage parameters, the snapshot must be contained in your own schema, or you must have the ALTER ANY SNAPSHOT system privilege.
For detailed information about the prerequisites for ALTER SNAPSHOT, see Oracle8 Replication.
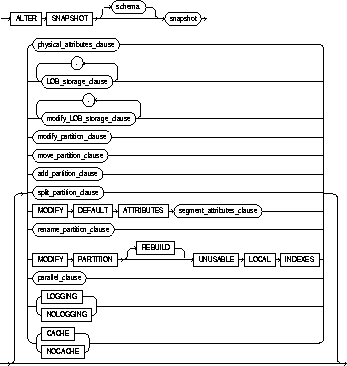
For the syntax of the following clauses, see ALTER TABLE:
|
schema |
is the schema containing the snapshot. If you omit schema, Oracle assumes the snapshot is in your own schema. |
|
|
snapshot |
is the name of the snapshot to be altered. |
|
|
modify_default_attributes |
specifies new values for the default attributes of a partitioned table. For information about specifying the parameters of this clause, see ALTER TABLE. |
|
|
physical_attributes_clause |
change the values of the PCTFREE, PCTUSED, INITRANS, and MAXTRANS parameters and the storage characteristics for the internal table that Oracle uses to maintain the snapshot's data. For more information, see CREATE TABLE and the STORAGE clause. |
|
|
LOGGING/NOLOGGING |
specifies the logging attribute. For information about specifying this option, see ALTER TABLE. |
|
|
CACHE/NOCACHE |
for data that will be accessed frequently, specifies whether the blocks retrieved for this table are placed at the most recently used end of the LRU list in the buffer cache when a full table scan is performed. This option is useful for small lookup tables. For information about specifying this option, see ALTER TABLE. |
|
|
LOB_storage_clause |
specifies the LOB storage characteristics. For information about specifying the parameters of this clause, see ALTER TABLE. |
|
|
modify_LOB_storage_clause |
modifies the physical attributes of the LOB attribute lob_item or LOB object attribute. For information about specifying the parameters of this clause, see ALTER TABLE. |
|
|
For more information on the following partitioning clauses, see "Partitioned Snapshots". |
||
|
modify_partition_clause |
modifies the real physical attributes of a table partition. For information about specifying the parameters of this clause, see ALTER TABLE. |
|
|
move_partition_clause |
moves table partition partition_name to another segment. For information about specifying the parameters of this clause, see ALTER TABLE. |
|
|
add_partition_clause |
adds a new partition new_partition_name to the "high" end of a partitioned table. For information about specifying the parameters of this clause, see ALTER TABLE. |
|
|
split_partition_clause |
creates two new partitions, each with a new segment and new physical attributes, and new initial extents. For information about specifying the parameters of this clause, see ALTER TABLE. |
|
|
rename_partition_clause |
renames table partition partition_name to new_partition_name. For information about specifying the parameters of this clause, see ALTER TABLE. |
|
|
parallel_clause |
specifies the degree of parallelism for the snapshot. See the PARALLEL clause on page 4-1022. When this clause is set for master tables, performance for snapshot creation and refresh may improve (depending on the snapshot definition query). |
|
|
MODIFY PARTITION UNUSABLE LOCAL INDEXES |
||
|
|
marks all the local index partitions associated with partition_name as unusable. |
|
|
MODIFY PARTITION REBUILD UNUSABLE LOCAL INDEXES |
||
|
|
rebuilds the unusable local index partitions associated with partition_name. |
|
|
USING INDEX |
changes the value of INITRANS, MAXTRANS, and STORAGE parameters for the index Oracle uses to maintain the snapshot's data. If USING INDEX is not specified then default values are used for the index. |
|
|
REFRESH |
changes the mode and times for automatic refreshes. |
|
|
|
FAST |
specifies a fast refresh, or a refresh using the snapshot log associated with the master table. |
|
|
COMPLETE |
specifies a complete refresh, or a refresh that re-creates the snapshot during each refresh. |
|
|
FORCE |
specifies a fast refresh if one is possible or complete refresh if a fast refresh is not possible. Oracle decides whether a fast refresh is possible at refresh time. |
|
|
If you omit the FAST, COMPLETE, and FORCE options, Oracle uses FORCE by default. |
|
|
|
START WITH |
specifies a date expression for the next automatic refresh time. |
|
|
NEXT |
specifies a new date expression for calculating the interval between automatic refreshes. |
|
|
START WITH and NEXT values must evaluate to times in the future. |
|
|
|
WITH PRIMARY KEY |
changes a ROWID snapshot to a primary key snapshot. Primary key snapshots allow snapshot master tables to be reorganized without impacting the snapshot's ability to continue to fast refresh. The master table must contain an enabled primary key constraint. See also "Primary Key Snapshots". |
|
USING MASTER ROLLBACK SEGMENT |
changes remote master rollback segment to be used during snapshot refresh; rollback_segment is the name of the rollback segment to be used. (To change the local snapshot rollback segment, use the DBMS_REFRESH package in Oracle8 Replication.) See also "Specifying Rollback Segments", |
|
|
|
DEFAULT |
specifies that Oracle will choose which rollback segment to use. If you specify DEFAULT, you cannot specify rollback_segment. |
|
|
||
|
|
MASTER |
specifies the remote rollback segment to be used at the remote master for the individual snapshot. |
|
|
LOCAL |
specifies the remote rollback segment to be used for the local refresh group that contains the snapshot. |
The following statement changes the automatic refresh mode for the HQ_EMP snapshot to FAST:
ALTER SNAPSHOT hq_emp
REFRESH FAST;
The next automatic refresh of the snapshot will be a fast refresh provided it is a simple snapshot and its master table has a snapshot log that was created before the snapshot was created or last refreshed.
Because the REFRESH clause does not specify START WITH or NEXT values, the refresh intervals established by the REFRESH clause when the HQ_EMP snapshot was created or last altered are still used.
The following statement stores a new interval between automatic refreshes for the BRANCH_EMP snapshot:
ALTER SNAPSHOT branch_emp
REFRESH NEXT SYSDATE+7;
Because the REFRESH clause does not specify a START WITH value, the next automatic refresh occurs at the time established by the START WITH and NEXT values specified when the BRANCH_EMP snapshot was created or last altered.
At the time of the next automatic refresh, Oracle refreshes the snapshot, evaluates the NEXT expression SYSDATE+7 to determine the next automatic refresh time, and continues to refresh the snapshot automatically once a week.
Because the REFRESH clause does not explicitly specify a refresh mode, Oracle continues to use the refresh mode specified by the REFRESH clause of a previous CREATE SNAPSHOT or ALTER SNAPSHOT statement.
The following statement specifies a new refresh mode, next refresh time, and new interval between automatic refreshes of the SF_EMP snapshot:
ALTER SNAPSHOT sf_emp
REFRESH COMPLETE
START WITH TRUNC(SYSDATE+1) + 9/24
NEXT SYSDATE+7;
The START WITH value establishes the next automatic refresh for the snapshot to be 9:00 am tomorrow. At that point, Oracle performs a fast refresh of the snapshot, evaluates the NEXT expression, and subsequently refreshes the snapshot every week.
You can specify the rollback segments to be used during a refresh for both the master site and the local site. The master rollback segment is stored on a per-snapshot basis and is validated during snapshot creation and refresh. If the snapshot is complex, the master rollback segment, if specified, is ignored.
You can change local snapshot rollback segments using the DBMS_REFRESH package and is stored at the refresh group level. For information about the DBMS_REFRESH package, see Oracle8 Replication. If the auto-refresh parameters (START WITH and NEXT) are specified, a new refresh group is automatically created to refresh the snapshot with a background process. The local rollback segment, if specified, is associated with this new refresh group. An error is raised if the auto-refresh parameters are not specified, but a local rollback segment is.
The following example changes the remote master rollback segment used during snapshot refresh to MASTER_SEG:
ALTER SNAPSHOT inventory
  REFRESH USING MASTER ROLLBACK SEGMENT master_seg;
The following example changes the remote master rollback segment used during snapshot refresh to one chosen by Oracle:
ALTER SNAPSHOT sales REFRESH USING DEFAULT MASTER ROLLBACK SEGMENT;
To change a ROWID snapshot to a primary key snapshot you must:
To fast refresh primary key snapshots you must first create a snapshot master log specifying WITH PRIMARY KEY. The snapshot master log can also store ROWIDs. The snapshot master log must be created before the snapshot is created in order for the snapshots to use the log to fast refresh.
For detailed information about primary key snapshots, see Oracle8 Replication.
The following example changes a ROWID to a primary key snapshot:
ALTER SNAPSHOT emp_rs REFRESH WITH PRIMARY KEY;
Partitioned snapshots are the same as partitioned tables because snapshots are basically tables. The options have the same syntax and semantics as the partitioned table options for CREATE TABLE and ALTER TABLE. The only difference is that the following operations are not allowed on snapshots and snapshot logs:
You cannot perform bulk deletions by dropping or truncating partitions on master tables. Thus, after dropping or truncating a partition, all snapshots must be refreshed manually. A fast refresh will probably produce incorrect results, but Oracle will not raise an error.
Changes the storage characteristics of a snapshot log. For more information on snapshot logs, see CREATE SNAPSHOT.
Only the owner of the master table or a user with the SELECT privilege for the master table can alter a snapshot log. For detailed information about the prerequisites for ALTER SNAPSHOT LOG, see Oracle8 Replication.
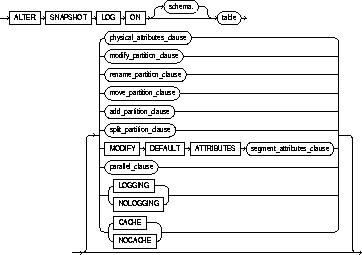

For the syntax of the following clauses, see ALTER TABLE:
|
schema |
is the schema containing the master table. If you omit schema, Oracle assumes the snapshot log is in your own schema. |
|
|
table |
is the name of the master table associated with the snapshot log to be altered. |
|
|
physical_attributes_clause |
changes the value of PCTFREE, PCTUSED, INITRANS, and MAXTRANS parameters for the table, partition, the overflow data segment, or the default characteristics of a partitioned table. See the PCTFREE, PCTUSED, INITRANS, and MAXTRANS parameters of CREATE TABLE. See the example under "Modifying Physical Attributes". |
|
|
rename_partition_clause |
renames table partition partition_name to new_partition_name. For information about specifying the parameters of this clause, see ALTER TABLE. |
|
|
modify_partition_clause |
modifies the real physical attributes of a table partition. For information about specifying the parameters of this clause, see ALTER TABLE. |
|
|
move_partition_clause |
moves table partition partition_name to another segment. For information about specifying the parameters of this clause, see ALTER TABLE. |
|
|
add_partition_clause |
adds a new partition new_partition_name to the "high" end of a partitioned table. For information about specifying the parameters of this clause, see ALTER TABLE. |
|
|
split_partition_clause |
creates two new partitions, each with a new segment and new physical attributes, and new initial extents. For information about specifying the parameters of this clause, see ALTER TABLE. For more information see "Partitioned Snapshot Logs". |
|
|
modify_default_attributes_clause |
is a valid option only for a partitioned index. Use this option to specify new values for the default attributes of a partitioned index. |
|
|
parallel_clause |
specifies the degree of parallelism for the snapshot. See the PARALLEL clause. When this clause is set for master tables, performance during snapshot creation and refresh may improve (depending on the snapshot definition query). |
|
|
LOGGING/NOLOGGING |
specifies the logging attribute. For information about specifying this option, see ALTER TABLE. |
|
|
CACHE/NOCACHE |
for data that will be accessed frequently, specifies whether the blocks retrieved for this table are placed at the most recently used end of the LRU list in the buffer cache when a full table scan is performed. This option is useful for small lookup tables. For information about specifying this option, see ALTER TABLE. |
|
|
ADD |
changes the snapshot log so that it records the primary key values or ROWID values when rows in the snapshot master table are updated. This clause can also be used to record additional filter columns. |
|
|
|
PRIMARY KEY |
specifies that the primary-key values of all rows updated should be recorded in the snapshot log. |
|
|
ROWID |
specifies that the ROWID values of all rows updated should be recorded in the snapshot log. |
|
|
filter_column(s) |
are non-primary-key columns referenced by snapshots. For information about filter columns, see Oracle8 Replication. |
|
|
For more information, see "Adding Primary Key, ROWID, and Filter Columns". |
|
The following statement changes the MAXEXTENTS value of a snapshot log:
ALTER SNAPSHOT LOG ON dept
STORAGE MAXEXTENTS 50;
Snapshot logs can be altered to additionally record primary key, ROWID, or filter column information when snapshot master tables are updated. To stop recording any of this information, you must first drop the snapshot log and then re-create it.
The following example alters an existing ROWID snapshot log to also record primary key information:
ALTER SNAPSHOT LOG ON sales ADD PRIMARY KEY;
Partitioned snapshot logs are the same as partitioned tables, because snapshot logs are basically tables. The options have the same syntax and semantics as the partitioned table options for CREATE TABLE and ALTER TABLE. The only difference is that the following operations are not allowed on snapshots and snapshot logs:
You cannot perform bulk deletions by dropping or truncating partitions on master tables. Therefore, after dropping or truncating a partition, all snapshots must be manually refreshed. A fast refresh will probably produce incorrect results, but Oracle will not raise an error.
To dynamically alter your Oracle instance in one of the following ways:
You must have ALTER SYSTEM system privilege.
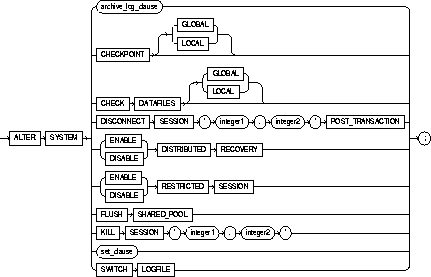
archive_log_clause: See the ARCHIVE LOG clause.
set_clause::=
dispatch_clause::=

options_clause::=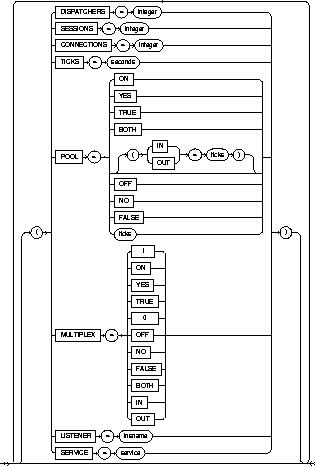
|
You can use the following options regardless of whether your instance has the database dismounted or mounted, open or closed: |
||
|
RESTRICTED SESSION |
specifies whether logon to Oracle is restricted |
|
|
|
ENABLE |
allows only users with RESTRICTED SESSION system privilege to logon to Oracle. |
|
|
DISABLE |
reverses the effect of the ENABLE RESTRICTED SESSION option, allowing all users with CREATE SESSION system privilege to log on to Oracle. |
|
|
For more information, see "Restricting Logons". |
|
|
FLUSH SHARED_POOL |
clears all data from the shared pool in the system global area (SGA). For more information, see "Clearing the Shared Pool". |
|
|
You can use the following options when your instance has the database mounted, open or closed: |
||
|
CHECKPOINT |
performs a checkpoint. |
|
|
|
GLOBAL |
performs a checkpoint for all instances that have opened the database. |
|
|
LOCAL |
performs a checkpoint only for the thread of redo log file groups for your instance. You can use this option only when your instance has the database open. |
|
|
If you omit both the GLOBAL and LOCAL options, Oracle performs a global checkpoint. For more information, see "Performing a Checkpoint". |
|
|
CHECK DATAFILES |
GLOBAL |
verifies that all instances that have opened the database can access all online datafiles. |
|
|
LOCAL |
verifies that your instance can access all online datafiles. |
|
|
If you omit both the GLOBAL and LOCAL options, Oracle uses GLOBAL by default. For more information, see "Checking Datafiles". |
|
|
You can use the following parameters and options only when your instance has the database open: |
||
|
RESOURCE_LIMIT |
controls resource limits. TRUE enables resource limits; FALSE disables resource limits. See also "Using Resource Limits". |
|
|
GLOBAL_NAMES |
controls the enforcement of global name resolution for your session. TRUE enables the enforcement of global names; FALSE disables the enforcement of global names. For more information, see "Global Name Resolution". |
|
|
SCAN_INSTANCES |
in a parallel server, specifies the number of instances to participate in parallelized operations. This syntax will be obsolete in the next major release. |
|
|
CACHE_INSTANCES |
in a parallel server, specifies the number of instances that will cache a table. This syntax will be obsolete in the next major release. |
|
|
For more information on parallel operations, see Oracle8 Tuning. For more information on the following multithreaded server parameters, see "Managing Processes for the Multithreaded Server". |
||
|
MTS_SERVERS |
specifies a new minimum number of shared server processes. |
|
|
MTS_DISPATCHERS |
specifies a new number of dispatcher processes: |
|
|
|
protocol |
is the network protocol of the dispatcher processes. |
|
|
integer |
is the new number of dispatcher processes of the specified protocol. |
|
|
You can specify multiple MTS_DISPATCHERS parameters in a single command for multiple network protocols. |
|
|
For more information on the following licensing parameters, see "Using Licensing Limits". |
||
|
JOB_QUEUE_PROCESSES |
specifies the number of job queue processes per instance (SNPn, where n is 0 to 9 followed by A to Z). Set this parameter to 1 or higher if you wish to have your snapshots updated automatically. One job queue process is usually sufficient unless you have many snapshots that refresh simultaneously. Oracle also uses job queue processes to process requests created by the DBMS_JOB package. For more information on managing table snapshots, see Oracle8 Replication. |
|
|
LICENSE_MAX_SESSIONS |
limits the number OS sessions on your instance. A value of 0 disables the limit. |
|
|
LICENSE_SESSIONS_WARNING |
establishes a threshold of sessions over which Oracle writes warning messages to the ALERT file for subsequent sessions. A value of 0 disables the warning threshold. |
|
|
LICENSE_MAX_USERS |
limits number of concurrent users on your database. A value of 0 disables the limit. |
|
|
REMOTE_DEPENDENCIES_MODE |
specifies how dependencies of remote stored procedures are handled by the server. For more information, refer to Oracle8 Application Developer's Guide.
|
|
|
SWITCH LOGFILE |
switches redo log file groups. For more information, see "Switching Redo Log File Groups". |
|
|
DISTRIBUTED RECOVERY |
specifies whether or not distributed recovery is enabled. |
|
|
|
ENABLE |
enables distributed recovery. In a single-process environment, you must use this option to initiate distributed recovery. |
|
|
DISABLE |
switches redo log files. |
|
|
For more information, see "Enabling and Disabling Distributed Recovery". |
|
|
ARCHIVE LOG |
manually archives redo log files or enables or disables automatic archiving. See the ARCHIVE LOG clause. |
|
|
KILL SESSION |
terminates a session and any ongoing transactions. You must identify the session with both of the following values from the V$SESSION view: |
|
|
|
integer1 |
is the value of the SID column. |
|
|
integer2 |
is the value of the SERIAL# column. |
|
|
For more information, see "Terminating a Session". |
|
|
DISCONNECT SESSION |
disconnects the current session by destroying the dedicated server process (or virtual circuit if the connection was made via MTS). If configured, application failover will take effect. For more information about application failover see Oracle8 Tuning and Oracle8 Parallel Server Concepts and Administration. You must identify the session with both of the following values from the V$SESSION view: |
|
|
|
integer1 |
is the value of the SID column. |
|
|
integer2 |
is the value of the SERIAL# column. |
|
|
POST_TRANSACTION |
allows ongoing transactions to complete before the session is disconnected. This keyword is required when DISCONNECT SESSION is specified. For more information, see "Disconnecting a Session". |
|
PLSQL_V2_COMPATIBILITY |
modifies the compile-time behavior of PL/SQL programs to allow language constructs that are illegal in Oracle8 (PL/SQL V3), but were legal in Oracle7 (PL/SQL V2). See the PL/SQL User's Guide and Reference and Oracle8 Reference for more information about this system parameter. |
|
|
|
TRUE |
enables Oracle8 PL/SQL V3 programs to execute Oracle7 PL/SQL V2 constructs. |
|
|
FALSE |
disallows illegal Oracle7 PL/SQL V2 constructs. This is the default. |
|
MAX_DUMP_FILE_SIZE |
specifies the trace dump file size upper limit for all user sessions. Specify the maximum size as either a nonnegative integer that represents the number of blocks, or as 'UNLIMITED'. If you specify 'UNLIMITED', no upper limit is imposed. |
|
|
|
DEFERRED |
modifies the trace dump file size upper limit for future user sessions only. |
By default, any user granted CREATE SESSION system privilege can log on to Oracle. The ENABLE RESTRICTED SESSION option of the ALTER SYSTEM command prevents logons by all users except those having RESTRICTED SESSION system privilege. Existing sessions are not terminated.
You may want to restrict logons if you are performing application maintenance and you want only application developers with RESTRICTED SESSION system privilege to log on. To restrict logons, issue the following statement:
ALTER SYSTEM
ENABLE RESTRICTED SESSION;
You can then terminate any existing sessions using the KILL SESSION clause of the ALTER SYSTEM command.
After performing maintenance on your application, issue the following statement to allow any user with CREATE SESSION system privilege to log on:
ALTER SYSTEM
DISABLE RESTRICTED SESSION;
The FLUSH SHARED_POOL option of the ALTER SYSTEM command clears all information from the shared pool in the system global area (SGA). The shared pool stores this information:
You might want to clear the shared pool before beginning performance analysis. To clear the shared pool, issue the following statement:
ALTER SYSTEM
FLUSH SHARED_POOL;
The above statement does not clear shared SQL and PL/SQL areas for SQL statements, stored procedures, functions, packages, or triggers that are currently being executed, or for SQL SELECT statements for which all rows have not yet been fetched.
The CHECKPOINT clause of the ALTER SYSTEM command explicitly forces Oracle to perform a checkpoint. You can force a checkpoint if you want to ensure that all changes made by committed transactions are written to the data files on disk. For more information on checkpoints, see the "Recovery Structures" chapter of Oracle8 Concepts.
If you are using Oracle with the Parallel Server option in parallel mode, you can specify either the GLOBAL option to perform a checkpoint on all instances that have opened the database or the LOCAL option to perform a checkpoint on only your instance.
The following statement forces a checkpoint:
ALTER SYSTEM
CHECKPOINT;
Oracle does not return control to you until the checkpoint is complete.
The CHECK DATAFILES clause of the ALTER SYSTEM command verifies access to all online datafiles. If any datafile is not accessible, Oracle writes a message to an ALERT file. You may want to perform this operation after fixing a hardware problem that prevented an instance from accessing a datafile. For more information on using this clause, see Oracle8 Parallel Server Concepts and Administration.
The following statement verifies that all instances that have opened the database can access all online datafiles:
ALTER SYSTEM
CHECK DATAFILES GLOBAL;
When you start an instance, Oracle enables or disables resource limits based on the value of the initialization parameter RESOURCE_LIMIT. You can issue an ALTER SYSTEM statement with the RESOURCE_LIMIT option to enable or disable resource limits for subsequent sessions.
Enabling resource limits only causes Oracle to enforce the resource limits already assigned to users. To choose resource limit values for a user, you must create a profile, or a set of limits, and assign that profile to the user. For more information on this process, see CREATE PROFILE and CREATE USER.
This ALTER SYSTEM statement dynamically enables resource limits:
ALTER SYSTEM
SET RESOURCE_LIMIT = TRUE;
When you start an instance, Oracle determines whether to enforce global name resolution for remote objects accessed in SQL statements based on the value of the initialization parameter GLOBAL_NAMES. You can subsequently enable or disable global name resolution while your instance is running with the GLOBAL_NAMES parameter of the ALTER SYSTEM command. You can also enable or disable global name resolution for your session with the GLOBAL_NAMES parameter of the ALTER SESSION command discussed earlier in this chapter.
Oracle recommends that you enable global name resolution if you use or plan to use distributed processing. For more information on global name resolution and how Oracle enforces it, see "Referring to Objects in Remote Databases" and Oracle8 Distributed Database Systems.
When you start your instance, Oracle creates shared server processes and dispatcher processes for the multithreaded server architecture based on the values of the following initialization parameters:
For more information on the multithreaded server architecture, see Oracle8 Concepts.
You can use the MTS_SERVERS and MTS_DISPATCHERS parameters of the ALTER SYSTEM command to perform one of the following operations while the instance is running:
You cannot use this command to create dispatcher processes for network protocols that are not specified by the initialization parameter MTS_DISPATCHERS. To create dispatcher processes for a new protocol, you must change the value of the initialization parameter.
The following statement changes the minimum number of shared server processes to 25:
ALTER SYSTEM
SET MTS_SERVERS = 25;
If there are currently fewer than 25 shared server processes, Oracle creates more. If there are currently more than 25, Oracle terminates some of them when they are finished processing their current calls if the load could be managed by the remaining 25.
The following statement dynamically changes the number of dispatcher processes for the TCP/IP protocol to 5 and the number of dispatcher processes for the DECNET protocol to 10:
ALTER SYSTEM
SET MTS_DISPATCHERS = 'TCP, 5'
MTS_DISPATCHERS = 'DECnet, 10';
If there are currently fewer than 5 dispatcher processes for TCP, Oracle creates new ones. If there are currently more than 5, Oracle terminates some of them after the connected users disconnect.
If there are currently fewer than 10 dispatcher processes for DECnet, Oracle creates new ones. If there are currently more than 10, Oracle terminates some of them after the connected users disconnect.
If there are currently existing dispatchers for another protocol, the above statement does not affect the number of dispatchers for that protocol.
Oracle enforces concurrent usage licensing and named user licensing limits specified by your Oracle license. When you start your instance, Oracle establishes the licensing limits based on the values of the following initialization parameters:
You can dynamically change or disable limits or thresholds while your instance is running using the LICENSE_MAX_SESSIONS, LICENSE_SESSIONS_WARNING, and LICENSE_MAX_USERS parameters of the ALTER SYSTEM command. Do not disable or raise session or user limits unless you have appropriately upgraded your Oracle license. For information on upgrading your license, contact your Oracle sales representative.
New limits apply only to future sessions and users:
The following statement dynamically changes the limit on sessions for your instance to 64 and the warning threshold for sessions on your instance to 54:
ALTER SYSTEM
SET LICENSE_MAX_SESSIONS = 64
LICENSE_SESSIONS_WARNING = 54;
If the number of sessions reaches 54, Oracle writes a warning message to the ALERT file for each subsequent session. Also, users with RESTRICTED SESSION system privilege receive warning messages when they begin subsequent sessions.
If the number of sessions reaches 64, only users with RESTRICTED SESSION system privilege can begin new sessions until the number of sessions falls below 64 again.
The following statement dynamically disables the limit for sessions on your instance:
ALTER SYSTEM
SET LICENSE_MAX_SESSIONS = 0;
After you issue the above statement, Oracle no longer limits the number of sessions on your instance.
The following statement dynamically changes the limit on the number of users in the database to 200:
ALTER SYSTEM
SET LICENSE_MAX_USERS = 200;
After you issue the above statement, Oracle prevents the number of users in the database from exceeding 200.
The SWITCH LOGFILE option of the ALTER SYSTEM command explicitly forces Oracle to begin writing to a new redo log file group, regardless of whether the files in the current redo log file group are full. You may want to force a log switch to drop or rename the current redo log file group or one of its members, because you cannot drop or rename a file while Oracle is writing to it. The forced log switch affects only your instance's redo log thread. Note that when you force a log switch, Oracle begins to perform a checkpoint. Oracle returns control to you immediately rather than when the associated checkpoint is complete.
The following statement forces a log switch:
ALTER SYSTEM
SWITCH LOGFILE;
Oracle allows you to perform distributed transactions, or transactions that modify data on multiple databases. If a network or machine failure occurs during the commit process for a distributed transaction, the state of the transaction may be unknown, or in doubt. Once the failure has been corrected and the network and its nodes are back online, Oracle recovers the transaction.
If you are using Oracle in multiple-process mode, this distributed recovery is performed automatically. If you are using Oracle in single-process (single user) mode, such as on the MS-DOS operating system, you must explicitly initiate distributed recovery with the following statement.
ALTER SYSTEM ENABLE DISTRIBUTED RECOVERY;
You may need to issue the above statement more than once to recover an in-doubt transaction, especially if the remote node involved in the transaction is not accessible. In-doubt transactions appear in the data dictionary view DBA_2PC_PENDING. You can tell that the transaction is recovered when it no longer appears in DBA_2PC_PENDING. For more information about distributed transactions and distributed recovery, see Oracle8 Distributed Database Systems.
You can disable distributed recovery in both single-process and multiprocess mode with the following statement:
ALTER SYSTEM DISABLE DISTRIBUTED RECOVERY;
You may want to disable distributed recovery for demonstration purposes. You can then enable distributed recovery again by issuing an ALTER SYSTEM statement with the ENABLE DISTRIBUTED RECOVERY clause.
The KILL SESSION clause of the ALTER SYSTEM command terminates a session, immediately performing the following tasks:
You may want to kill the session of a user that is holding resources needed by other users. The user receives an error message indicating that the session has been killed; that user can no longer make calls to the database without beginning a new session. You can kill a session only on the same instance as your current session.
If you try to kill a session that is performing some activity that must be completed, such as waiting for a reply from a remote database or rolling back a transaction, Oracle waits for this activity to complete, kills the session, and then returns control to you. If the waiting lasts as long as a minute, Oracle marks the session to be killed and returns control to you with a message indicating that the session is marked to be killed. Oracle then kills the session when the activity is complete.
Consider this data from the V$SESSION dynamic performance table:
SELECT sid, serial, usernameFROM v$sessionSID SERIAL USERNAME----- --------- ----------------1 12 13 14 15 17 18 28 OPS$BQUIGLEY10 211 OPS$SWIFT11 39 OPS$OBRIEN12 13 SYSTEM13 8 SCOTT
The following statement kills the session of the user SCOTT using the SID and SERIAL# values from V$SESSION:
ALTER SYSTEM
KILL SESSION '13, 8';
The DISCONNECT SESSION clause is similar to the KILL SESSION clause, but with two distinct differences.
First, the ALTER SYSTEM DISCONNECT SESSION 'X, Y' POST_TRANSACTION command waits until any current transaction that the session is working on completes before taking effect.
Second, the session is disconnected rather than killed, which means that the dedicated server process (or virtual circuit if the connection was made through MTS) is destroyed by this command. Termination of a session's connection causes application failover to take effect if the appropriate system parameters are configured.
Disconnecting a session essentially allows you to perform a manual application failover. Using this command in a parallel server environment allows you to disconnect sessions on an overloaded instance and shift them to another instance.
The POST_TRANSACTION keyword is required.
The following statement disconnects user SCOTT's session, using the SID and SERIAL# values from V$SESSION:
ALTER SYSTEM
DISCONNECT SESSION '13, 8' POST_TRANSACTION;
For more information about application failover, see Oracle8 Parallel Server Concepts and Administration and Oracle8 Tuning.
To alter the definition of a table in one of the following ways:
 add or modify object type, nested table type, or VARRAY type column
 add integrity constraints to object type columns
The table must be in your own schema, or you must have ALTER privilege on the table, or you must have ALTER ANY TABLE system privilege. For some operations you may also need the CREATE ANY INDEX privilege.
 To use an object type in a column definition when modifying a table, either that object must belong to the same schema as the table being altered, or you must have either the EXECUTE ANY TYPE system privilege or the EXECUTE schema object privilege for the object type.
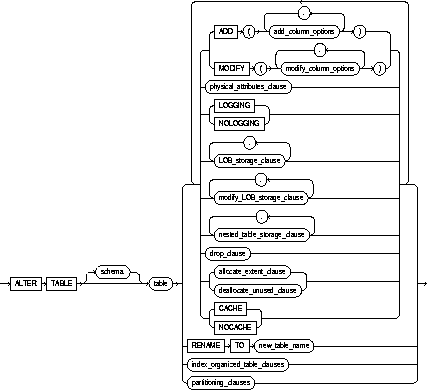
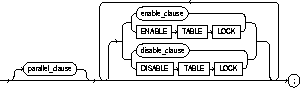
add_column_options::=
column_constraint, table_constraint: See the CONSTRAINT clause
column_ref_clause::=
table_ref_clause::=
modify_column_options::=
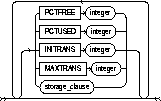 physical_attributes_clause::=
storage_clause: See STORAGE clause.
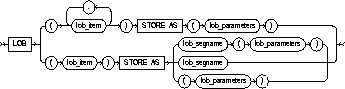 LOB_storage_clause::=
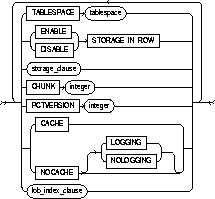 LOB_parameters::=
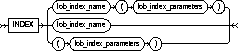 LOB_index_clause::=
 LOB_index_parameters::=
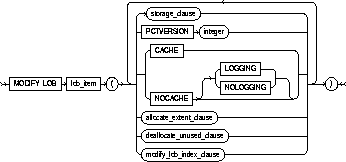 modify_LOB_storage_clause::=
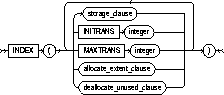 modify_LOB_index_clause::=
 nested_table_storage_clause::=
drop_clause: See the DROP clause.
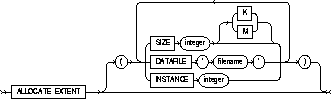 allocate_extent_clause::=
deallocate_unused_clause: See the DEALLOCATE UNUSED clause.
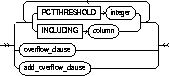 index_organized_table_clauses::=
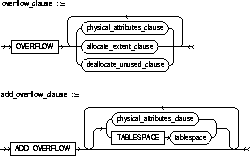
 partitioning_clauses::=
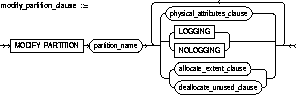


rename_partition_clause::=
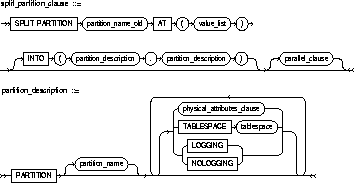
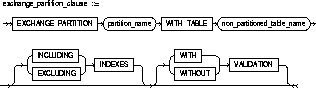
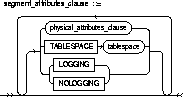
parallel_clause: See the PARALLEL clause.
|
schema |
is the schema containing the table. If you omit schema, Oracle assumes the table is in your own schema. |
|
|
table |
is the name of the table to be altered. You can alter the definition of an index-organized table. |
|
|
ADD |
adds a column or integrity constraint. You cannot ADD columns to an index-organized table. See also "Adding Columns". |
|
|
MODIFY |
modifies the definition of an existing column. If you omit any of the optional parts of the column definition (datatype, default value, or column constraint), these parts remain unchanged.You cannot MODIFY column definitions of index-organized tables. See also "Modifying Column Definitions". |
|
|
|
column |
is the name of the column to be added or modified. |
|
|
datatype |
specifies a datatype for a new column or a new datatype for an existing column. You can omit the datatype only if the statement also designates the column as part of the foreign key of a referential integrity constraint. Oracle automatically assigns the column the same datatype as the corresponding column of the referenced key of the referential integrity constraint. |
|
|
DEFAULT |
specifies a default value for a new column or a new default for an existing column. Oracle assigns this value to the column if a subsequent INSERT statement omits a value for the column. If you are adding a new column to the table and specify the default value, Oracle inserts the default column value into all rows of the table. The datatype of the default value must match the datatype specified for the column. The column must also be long enough to hold the default value. A DEFAULT expression cannot contain references to other columns, the pseudocolumns CURRVAL, NEXTVAL, LEVEL, and ROWNUM, or date constants that are not fully specified. |
|
|
column_constraint |
adds or removes a NOT NULL constraint to or from an existing column. See the syntax of column_constraint in the CONSTRAINT clause. |
|
|
table_constraint |
adds an integrity constraint to the table. See the syntax of table_constraint in the CONSTRAINT clause. See also "REFs". |
|
modify_default_attributes_clause |
is a valid option only for partitioned tables. Use this option to specify new values for the default attributes of a partitioned table. |
|
|
physical_attributes_clause |
changes the value of PCTFREE, PCTUSED, INITRANS, and MAXTRANS parameters for the table, partition, the overflow data segment, or the default characteristics of a partitioned table. See the PCTFREE, PCTUSED, INITRANS, and MAXTRANS parameters of CREATE TABLE. |
|
|
|
storage_clause |
changes the storage characteristics of the table, partition, overflow data segment, or the default characteristics of a partitioned table. See the STORAGE clause. |
|
PCTTHRESHOLD |
specifies the percentage of space reserved in the index block for an index-organized table row. Any portion of the row that exceeds the specified threshold is stored in the overflow area. If OVERFLOW is not specified, then rows exceeding the THRESHOLD limit are rejected. PCTTHRESHOLD must be a value from 0 to 50. |
|
|
|
INCLUDING column_name |
specifies a column at which to divide an index-organized table row into index and overflow portions. All columns that follow column_name are stored in the overflow data segment. A column_name is either the name of the last primary key column or any non-primary-key column. |
|
|
OVERFLOW |
specifies the overflow data segment physical storage attributes to be modified for the index-organized table. Parameters specified in this clause are only applicable to the overflow data segment. See CREATE TABLE. |
|
|
ADD OVERFLOW |
adds an overflow data segment to the specified index-organized table. |
|
|
See also "Index-Organized Tables". |
|
|
LOB |
specifies the LOB storage characteristics for the newly added LOB column. You cannot use this clause to modify an existing LOB column. |
|
|
lob_item |
is the LOB column name or LOB object attribute for which you are explicitly defining tablespace and storage characteristics that are different from those of the table. |
|
|
STORE AS |
|
|
|
|
lob_segname |
specifies the name of the LOB data segment. You cannot use lob_segname if more than one lob_item is specified. |
|
|
ENABLE STORAGE IN ROW |
specifies that the LOB value is stored in the row (inline) if its length is less than approximately 4000 bytes minus system control information. This is the default. |
|
|
DISABLE STORAGE IN ROW |
specifies that the LOB value is stored outside of the row regardless of the length of the LOB value. |
|
|
Note that the LOB locator is always stored in the row regardless of where the LOB value is stored. You cannot change the STORAGE IN ROW once it is set. |
|
|
|
CHUNK integer |
specifies the number of bytes to be allocated for LOB manipulation. If integer is not a multiple of the database block size, Oracle rounds up (in bytes) to the next multiple. For example, if the database block size is 2048 and integer is 2050, Oracle allocates 4096 bytes (2 blocks).The maximum value is 32768 (32 K), which is the largest Oracle block size allowed. Note: The value of CHUNK must be less than or equal to the values of both INITIAL and NEXT (either the default values or those specified in the storage clause). If CHUNK exceeds the value of either INITIAL or NEXT, Oracle returns an error. |
|
|
PCTVERSION integer |
is the maximum percentage of overall LOB storage space used for creating new versions of the LOB. The default value is 10, meaning that older versions of the LOB data rae not overwritten until 10% of the overall LOB storage space is used. |
|
|
INDEX lob_index_name |
is the name of the LOB index segment. You cannot use lob_index_name if more than one lob_item is specified. |
|
MODIFY LOB (lob_item) |
modifies the physical attributes of the LOB attribute lob_item or LOB object attribute. You can only specify one LOB column for each MODIFY LOB clause. See also "LOB Columns". |
|
|
|
||
|
|
specifies storage_table as the name of the storage table in which the rows of all nested_item values reside. You must include this clause when modifying a table with columns or column attributes whose type is a nested table. |
|
|
|
The nested_item is the name of a column or a column-qualified attribute whose type is a nested table. |
|
|
|
The storage_table is the name of the storage table. The storage table is modified in the same schema and the same tablespace as the parent table. See also "Nested Table Columns". |
|
|
drop_clause |
drops an integrity constraint. See the DROP clause. |
|
|
ALLOCATE EXTENT |
explicitly allocates a new extent for the table, the partition, the overflow data segment, the LOB data segment, or the LOB index. |
|
|
|
SIZE |
specifies the size of the extent in bytes. You can use K or M to specify the extent size in kilobytes or megabytes. If you omit this parameter, Oracle determines the size based on the values of the table's overflow data segment's, or LOB index's STORAGE parameters. |
|
|
DATAFILE |
specifies one of the datafiles in the tablespace of the table, overflow data segment, LOB data tablespace, or LOB index to contain the new extent. If you omit this parameter, Oracle chooses the datafile. |
|
|
INSTANCE |
makes the new extent available to the freelist group associated with the specified instance. If the instance number exceeds the maximum number of freelist groups, the former is divided by the latter, and the remainder is used to identify the freelist group to be used. An instance is identified by the value of its initialization parameter INSTANCE_NUMBER. If you omit this parameter, the space is allocated to the table, but is not drawn from any particular freelist group. Rather, the master freelist is used, and space is allocated as needed. For more information, see Oracle8 Concepts. Use this parameter only if you are using Oracle with the Parallel Server option in parallel mode. |
|
|
Explicitly allocating an extent with this clause does affect the size for the next extent to be allocated as specified by the NEXT and PCTINCREASE storage parameters. |
|
|
DEALLOCATE UNUSED |
explicitly deallocates unused space at the end of the table, partition, overflow data segment, LOB data segment, or LOB index and makes the space available for other segments. You can free only unused space above the high-water mark. If KEEP is omitted, all unused space is freed. For more information, see DEALLOCATE UNUSED clause. |
|
|
|
KEEP |
specifies the number of bytes above the high-water mark that the table, overflow data segment, LOB data segment, or LOB index will have after deallocation. If the number of remaining extents are less than MINEXTENTS, then MINEXTENTS is set to the current number of extents. If the initial extent becomes smaller than INITIAL, then INITIAL is set to the value of the current initial extent. |
|
enable_clause |
enables a single integrity constraint or all triggers associated with the table. See the ENABLE clause. |
|
|
CACHE |
for data that is accessed frequently, specifies that the blocks retrieved for this table are placed at the most recently used end of the LRU list in the buffer cache when a full table scan is performed. This option is useful for small lookup tables. CACHE is not a valid option for index-organized tables. |
|
|
NOCACHE |
for data that is not accessed frequently, specifies that the blocks retrieved for this table are placed at the least recently used end of the LRU list in the buffer cache when a full table scan is performed. For LOBs, the LOB value is either not brought into the buffer cache or brought into the buffer cache and placed at the least recently used end of the LRU list. (The latter is the default behavior.) |
|
|
|
NOCACHE is not a valid option for index-organized tables. |
|
|
LOGGING/NOLOGGING |
LOGGING/NOLOGGING specifies that subsequent Direct Loader (SQL*Loader) and direct-load INSERT operations against a nonpartitioned table, table partition, or all partitions of a partitioned table will be logged (LOGGING) or not logged (NOLOGGING) in the redo log file. When used with the modify_default_attributes_clause, this option affects the logging attribute of a partitioned table. |
|
|
|
LOGGING/NOLOGGING also specifies whether ALTER TABLE...MOVE and ALTER TABLE...SPLIT operations will be logged or not logged. |
|
|
|
In NOLOGGING mode, data is modified with minimal logging (to mark new extents invalid and to record dictionary changes). When applied during media recovery, the extent invalidation records mark a range of blocks as logically corrupt, because the redo data is not logged. Therefore, if you cannot afford to lose this table, it is important to take a backup after the NOLOGGING operation. |
|
|
|
If the database is run in ARCHIVELOG mode, media recovery from a backup taken before the LOGGING operation will restore the table. However, media recovery from a backup taken before the NOLOGGING operation will not restore the table. |
|
|
|
The logging attribute of the base table is independent of that of its indexes. |
|
|
|
For more information about the LOGGING option and Parallel DML, see Oracle8 Parallel Server Concepts and Administration. |
|
|
|
NOLOGGING is not a valid keyword for altering index-organized tables. |
|
|
RENAME TO |
renames table to new_table_name. |
|
|
partitioning_clauses |
See also "Modifying Table Partitions". |
|
|
MODIFY PARTITION [table partitions] |
modifies the real physical attributes of a table partition partition_name. You can specify any of the following as new physical attributes for the partition: the logging attribute; PCTFREE, PCTUSED, INITRANS, or MAXTRANS parameter; or storage parameters. |
|
|
MODIFY PARTITION [index partitions] |
modifies the attributes of an index partition partition_name. Note that you cannot specify the following options with clauses of the MODIFY PARTITION [table partitions] option. |
|
|
|
UNUSABLE LOCAL INDEXES |
marks all the local index partitions associated with partition_name as unusable. |
|
|
REBUILD UNUSABLE LOCAL INDEXES |
rebuilds the unusable local index partitions associated with partition_name. |
|
RENAME PARTITION |
renames table partition current_name to new_name. |
|
|
MOVE PARTITION |
moves table partition partition_name to another segment. You can move partition data to another tablespace, recluster data to reduce fragmentation, or change a create-time physical attribute. |
|
|
ADD PARTITION |
adds a new partition new_partition_name to the "high" end of a partitioned table. You can specify any of the following as new physical attributes for the partition: the logging attribute; the PCTFREE, PCTUSED, INITRANS, or MAXTRANS parameter; or storage parameters. |
|
|
|
VALUES LESS THAN (value_list) |
specifies the upper bound for the new partition. The value_list is a comma-separated, ordered list of literal values corresponding to column_list. The value_list must collate greater than the partition bound for the highest existing partition in the table. |
|
DROP PARTITION |
removes partition partition_name, and the data in that partition, from a partitioned table. |
|
|
TRUNCATE PARTITION |
removes all rows from the partition partition_name in a table. |
|
|
|
DROP STORAGE |
specifies that space from the deleted rows be deallocated and made available for use by other schema objects in the tablespace. |
|
|
REUSE STORAGE |
specifies that space from the deleted rows remains allocated to the partition. The space is subsequently available only for inserts and updates to the same partition. |
|
SPLIT PARTITION |
from an original partition partition_name_old, creates two new partitions, each with a new segment and new physical attributes, and new initial extents. The segment associated with partition_name_old is discarded. |
|
|
|
AT (value_list) |
specifies the new noninclusive upper bound for split_partition_1. The value_list must compare less than the pre-split partition bound for partition_name_old and greater than the partition bound for the next lowest partition (if there is one). |
|
|
INTO |
describes the two partitions resulting from the split. |
|
|
partition_description, partition_description |
specifies optimal names and physical attributes of the two partitions resulting from the split. |
|
EXCHANGE PARTITION |
converts partition partition_name into a nonpartitioned table, and a nonpartitioned table into a partition of a partitioned table by exchanging their data (and index) segments. The default behavior is EXCLUDING INDEXES WITH VALIDATION. |
|
|
|
WITH TABLE table |
specifies the table with which the partition will be exchanged. |
|
|
INCLUDING INDEXES |
specifies that the local index partitions be exchanged with the corresponding regular indexes. |
|
|
EXCLUDING INDEXES |
specifies that all the local index partitions corresponding to the partition and all the regular indexes on the exchanged table are marked as unusable. |
|
|
WITH VALIDATION |
specifies that any rows in the exchanged table that do not collate properly return an error. |
|
|
WITHOUT VALIDATION |
specifies that the proper collation of rows in the exchanged table is not checked. |
|
parallel_clause |
specifies the degree of parallelism for the table. PARALLEL is not a valid option for index-organized tables. See the PARALLEL clause. |
|
|
|
ENABLE TABLE LOCK |
enables DML and DDL locks on a table in a parallel server environment. For more information, see Oracle8 Parallel Server Concepts and Administration. |
|
|
disable_clause |
disables a single integrity constraint or all triggers associated with the tables. See the DISABLE clause. |
|
|
|
Integrity constraints specified in DISABLED clauses must be defined in the ALTER TABLE statements or in a previously issued statement. You can also enable and disable integrity constraints with the ENABLE and DISABLE keywords of the CONSTRAINT clause. If you define an integrity constraint but do not explicitly enable or disable it, Oracle enables it by default. |
|
|
DISABLE TABLE LOCK |
disables DML and DDL locks on a table to improve performance in a parallel server environment. For more information, see Oracle8 Parallel Server Concepts and Administration. |
If you use the ADD clause to add a new column to the table, then the initial value of each row for the new column is null. You can add a column with a NOT NULL constraint only to a table that contains no rows.
If you create a view with a query that uses the asterisk (*) in the select list to select all columns from the base table and you subsequently add columns to the base table, Oracle will not automatically add the new column to the view. To add the new column to the view, you can re-create the view using the CREATE VIEW command with the OR REPLACE option.
Operations performed by the ALTER TABLE command can cause Oracle to invalidate procedures and stored functions that access the table. For information on how and when Oracle invalidates such objects, see Oracle8 Concepts.
You can use the MODIFY clause to change any of the following parts of a column definition: datatype, size, default value, or NOT NULL column constraint.
The MODIFY clause need only specify the column name and the modified part of the definition, rather than the entire column definition.
You can change a CHAR column to VARCHAR2 (or VARCHAR) and a VARCHAR2 (or VARCHAR) to CHAR only if the column contains nulls in all rows or if you do not attempt to change the column size. You can change any column's datatype or decrease any column's size if all rows for the column contain nulls. However, you can always increase the size of a character or raw column or the precision of a numeric column.
You cannot change a column's datatype to a LOB or REF datatype.
A change to a column's default value only affects rows subsequently inserted into the table. Such a change does not change default values previously inserted.
To discontinue previously specified default values, so that they are no longer automatically inserted into newly added rows, replace the values with nulls, as shown in this example:
ALTER TABLE accounts
   MODIFY (bal DEFAULT NULL);
This statement has no effect on any existing values in existing rows.
The only type of integrity constraint that you can add to an existing column using the MODIFY clause with the column constraint syntax is a NOT NULL constraint. However, you can define other types of integrity constraints (UNIQUE, PRIMARY KEY, referential integrity, and CHECK constraints) on existing columns using the ADD clause and the table constraint syntax.
You can define a NOT NULL constraint on an existing column only if the column contains no nulls.
The following statement adds a column named THRIFTPLAN of datatype NUMBER with a maximum of seven digits and two decimal places and a column named LOANCODE of datatype CHAR with a size of one and a NOT NULL integrity constraint:
ALTER TABLE emp
   ADD (thriftplan NUMBER(7,2),
        loancode CHAR(1) NOT NULL);
The following statement increases the size of the THRIFTPLAN column to nine digits:
ALTER TABLE emp
   MODIFY (thriftplan NUMBER(9,2));
Because the MODIFY clause contains only one column definition, the parentheses around the definition are optional.
The following statement changes the values of the PCTFREE and PCTUSED parameters for the EMP table to 30 and 60, respectively:
ALTER TABLE emp
    PCTFREE 30
    PCTUSED 60;
The following statement allocates an extent of 5 kilobytes for the EMP table and makes it available to instance 4:
ALTER TABLE emp
  ALLOCATE EXTENT (SIZE 5K INSTANCE 4);
Because this command omits the DATAFILE parameter, Oracle allocates the extent in one of the datafiles belonging to the tablespace containing the table.
This example modifies the BAL column of the ACCOUNTS table so that it has a default value of 0:
ALTER TABLE accounts
  MODIFY (bal  DEFAULT 0);
If you subsequently add a new row to the ACCOUNTS table and do not specify a value for the BAL column, the value of the BAL column is automatically 0:
INSERT INTO accounts(accno, accname)
  VALUES (accseq.nextval, 'LEWIS')
  SELECT *
    FROM accounts
    WHERE accname = 'LEWIS';

ACCNO  ACCNAME BAL
------ ------- ---
815234  LEWIS     0
Index-organized tables are special kinds of tables that keep data sorted on the primary key and are therefore best suited for primary-key-based access and manipulation.
You cannot ADD columns to an index-organized table, but you can alter the definition of an index-organized table.
This example modifies the INITRANS parameter for the index segment of index-organized table DOCINDEX:
ALTER TABLE docindex INITRANS 4;
The following statement adds an overflow data segment to index-organized table DOCINDEX:
ALTER TABLE docindex ADD OVERFLOW;
This example modifies the INITRANS parameter for the overflow data segment of index-organized table DOCINDEX:
ALTER TABLE docindex OVERFLOW INITRANS 4;
You can add a LOB column to a table, or modify the LOB data segment or index storage characteristics.
The following statement adds CLOB column RESUME to the EMPLOYEE table:
ALTER TABLE employee ADD (resume CLOB)
  LOB (resume) STORE AS resume_seg (TABLESPACE resume_ts);
To modify the LOB column RESUME to use caching, enter the following statement:
ALTER TABLE employee MODIFY LOB (resume) (CACHE);
 Nested Table Columns
You can add a nested table type column to a table. Specify a nested table storage clause for each column added.
The following example adds the nested table column SKILLS to the EMPLOYEE table:
ALTER TABLE employee ADD (skills skill_table_type)
    NESTED TABLE skills STORE AS nested_skill_table;
You can also modify a nested table's storage characteristics. Use the name of the storage table specified in the nested table storage clause to make the modification. You cannot query or perform DML statements on the storage table; only use the storage table to modify the nested table column storage characteristics.
 The following example creates table VETSERVICE with nested table column CLIENT and storage table CLIENT_TAB. Nested table VETSERVICE is modified to specify constraints and modify a column length by altering nested storage table CLIENT_TAB:
CREATE TABLE vetservice (vet_name VARCHAR2(30),
                         client   pet_table)
  NESTED TABLE client STORE AS client_tab;
ALTER TABLE client_tab ADD UNIQUE (ssn);
ALTER TABLE client_tab MODIFY (pet_name VARCHAR2(35));
 The following statement adds a UNIQUE constraint to nested table NESTED_SKILL_TABLE:
ALTER TABLE nested_skill_table ADD UNIQUE (a);
For more information about nested table storage see the CREATE TABLE. For more information about nested tables, see Oracle8 Application Developer's Guide.
The following example alters the storage table for a nested table of REF values to specify that the REF is scoped:
CREATE TYPE emp_t AS OBJECT ( eno number, ename char(31));
CREATE TYPE emps_t AS TABLE OF REF emp_t;
CREATE TABLE emptab OF emp_t;
CREATE TABLE dept (dno NUMBER, employees EMPS_T)
   NESTED TABLE employees STORE AS deptemps;
ALTER TABLE deptemps ADD(SCOPE FOR (column_value) IS emptab);
Similarly, to specify storing the REF with ROWID:
ALTER TABLE deptemps ADD (REF(column_value) WITH ROWID);
Note that in order to execute these ALTER TABLE statements successfully, the storage table DEPTEMPS must be empty. Also, note that because the nested table is defined as a table of scalars (REFs), Oracle implicitly provides the column name COLUMN_VALUE for the storage table.
 REFs
REFsA REF value is a reference to a row in an object table. A table can have top-level REF columns or it can have REF attributes embedded within an object column. In general, if a table has a REF column, each REF value in the column could reference a row in a different object table. A SCOPE clause restricts the scope of references to a single table.
Use the ALTER TABLE command to add new REF columns or to add REF clauses to existing REF columns. You can modify any table, including named inner nested tables (storage tables). If a REF column is created WITH ROWID or with a scope table, you cannot modify the column to drop these options. However, if a table is created without any REF clauses, you can add them later with an ALTER TABLE statement.
Note: You can add a scope clause to existing REF columns of a table only if the table is empty. The scope_table_name must be in your own schema or you must have SELECT privilege on the table, or the SELECT ANY TABLE system privilege. This privilege is needed only while altering the table with the REF column.
In the following example an object type DEPT_T has been previously defined. Now, create table EMP as follows:
CREATE TABLE emp
   (name VARCHAR(100),
    salary NUMBER,
    dept REF dept_t);
An object table DEPARTMENTS is created as:
CREATE TABLE departments OF dept_t;
If the DEPARTMENTS table contains all possible departments, the DEPT column in EMP can only refer to rows in the DEPARTMENTS table. This can be expressed as a scope clause on the DEPT column as follows:
ALTER TABLE emp
    ADD (SCOPE FOR (dept) IS departments);
Note that the above ALTER TABLE statement will succeed only if the EMP table is empty.
If you want the REF values in the DEPT column of EMP to also store the ROWIDs, issue the following statement:
   ALTER TABLE emp
    ADD (REF(dept) WITH ROWID);
You can modify a table or table partition in any of the following ways. You cannot combine partition operations with other partition operations or with operations on the base table in one ALTER TABLE statement.
Use ALTER TABLE ADD PARTITION to add a partition to the high end of the table (after the last existing partition). If the first element of the partition bound of the high partition is MAXVALUE, you cannot add a partition to the table. You must split the high partition.
You can add a partition to a table even if one or more of the table indexes or index partitions are marked UNUSABLE.
You must use the SPLIT PARTITION clause to add a partition at the beginning or the middle of the table.
The following example adds partition JAN97 to tablespace TSX:
ALTER TABLE sales
  ADD PARTITION jan97 VALUES LESS THAN( '970201' )
  TABLESPACE tsx;
ALTER TABLE DROP PARTITION drops a partition and its data. If you want to drop a partition but keep its data in the table, you must merge the partition into one of the adjacent partitions. For information about merging two tables partitions, see the Oracle8 Administrator's Guide.
If you drop a partition and later insert a row that would have belonged to the dropped partition, the row will be stored in the next higher partition. However, if you drop the highest partition, the insert will fail because the range of values represented by the dropped partition is no longer valid for the table.
This statement also drops the corresponding partition in each local index defined on table. The index partitions are dropped even if they are marked as unusable.
If there are global indexes defined on table, and the partition you want to drop is not empty, dropping the partition marks all the global, nonpartitioned indexes and all the partitions of global partitioned indexes as unusable.
When a table contains only one partition, you cannot drop the partition. You must drop the table.
The following example drops partition DEC95:
ALTER TABLE sales DROP PARTITION dec95;
This form of ALTER TABLE converts a partition to a nonpartitioned table and a NONPARTITIONED table to a partition by exchanging their data segments. You must have ALTER TABLE privileges on both tables to perform this operation.
The statistics of the table and partition-including table, column, index statistics and histograms-are exchanged. The aggregate statistics of the partitioned table are recalculated.
The logging attribute of the table and partition is exchanged.
The following example converts partition FEB97 to table SALES_FEB97 without exchanging local index partitions with corresponding indexes on SALES_FEB97 and without verifying that data in SALES_FEB97 falls within the bounds of partition FEB97:
ALTER TABLE sales
  EXCHANGE PARTITION feb97 WITH TABLE sales_feb97
   WITHOUT VALIDATION;
Use the MODIFY PARTITION options of ALTER TABLE to
The following example marks all the local index partitions corresponding to the NOV96 partition of the SALES table UNUSABLE:
ALTER TABLE sales MODIFY PARTITION nov96
  UNUSABLE LOCAL INDEXES;
The following example rebuilds all the local index partitions that were marked UNUSABLE:
ALTER TABLE sales MODIFY PARTITION jan97
  REBUILD UNUSABLE LOCAL INDEXES;
The following example changes MAXEXTENTS and logging attribute for partition BRANCH_NY:
ALTER TABLE branch MODIFY PARTITION branch_ny
  STORAGE(MAXEXTENTS 75) LOGGING;
This ALTER TABLE option moves a table partition to another segment. MOVE PARTITION always drops the partition's old segment and creates a new segment, even if you do not specify a new tablespace.
If partition partition_name is not empty, MOVE PARTITION marks all corresponding local index partitions and all global nonpartitioned indexes, and all the partitions of global partitioned indexes as unusable.
ALTER TABLE MOVE PARTITION obtains its parallel attribute from the PARALLEL clause, if specified. If not specified, the default PARALLEL attributes of the table, if any, are used. If neither is specified, it performs the move without using parallelism.
The PARALLEL clause on MOVE PARTITION does not change the default PARALLEL attributes of table.
The following example moves partition DEPOT2 to tablespace TS094:
ALTER TABLE parts
  MOVE PARTITION depot2 TABLESPACE ts094 NOLOGGING;
Use the RENAME option of ALTER TABLE to rename a table or to rename a partition.
The following example renames a table:
ALTER TABLE emp RENAME TO employee;
In the following example, partition EMP3 is renamed:
ALTER TABLE employee RENAME PARTITION emp3 TO employee3;
The SPLIT PARTITION option divides a partition into two partitions. A new segment is allocated for each partition resulting from the split. The attributes of the new partitions are inherited from the partition that was split, except for attributes whose values you explicitly override in the SPLIT clause. The segment associated with the old partition is discarded.
This statement also performs a matching split on the corresponding partition in each local index defined on table. The index partitions are split even if they are marked unusable.
With the exception of the TABLESPACE attribute, the physical attributes of the LOCAL index partition being split are used for both new index partitions. If the parent LOCAL index lacks a default TABLESPACE attribute, new LOCAL index partitions will reside in the same tablespace as the corresponding newly created partitions of the underlying table.
If you do not specify physical attributes (PCTFREE, PCTUSED, INITRANS, MAXTRANS, STORAGE) for the new partitions, the current values of the partition being split are used as the default values for both partitions.
If partition_name is not empty, SPLIT PARTITION marks all affected index partitions as unusable. This includes all global index partitions as well as the local index partitions that result from the split.
The PARALLEL clause on SPLIT PARTITION does not change the default PARALLEL attributes of table.
The following example splits the old partition DEPOT4, creating two new partitions, naming one DEPOT9 and reusing the name of the old partition for the other:
ALTER TABLE parts
  SPLIT PARTITION depot4 AT ( '40-001' )
  INTO ( PARTITION depot4 TABLESPACE ts009 (MINEXTENTS 2),
         PARTITION depot9 TABLESPACE ts010 )
  PARALLEL ( DEGREE 10 );
Use TRUNCATE PARTITION to remove all rows from a partition in a table. Freed space is deallocated or reused depending on whether DROP STORAGE or REUSE STORAGE is specified in the clause.
This statement truncates the corresponding partition in each local index defined on table. The local index partitions are truncated even if they are marked as unusable. The unusable local index partitions are marked valid, resetting the UNUSABLE indicator.
If any global indexes are defined on table, and the partition you want to truncate is not empty, truncating the partition marks all the global nonpartitioned indexes and all the partitions of global partitioned indexes as unusable.
If you want to truncate a partition that contains data, you must first disable any referential integrity constraints on the table. Alternatively, you can delete the rows and then truncate the partition.
The following example deletes all the data in the SYS_P017 partition and deallocates the freed space:
ALTER TABLE deliveries
  TRUNCATE PARTITION sys_p017 DROP STORAGE;
For examples of defining integrity constraints with the ALTER TABLE command, see the CONSTRAINT clause.
For examples of enabling, disabling, and dropping integrity constraints and triggers with the ALTER TABLE command, see the ENABLE clause, the DISABLE clause, and the DROP clause.
For examples of changing the value of a table's storage parameters, see the STORAGE clause.
To alter an existing tablespace in one of the following ways:
See also "Using ALTER TABLESPACE".
If you have ALTER TABLESPACE system privilege, you can perform any of this command's operations. If you have MANAGE TABLESPACE system privilege, you can only perform the following operations:
Before you can make a tablespace read-only, the following conditions must be met. Performing this function in restricted mode may help you meet these restrictions, since only users with RESTRICTED SESSION system privilege can be logged on.

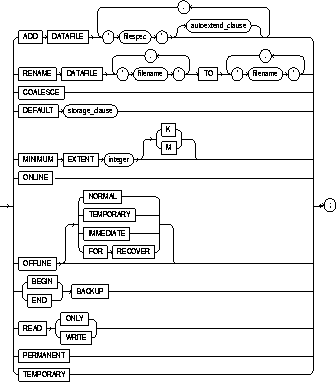
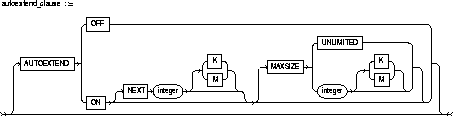
filespec: See "Filespec".
storage_clause: See STORAGE clause.
|
tablespace |
is the name of the tablespace to be altered. |
|
|
LOGGING/ NOLOGGING |
specifies the default logging attribute of all tables, indexes, and partitions within the tablespace. The tablespace-level logging attribute can be overridden by logging specifications at the table, index, and partition levels. |
|
|
|
When an existing tablespace logging attribute is changed by an ALTER TABLESPACE statement, all tables, indexes, and partitions created after the statement will have the new default logging attribute (which you can still subsequently override); the logging attributes of existing objects are not changed. |
|
|
|
Only the following operations support NOLOGGING mode: |
|
|
|
||
|
|
In NOLOGGING mode, data is modified with minimal logging (to mark new extents invalid and to record dictionary changes). When applied during media recovery, the extent invalidation records mark a range of blocks as logically corrupt, because the redo data is not logged. Therefore, if you cannot afford to lose the object, it is important to take a backup after the NOLOGGING operation. |
|
|
ADD DATAFILE |
adds the datafile specified by filespec to the tablespace. (See the syntax description of Filespec). You can add a datafile while the tablespace is online or offline. Be sure that the datafile is not already in use by another database. |
|
|
AUTOEXTEND |
enables or disables the autoextending of the size of the datafile in the tablespace. |
|
|
|
OFF |
disables autoextend if it is turned on. NEXT and MAXSIZE are set to zero. Values for NEXT and MAXSIZE must be respecified in further ALTER TABLESPACE AUTOEXTEND commands. |
|
|
ON |
enables autoextend. |
|
|
NEXT |
specifies the size in bytes of the next increment of disk space to be allocated automatically to the datafile when more extents are required. You can use K or M to specify this size in kilobytes or megabytes. The default is one data block. |
|
|
MAXSIZE |
specifies maximum disk space allowed for automatic extension of the datafile. |
|
|
UNLIMITED |
sets no limit on allocating disk space to the datafile. |
|
RENAME DATAFILE |
renames one or more of the tablespace's datafiles. Take the tablespace offline before renaming the datafile. Each 'filename' must fully specify a datafile using the conventions for filenames on your operating system. |
|
|
|
This clause only associates the tablespace with the new file rather than the old one. This clause does not actually change the name of the operating system file. You must change the name of the file through your operating system. |
|
|
COALESCE |
for each datafile in the tablespace, coalesces all contiguous free extents into larger contiguous extents. |
|
|
|
COALESCE cannot be specified with any other command option. |
|
|
DEFAULT storage_clause |
specifies the new default storage parameters for objects subsequently created in the tablespace. See the STORAGE clause. |
|
|
MINIMUM EXTENT integer |
controls free space fragmentation in the tablespace by ensuring that every used and/or free extent size in a tablespace is at least as large as, and is a multiple of, integer. For more information about using MINIMUM EXTENT to control space fragmentation, see Oracle8 Administrator's Guide. |
|
|
ONLINE |
brings the tablespace online. |
|
|
OFFLINE |
takes the tablespace offline and prevents further access to its segments. |
|
|
|
NORMAL |
performs a checkpoint for all datafiles in the tablespace. All of these datafiles must be online. This is the default. You need not perform media recovery on this tablespace before bringing it back online. You must use this option if the database is in NOARCHIVELOG mode. |
|
|
TEMPORARY |
performs a checkpoint for all online datafiles in the tablespace but does not ensure that all files can be written. Any offline files may require media recovery before you bring the tablespace back online. |
|
|
IMMEDIATE |
does not ensure that tablespace files are available and does not perform a checkpoint. You must perform media recovery on the tablespace before bringing it back online. |
|
|
FOR RECOVER |
takes the production database tablespaces in the recovery set offline. Use this option when one or more datafiles in the tablespace are unavailable. |
|
Suggestion: Before taking a tablespace offline for a long time, you may want to alter any users who have been assigned the tablespace as either a default or temporary tablespace. When the tablespace is offline, these users cannot allocate space for objects or sort areas in the tablespace. You can reassign to such users new default and temporary tablespaces with the ALTER USER command. |
||
|
BEGIN BACKUP |
signifies that an open backup is to be performed on the datafiles that make up this tablespace. This option does not prevent users from accessing the tablespace. You must use this option before beginning an open backup. You cannot use this option on a read-only tablespace. |
|
|
|
Note: While the backup is in progress, you cannot: take the tablespace offline normally, shutdown the instance, or begin another backup of the tablespace. |
|
|
END BACKUP |
signifies that an open backup of the tablespace is complete. Use this option as soon as possible after completing an open backup. You cannot use this option on a read-only tablespace. If you forget to indicate the end of an online tablespace backup, and an instance failure or SHUTDOWN ABORT occurs, Oracle assumes that media recovery (possibly requiring archived redo log) is necessary at the next instance start up. To restart the database without media recovery, see Oracle8 Administrator's Guide. |
|
|
READ ONLY |
signifies that no further write operations are allowed on the tablespace. The tablespace becomes read only. Once a tablespace is read-only, you can copy its files to read-only media. You must then rename the datafiles in the control file to point to the new location by using the SQL command ALTER DATABASE RENAME. |
|
|
READ WRITE |
signifies that write operations are allowed on a previously read-only tablespace. |
|
|
PERMANENT |
specifies that the tablespace is to be converted from a temporary to a permanent one. A permanent tablespace is one wherein permanent database objects can be stored. This is the default when a tablespace is created. |
|
|
TEMPORARY |
specifies that the tablespace is to be converted from a permanent to a temporary one. A temporary tablespace is one in which no permanent database objects can be stored. |
|
The following examples illustrate the use of the ALTER TABLESPACE COMMAND.
The following statement signals to the database that a backup is about to begin:
ALTER TABLESPACE accounting
    BEGIN BACKUP;
The following statement signals to the database that the backup is finished:
ALTER TABLESPACE accounting
    END BACKUP;
This example moves and renames a datafile associated with the ACCOUNTING tablespace from 'DISKA:PAY1.DAT' to 'DISKB:RECEIVE1.DAT':
ALTER TABLESPACE accounting OFFLINE NORMAL;
ALTER TABLESPACE accounting
  RENAME DATAFILE 'diska:pay1.dbf'
  TO     'diskb:receive1.dbf';
ALTER TABLESPACE accounting ONLINE;
The following statement adds a datafile to the tablespace and changes the default logging attribute to NOLOGGING; when more space is needed new extents of size 10 kilobytes will be added up to a maximum of 100 kilobytes:
ALTER TABLESPACE accounting NOLOGGING
    ADD DATAFILE 'disk3:pay3.dbf'
    AUTOEXTEND ON
    NEXT 10 K
    MAXSIZE 100 K;
Altering a tablespace logging attribute has no affect on the logging attributes of the existing schema objects within the tablespace. The tablespace-level logging attribute can be overridden by logging specifications at the table, index, and partition levels.
The following statement changes the allocation of every extent of TABSPACE_ST to a multiple of 128K:
ALTER TABLESPACE tabspace_st MINIMUM EXTENT 128K;
To enable, disable, or compile a database trigger.
The trigger must be in your own schema or you must have ALTER ANY TRIGGER system privilege.
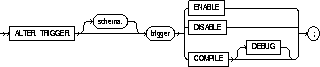
|
schema |
is the schema containing the trigger. If you omit schema, Oracle assumes the trigger is in your own schema. |
|
|
trigger |
is the name of the trigger to be altered. See also "Invalid Triggers". |
|
|
ENABLE |
enables the trigger. See also "Enabling and Disabling Triggers". |
|
|
DISABLE |
disables the trigger. See also "Enabling and Disabling Triggers". |
|
|
COMPILE |
compiles the trigger. |
|
|
|
DEBUG |
instructs the PL/SQL compiler to generate and store the code for use by the PL/SQL debugger. This option can be used for normal triggers and for instead-of triggers. |
You can use the ALTER TRIGGER command to explicitly recompile a trigger that is invalid. Explicit recompilation eliminates the need for implicit run-time recompilation and prevents associated run-time compilation errors and performance overhead.
When you issue an ALTER TRIGGER statement, Oracle recompiles the trigger regardless of whether it is valid or invalid.
When you recompile a trigger, Oracle first recompiles objects upon which the trigger depends, if any of these objects are invalid. If Oracle recompiles the trigger successfully, the trigger becomes valid. If recompiling the trigger results in compilation errors, then Oracle returns an error and the trigger remains invalid. You can then debug triggers using the predefined package DBMS_OUTPUT. For information on debugging procedures, see Oracle8 Application Developer's Guide. For information on how Oracle maintains dependencies among schema objects, including remote objects, see Oracle8 Concepts.
A database trigger is always either enabled or disabled. If a trigger is enabled, Oracle fires the trigger when a triggering statement is issued. If the trigger is disabled, Oracle does not fire the trigger when a triggering statement is issued.
When you create a trigger, Oracle enables it automatically. You can use the ENABLE and DISABLE options of the ALTER TRIGGER command to enable and disable a trigger.
You can also use the ENABLE and DISABLE clauses of the ALTER TABLE command to enable and disable all triggers associated with a table.
Consider a trigger named REORDER created on the INVENTORY table. The trigger is fired whenever an UPDATE statement reduces the number of a particular part on hand below the part's reorder point. The trigger inserts into a table of pending orders a row that contains the part number, a reorder quantity, and the current date.
When this trigger is created, Oracle enables it automatically. You can subsequently disable the trigger with the following statement:
ALTER TRIGGER reorder
    DISABLE;
When the trigger is disabled, Oracle does not fire the trigger when an UPDATE statement causes the part's inventory to fall below its reorder point.
After disabling the trigger, you can subsequently enable it with the following statement:
ALTER TRIGGER reorder
    ENABLE;
After you reenable the trigger, Oracle fires the trigger whenever a part's inventory falls below its reorder point as a result of an UPDATE statement. Note that a part's inventory may have fallen below its reorder point while the trigger was disabled. When you reenable the trigger, Oracle does not automatically fire the trigger for this part until another transaction further reduces the inventory.
 ALTER TYPE
To recompile the specification and/or body, or to change the specification of an object type by adding new object member subprogram specifications.
The object type must be in your own schema and you must have CREATE TYPE or CREATE ANY TYPE system privilege, or you must have ALTER ANY TYPE system privileges.
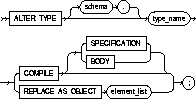

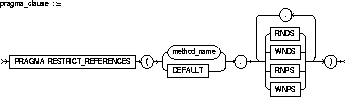
|
schema |
is the schema that contains the type. If you omit schema, Oracle creates the type in your current schema. |
|
|
type_name |
is the name of an object type, a nested table type, or a VARRAY type. |
|
|
COMPILE |
compiles the object type specification and body. This is the default if no option is specified. |
|
|
|
SPECIFICATION |
compiles only the object type specification. |
|
|
BODY |
compiles only the object type body. |
|
REPLACE AS OBJECT |
adds new member subprogram specifications. This option is valid only for object types. |
|
|
attribute_name |
is an object attribute name. Attributes are data items with a name and a type specifier that form the structure of the object. |
|
|
MAP/ORDER MEMBER function_specification |
||
|
|
MAP |
specifies a member function (MAP method) that returns the relative position of a given instance in the ordering of all instances of the object. A map method is called implicitly and induces an ordering of object instances by mapping them to values of a predefined scalar type. PL/SQL uses the ordering to evaluate Boolean expressions and to perform comparisons. |
|
|
|
A scalar value is always manipulated as a single unit. Scalars are mapped directly to the underlying hardware. An integer, for example, occupies 4 or 8 contiguous bytes of storage, in memory or on disk. |
|
|
|
An object specification can contain only one map method, which must be a function. The result type must be a predefined SQL scalar type, and the map function can have no arguments other than the implicit SELF argument. |
|
|
ORDER |
specifies a member function (ORDER method) that takes an instance of an object as an explicit argument and the implicit SELF argument and returns either a negative, zero, or positive integer. The negative, zero, or positive indicates that the implicit SELF argument is less than, equal to, or greater than the explicit argument. |
|
|
|
When instances of the same object type definition are compared in an ORDER BY clause, the order method function_specification is invoked. |
|
|
|
An object specification can contain only one ORDER method, which must be a function having the return type INTEGER. |
|
|
You can declare either a MAP method or an ORDER method, but not both. If you declare either method, you can compare object instances in SQL. |
|
|
|
If you do not declare either method, you can compare object instances only for equality or inequality. Note that instances of the same type definition are equal only if each pair of their corresponding attributes is equal. No comparison method needs to be specified to determine the equality of two object types. For more information about object value comparisons, "Object Values". |
|
|
MEMBER |
specifies a function or procedure subprogram associated with the object type which is referenced as an attribute. For information about overloading subprogram names within a package, see the PL/SQL User's Guide and Reference. See also "Restriction". You must specify a corresponding method body in the object type body for each procedure or function specification. See CREATE TYPE BODY. |
|
|
|
procedure_specification |
is the specification of a procedure subprogram. |
|
|
function_specification |
is the specification of a function subprogram. |
|
PRAGMA RESTRICT_REFERENCES |
is a complier directive that denies member functions read/write access to database tables, packaged variables, or both, and thereby helps to avoid side effects. For more information, see the PL/SQL User's Guide and Reference. |
|
|
|
method_name |
is the name of the MEMBER function or procedure to which the pragma is being applied. |
|
|
WNDS |
specifies constraint writes no database state (does not modify database tables). |
|
|
WNPS |
specifies constraint writes no package state (does not modify packaged variables). |
|
|
RNDS |
specifies constraint reads no database state (does not query database tables). |
|
|
RNPS |
specifies constraint reads no package state (does not reference packages variables). |
You cannot change the existing properties (attributes, member subprograms, map or order functions) of an object type, but you can add new member subprogram specifications.
In the following example, member function QTR is added to the type definition of DATA_T:
CREATE TYPE data_t AS OBJECT
   ( year NUMBER,
     MEMBER FUNCTION prod(invent NUMBER) RETURN NUMBER
   );

   CREATE TYPE BODY data_t IS
      MEMBER FUNCTION prod (invent NUMBER) RETURN NUMBER IS
        BEGIN
           RETURN (year + invent);
        END;
      END;

   ALTER TYPE data_t REPLACE AS OBJECT
   ( year NUMBER,
     MEMBER FUNCTION  prod(invent NUMBER) RETURN NUMBER,
     MEMBER FUNCTION  qtr(der_qtr DATE) RETURN CHAR
   );

   CREATE OR REPLACE TYPE BODY data_t IS
      MEMBER FUNCTION prod (invent NUMBER) RETURN NUMBER IS
        BEGIN
           RETURN (year + invent);
        END;
      MEMBER FUNCTION qtr(der_qtr DATE) RETURN CHAR IS
        BEGIN
           RETURN 'FIRST';
        END;
      END;
The following example recompiles type LOAN_T:
CREATE TYPE loan_t AS OBJECT
  ( loan_num        INTEGER,
    interest_rate   FLOAT,
    amount          FLOAT,
    start_date      DATE,
    end_date        DATE );

ALTER TYPE loan_t COMPILE;
The following example compiles the type body of LINK2:
CREATE TYPE link1 AS OBJECT
  (a NUMBER);

CREATE TYPE link2 AS OBJECT
  (a NUMBER,
   b link1,
   MEMBER FUNCTION p(c1 NUMBER) RETURN NUMBER);

CREATE TYPE BODY link2 AS
   MEMBER FUNCTION p(c1 NUMBER) RETURN NUMBER IS t13 link1;
     BEGIN t13 := link1(13);
      dbms_output.put_line(t13.a);
        RETURN 5;
     END;
END;

CREATE TYPE link3 AS OBJECT (a link2);
CREATE TYPE link4 AS OBJECT (a link3);
CREATE TYPE link5 AS OBJECT (a link4);
ALTER TYPE link2 COMPILE BODY;
The following example compiles the type specification of LINK2:
CREATE TYPE link1 AS OBJECT
  (a NUMBER);

CREATE TYPE link2 AS OBJECT
  (a NUMBER,
   b link1,
   MEMBER FUNCTION p(c1 NUMBER) RETURN NUMBER);

CREATE TYPE BODY link2 AS
    MEMBER FUNCTION p(c1 NUMBER) RETURN NUMBER IS t14 link1;
      BEGIN t14 := link1(14);
      dbms_output.put_line(t14.a);
       RETURN 5;
      END;
END;

CREATE TYPE link3 AS OBJECT (a link2);
CREATE TYPE link4 AS OBJECT (a link3);
CREATE TYPE link5 AS OBJECT (a link4);
ALTER TYPE link2 COMPILE SPECIFICATION;
To change any of the following characteristics of a database user:
You must have the ALTER USER system privilege. However, you can change your own password without this privilege.
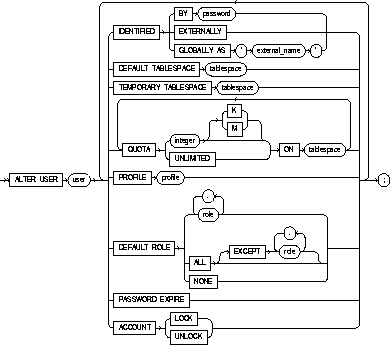
The keywords and parameters in the ALTER USER command all have the same meaning as in the CREATE USER command. For information on these keywords and parameters, see CREATE USER.
For more information on default roles, see "Establishing Default Roles". For more information on security domains, see "Changing Authentication Methods".
The DEFAULT ROLE clause can only contain roles that have been granted directly to the user with a GRANT statement. You cannot use the DEFAULT ROLE clause to enable:
Note that Oracle enables default roles at logon without requiring the user to specify their passwords.
The following statement changes the user SCOTT's password to LION and default tablespace to the tablespace TSTEST:
ALTER USER scott
    IDENTIFIED BY lion
    DEFAULT TABLESPACE tstest;
The following statement assigns the CLERK profile to SCOTT:
ALTER USER scott
    PROFILE clerk;
In subsequent sessions, SCOTT is restricted by limits in the CLERK profile.
The following statement makes all roles granted directly to SCOTT default roles, except the AGENT role:
ALTER USER scott
    DEFAULT ROLE ALL EXCEPT agent;
At the beginning of SCOTT's next session, Oracle enables all roles granted directly to SCOTT except the AGENT role.
You can change a user's access verification method to IDENTIFIED GLOBALLY AS 'external_name' only if all external roles granted directly to the user are revoked.
You can change a user created as IDENTIFIED GLOBALLY AS 'external_name' to IDENTIFIED BY password or IDENTIFIED EXTERNALLY.
The following example changes user TOM's authentication mechanism:
ALTER USER tom IDENTIFIED GLOBALLY AS 'CN=tom';
The following example causes user FRED's password to expire:
ALTER USER fred PASSWORD EXPIRE;
If you cause a database user's password to expire with PASSWORD EXPIRE, the user must change the password before attempting to log in to the database following the expiration. However, tools such as SQL*Plus allow you to change the password on the first attempted login following the expiration.
To recompile a view or an object view. See also "Recompiling Views".
The view must be in your own schema or you must have ALTER ANY TABLE system privilege.

You can use the ALTER VIEW command to explicitly recompile a view that is invalid. Explicit recompilation allows you to locate recompilation errors before run time. You may want to explicitly recompile a view after altering one of its base tables to ensure that the alteration does not affect the view or other objects that depend on it.
When you issue an ALTER VIEW statement, Oracle recompiles the view regardless of whether it is valid or invalid. Oracle also invalidates any local objects that depend on the view. For more about dependencies among schema objects, see Oracle8 Concepts.
|
Note: This command does not change the definition of an existing view. To redefine a view, you must use the CREATE VIEW command with the OR REPLACE option. |
To recompile the view CUSTOMER_VIEW, issue the following statement:
ALTER VIEW customer_view
    COMPILE;
If Oracle encounters no compilation errors while recompiling CUSTOMER_VIEW, CUSTOMER_VIEW becomes valid. If recompiling results in compilation errors, Oracle returns an error and CUSTOMER_VIEW remains invalid.
Oracle also invalidates all dependent objects. These objects include any procedures, functions, package bodies, and views that reference CUSTOMER_VIEW. If you subsequently reference one of these objects without first explicitly recompiling it, Oracle recompiles it implicitly at run time.
To perform one of the following functions on an index or index partition, table or table partition, index-organized table, or cluster:
 collect statistics on scalar object attributes
 validate and update object references (REFs)
The schema object to be analyzed must be in your own schema or you must have the ANALYZE ANY system privilege.
If you want to list chained rows of a table or cluster into a list table, the list table must be in your own schema, or you must have INSERT privilege on the list table, or you must have INSERT ANY TABLE system privilege. If you want to validate a partitioned table, you must have INSERT privilege on the table into which you list analyzed ROWIDS, or you must have INSERT ANY TABLE system privilege.
See also "Restrictions".

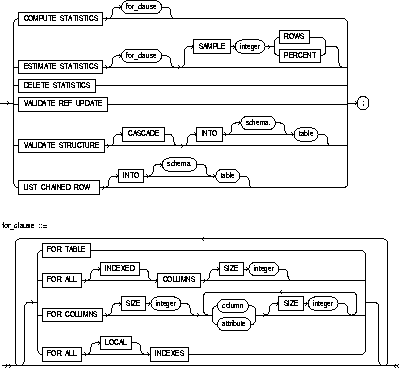
|
schema |
is the schema containing the index, table, or cluster. If you omit schema, Oracle assumes the index, table, or cluster is in your own schema. |
|
|
index |
identifies an index to be analyzed (if no FOR clause is used). |
|
|
table |
identifies a table to be analyzed. When you collect statistics for a table, Oracle also automatically collects the statistics for each of the table's indexes, provided that no FOR clauses are used. |
|
|
PARTITION |
specifies that statistics will be gathered for (partition_name). You cannot use this option when analyzing clusters. |
|
|
cluster |
identifies a cluster to be analyzed. When you collect statistics for a cluster, Oracle also automatically collects the statistics for all the cluster's tables and all their indexes, including the cluster index. See also "Clusters". |
|
|
|
validates the REFs in the specified table, checks the ROWID portion in each REF, compares it with the true ROWID, and corrects, if necessary. You can use this option only when analyzing a table. |
|
|
COMPUTE STATISTICS |
computes exact statistics about the analyzed object and stores them in a data dictionary. See also "Collecting Statistics". |
|
|
ESTIMATE STATISTICS |
estimates statistics about the analyzed object and stores them in the data dictionary. |
|
|
|
SAMPLE |
specifies the amount of data from the analyzed object Oracle samples to estimate statistics. If you omit this parameter, Oracle samples 1064 rows. If you specify more than half of the data, Oracle reads all the data and computes the statistics. |
|
|
ROWS |
causes Oracle to sample integer rows of the table or cluster or integer entries from the index. The integer must be at least 1. |
|
|
PERCENT |
causes Oracle to sample integer percent of the rows from the table or cluster or integer percent of the index entries. The integer can range from 1 to 99. |
|
for_clause |
specifies whether an entire table or index, or just particular columns, will be analyzed. The following clauses apply only to the ANALYZE TABLE version of this command: |
|
|
|
FOR TABLE |
collects table statistics for the table. |
|
|
FOR ALL COLUMNS |
collects column statistics for all columns and scalar object attributes. |
|
|
|
INDEX collects column statistics for all indexed columns in the table. |
|
|
FOR COLUMNS |
collects column statistics for the specified columns and scalar object attributes. |
|
|
|
specifies the qualified column name of an item in an object. |
|
|
FOR ALL INDEXES |
all indexes associated with the table will be analyzed. |
|
|
FOR ALL LOCAL INDEXES |
specifies that all local index partitions are analyzed. You must specify the keyword LOCAL if the PARTITION (partition_name) clause and the index option are specified. |
|
|
SIZE |
specifies the maximum number of partitions in the histogram. The default value is 75, minimum value is 1, and maximum value is 254. |
|
|
Histogram statistics are described in Oracle8 Tuning. See also "Columns". |
|
|
DELETE STATISTICS |
deletes any statistics about the analyzed object that are currently stored in the data dictionary. See also "Deleting Statistics". |
|
|
VALIDATE STRUCTURE |
validates the structure of the analyzed object. If you use this option when analyzing a cluster, Oracle automatically validates the structure of the cluster's tables. If you use this option when analyzing a partitioned table, Oracle also verifies that the row belongs to the correct partition. See also "Validating Structures". |
|
|
|
INTO |
specifies a table into which Oracle lists the ROWIDs of the partitions whose rows do not collate correctly. If you omit schema, Oracle assumes the list is in your own schema. If you omit this clause all together, Oracle assumes that the table is named INVALID_ROWS. The SQL script used to create this table is UTLVALID.SQL. |
|
|
CASCADE |
validates the structure of the indexes associated with the table or cluster. If you use this option when validating a table, Oracle also validates the table's indexes. If you use this option when validating a cluster, Oracle also validates all the clustered tables' indexes, including the cluster index. |
|
LIST CHAINED ROWS |
identifies migrated and chained rows of the analyzed table or cluster. You cannot use this option when analyzing an index. |
|
|
|
INTO |
specifies a table into which Oracle lists the migrated and chained rows. If you omit schema, Oracle assumes the list table is in your own schema. If you omit this clause altogether, Oracle assumes that the table is named CHAINED_ROWS. The script used to create this table is UTLCHAIN.SQL. The list table must be on your local database. |
|
|
To analyze index-organized tables, you must create a separate chained-rows table for each index-organized table created to accommodate the primary key storage of index-organized tables. Use the SQL scripts DBMSIOTC.SQL and PRVTIOTC.PLB to define the BUILD_CHAIN_ROWS_TABLE package, and then execute this procedure to create an IOT_CHAINED_ROWS table for an index-organized table. See also "Listing Chained Rows". |
|
Do not use ANALYZE to collect statistics on data dictionary tables.
You cannot compute or estimate statistics for the following column types:
You can collect statistics about the physical storage characteristics and data distribution of an index, table, column, or cluster and store them in the data dictionary. For computing or estimating statistics:
Use estimation, rather than computation, unless you feel you need exact values. Some statistics are always computed exactly, regardless of whether you specify computation or estimation. If you choose estimation and the time saved by estimating a statistic is negligible, Oracle computes the statistic exactly.
If the data dictionary already contains statistics for the analyzed object, Oracle updates the existing statistics with the new ones.
 The following statement calculates statistics for a scalar object attribute:
ANALYZE TABLE emp COMPUTE STATISTICS FOR COLUMNS addr.street;
The statistics are used by the Oracle optimizer to choose the execution plan for SQL statements that access analyzed objects. These statistics may also be useful to application developers who write such statements. For information on how these statistics are used, see Oracle8 Tuning.
The following sections list the statistics for that are collected for indexes, tables, columns, and clusters. The statistics marked with asterisks (*) are always computed exactly.
For an index, Oracle collects the following statistics:
Index statistics appear in the data dictionary views USER_INDEXES, ALL_INDEXES, and DBA_INDEXES.
For a table, Oracle collects the following statistics:
Table statistics appear in the data dictionary views USER_TABLES, ALL_TABLES, and DBA_TABLES.
Column statistics can be based on the entire column or can use a histogram. A histogram partitions the values in the column into bands, so that all column values in a band fall within the same range. In some cases, it is useful to see how many values fall in various ranges. Oracle's histograms are height balanced as opposed to width balanced. This means that the column values are divided into bands so that each band contains approximately the same number of values. The useful information the histogram provides, then, is where in the range of values the endpoints fall. Width-balanced histograms, in contrast, divide the data into a number of ranges, all of which are the same size, and then count the number of values falling into each range.
Oracle collects the following column statistics:
For uniformly distributed data, the cost-based approach makes fairly accurate guesses at the cost of executing a particular statement. For non-uniformly distributed data, Oracle allows you to store histograms describing the data distribution of a particular column. These histograms are stored in the dictionary and can be used by the cost-based optimizer.
Histograms are persistent objects, so there is a maintenance and space cost for using them. You should compute histograms only for columns that you know have highly skewed data distribution. Also, be aware that histograms, as well as all optimizer statistics, are static. If the data distribution of a column changes frequently, you must reissue the ANALYZE command to recompute the histogram for that column.
Histograms are not useful for columns with the following characteristics:
Create histograms on columns that are frequently used in WHERE clauses of queries and have a highly skewed data distribution. You create a histogram by using the ANALYZE TABLE command. For example, if you want to create a 10-band histogram on the SAL column of the EMP table, issue the following statement:
ANALYZE TABLE emp
   COMPUTE STATISTICS FOR COLUMNS sal SIZE 10;
You can also collect histograms for a single partition of a table. The following statement analyzes the EMP table partition P1:
ANALYZE TABLE emp PARTITION (p1) COMPUTE STATISTICS;
Column statistics appear in the data dictionary views: USER_TAB_COLUMNS, ALL_TAB_COLUMNS, and DBA_TAB_COLUMNS.
Histograms appear in the data dictionary views USER_HISTOGRAMS, DBA_HISTOGRAMS, and ALL_HISTOGRAMS.
For an indexed cluster, Oracle collects the average number of data blocks taken up by a single cluster key value and all of its rows. For a hash clusters, Oracle collects the average number of data blocks taken up by a single hash key value and all of its rows. These statistics appear in the data dictionary views USER_CLUSTERS and DBA_CLUSTERS.
The following statement estimates statistics for the CUST_HISTORY table and all of its indexes:
ANALYZE TABLE cust_history
   ESTIMATE STATISTICS;
With the DELETE STATISTICS option of the ANALYZE command, you can remove existing statistics about an object from the data dictionary. You may want to remove statistics if you no longer want the Oracle optimizer to use them.
When you use the DELETE STATISTICS option on a table, Oracle also automatically removes statistics for all the table's indexes. When you use the DELETE STATISTICS option on a cluster, Oracle also automatically removes statistics for all the cluster's tables and all their indexes, including the cluster index.
The following statement deletes statistics about the CUST_HISTORY table and all its indexes from the data dictionary:
ANALYZE TABLE cust_history
   DELETE STATISTICS;
With the VALIDATE STRUCTURE option of the ANALYZE command, you can verify the integrity of the structure of an index, table, or cluster. If Oracle successfully validates the structure, a message confirming its validation is returned to you. If Oracle encounters corruption in the structure of the object, an error message is returned to you. In this case, drop and re-create the object.
Validating the structure of a object prevents SELECT, INSERT, UPDATE, and DELETE statements from concurrently accessing the object. Therefore, do not use this option on the tables, clusters, and indexes of your production applications during periods of high database activity.
For an index, the VALIDATE STRUCTURE option verifies the integrity of each data block in the index and checks for block corruption. Note that this option does not confirm that each row in the table has an index entry or that each index entry points to a row in the table. You can perform these operations by validating the structure of the table with the CASCADE option.
When you use the VALIDATE STRUCTURE option on an index, Oracle also collects statistics about the index and stores them in the data dictionary view INDEX_STATS. Oracle overwrites any existing statistics about previously validated indexes. At any time, INDEX_STATS can contain only one row describing only one index. The INDEX_STATS view is described in the Oracle8 Reference.
The statistics collected by this option are not used by the Oracle optimizer. Do not confuse these statistics with the statistics collected by the COMPUTE STATISTICS and ESTIMATE STATISTICS options.
The following statement validates the structure of the index PARTS_INDEX:
ANALYZE INDEX parts_index
  VALIDATE STRUCTURE;
For a table, the VALIDATE STRUCTURE option verifies the integrity of each of the table's data blocks and rows. You can use the CASCADE option to also validate the structure of all indexes on the table as well and to perform cross-referencing between the table and each of its indexes. For each index, the cross-referencing involves the following validations:
The following statement analyzes the EMP table and all of its indexes:
ANALYZE TABLE emp
   VALIDATE STRUCTURE CASCADE;
 For a table, the VALIDATE REF UPDATE option verifies the REFs in the specified table, checks the ROWID portion of each REF, and then compares it with the true ROWID. If the result is an incorrect ROWID, the REF is updated so that the ROWID portion is correct.
 The following statement validates the REFs in the EMP table:
ANALYZE TABLE emp VALIDATE REF UPDATE;
For a cluster, the VALIDATE STRUCTURE option verifies the integrity of each row in the cluster and automatically validates the structure of each of the cluster's tables. You can use the CASCADE option to also validate the structure of all indexes on the cluster's tables as well, including the cluster index.
The following statement analyzes the ORDER_CUSTS cluster, all of its tables, and all of their indexes, including the cluster index:
ANALYZE CLUSTER order_custs
    VALIDATE STRUCTURE CASCADE;
There is no rule-based optimizer for partitioned tables, so it is important to analyze partitioned tables and indexes regularly.
For a partitioned table, the VALIDATE STRUCTURE option verifies each row in the partition to verify whether the column values of the partitioning columns collate less than the partition bound of that partition and greater than the partition bound of the previous partition (except the first partition). If the row does not collate correctly, the ROWID is inserted into the INVALID_ROWS table.
With the LIST option of the ANALYZE command, you can collect information about the migrated and chained rows in a table or cluster. A migrated row is one that has been moved from one data block to another. For example, Oracle migrates a row in a cluster if its cluster key value is updated. A chained row is one that is contained in more than one data block. For example, Oracle chains a row of a table or cluster if the row is too long to fit in a single data block. Migrated and chained rows may cause excessive I/O. You may want to identify such rows to eliminate them. For information on eliminating migrated and chained rows, see Oracle8 Tuning.
You can use the INTO clause to specify an output table into which Oracle places this information. The definition of a sample output table CHAINED_ROWS is provided in a SQL script available on your distribution media. Your list table must have the same column names, types, and sizes as the CHAINED_ROWS table. On many operating systems, the name of this script is UTLCHAIN.SQL. The actual name and location of this script depends on your operating system.
The following statement collects information about all the chained rows of the table ORDER_HIST:
ANALYZE TABLE order_hist
    LIST CHAINED ROWS INTO cr;
The preceding statement places the information into the table CR. You can then examine the rows with this query:
SELECT *
    FROM cr
OWNER_NAME  TABLE_NAME  CLUSTER_NAME  HEAD_ROWID         TIMESTAMP
----------  ----------  ------------  ------------------ ---------
SCOTT       ORDER_HIST                AAAAZzAABAAABrXAAA 15-MAR-96
To manually archive redo log file groups or to enable or disable automatic archiving. See also "Restrictions".
The ARCHIVE LOG clause must appear in an ALTER SYSTEM command. You must have the privileges necessary to issue this statement. For information on these privileges, see ALTER SYSTEM.
You must also have the OSDBA or OSOPER role enabled.
You can use most of the options of this clause when your instance has the database mounted, open or closed. Options that require your instance to have the database open are noted.
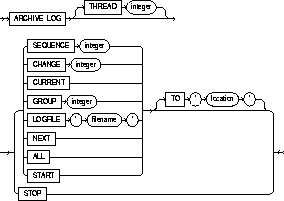
You must archive redo log file groups in the order in which they are filled. If you specify a redo log file group for archiving with the LOGFILE parameter, and earlier redo log file groups are not yet archived, Oracle returns an error. If you specify a redo log file group for archiving with the CHANGE parameter or CURRENT option, and earlier redo log file groups are not yet archived, Oracle archives all unarchived groups up to and including the specified group.
You can also manually archive redo log file groups with the ARCHIVE LOG Server Manager command. For information on this command, see the Oracle Server Manager User's Guide.
You can also choose to have Oracle archive redo log files groups automatically. For information on automatic archiving, see Oracle8 Administrator's Guide. Note that you can always manually archive redo log file groups regardless of whether automatic archiving is enabled.
The following statement manually archives the redo log file group with the log sequence number 4 in thread number 3:
ALTER SYSTEM ARCHIVE LOG THREAD 3 SEQUENCE 4;
The following statement manually archives the redo log file group containing the redo log entry with the SCN 9356083:
ALTER SYSTEM ARCHIVE LOG CHANGE 9356083;
The following statement manually archives the redo log file group containing a member named 'DISKL:LOG6.LOG' to an archived redo log file in the location 'DISKA:[ARCH$]':
ALTER SYSTEM ARCHIVE LOG
    LOGFILE 'diskl:log6.log'
    TO 'diska:[arch$]';
To choose specific SQL statements for auditing in subsequent user sessions. To choose particular schema objects for auditing, see AUDIT (Schema Objects). See also "Auditing".
You must have AUDIT SYSTEM system privilege.
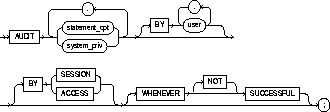
|
statement_opt |
chooses specific SQL statements for auditing. For a list of these statement options and the SQL statements they audit, see Table 4-6 and Table 4-7. See also "Statement Options for Database Objects" and "Statement Options for Commands". |
|
|
system_priv |
chooses SQL statements that are authorized by the specified system privilege for auditing. For a list of all system privileges and the SQL statements that they authorize, see Table 4-19. See also "Shortcuts for System Privileges and Statement Options". |
|
|
BY user |
chooses only SQL statements issued by specified users for auditing. If you omit this clause, Oracle audits all users' statements. |
|
|
BY SESSION |
causes Oracle to write a single record for all SQL statements of the same type issued in the same session. |
|
|
BY ACCESS |
causes Oracle to write one record for each audited statement. |
|
|
|
If you specify statement options or system privileges that audit data definition language (DDL) statements, Oracle automatically audits by access regardless of whether you specify the BY SESSION or BY ACCESS option. |
|
|
|
For statement options and system privileges that audit other types of SQL statements other than DDL, you can specify either the BY SESSION or BY ACCESS option. BY SESSION is the default. |
|
|
WHENEVER SUCCESSFUL |
chooses auditing only for statements that succeed. |
|
|
|
NOT chooses auditing only for statements that fail or result in errors. |
|
|
|
If you omit the WHENEVER clause, Oracle audits SQL statements regardless of success or failure. |
|
Auditing keeps track of operations performed by database users. For each audited operation, Oracle produces an audit record containing this information:
Oracle writes audit records to the audit trail. The audit trail is a database table that contains audit records. You can review database activity by examining the audit trail through data dictionary views. For information on these views, see the Oracle8 Reference.
To generate audit records, you must perform the following steps:
You must enable auditing by setting the initialization parameter AUDIT_TRAIL = DB.
To specify auditing options, you must use the AUDIT command. Auditing options choose which SQL commands, operations, database objects, and users Oracle audits. After you specify auditing options, they appear in the data dictionary. For more information on data dictionary views containing auditing options see the Oracle8 Reference.
You can specify auditing options regardless of whether auditing is enabled. However, Oracle does not generate audit records until you enable auditing.
Auditing options specified by the AUDIT command (SQL Statements) apply only to subsequent sessions, rather than to current sessions.
Table 4-6 lists the statement options relating to database objects and the statements that they audit.
Table 4-7 lists additional statement options related to commands and the SQL statements and operations that they audit.
To choose auditing for every SQL statement that creates, alters, drops, or sets a role, regardless of whether the statement completes successfully, issue the following statement:
AUDIT ROLE;
To choose auditing for every statement that successfully creates, alters, drops, or sets a role, issue the following statement:
AUDIT ROLE
    WHENEVER SUCCESSFUL;
To choose auditing for every CREATE ROLE, ALTER ROLE, DROP ROLE, or SET ROLE statement that results in an Oracle error, issue the following statement:
AUDIT ROLE
    WHENEVER NOT SUCCESSFUL;
To choose auditing for any statement that queries or updates any table, issue the following statement:
AUDIT SELECT TABLE, UPDATE TABLE;
To choose auditing for statements issued by the users SCOTT and BLAKE that query or update a table or view, issue the following statement:
AUDIT SELECT TABLE, UPDATE TABLE
    BY scott, blake;
To choose auditing for statements issued using the DELETE ANY TABLE system privilege, issue the following statement:
AUDIT DELETE ANY TABLE;
To choose auditing for statements issued using the CREATE ANY DIRECTORY system privilege, issue the following statement:
AUDIT CREATE ANY DIRECTORY;
To choose auditing for CREATE DIRECTORY (and DROP DIRECTORY) statements that do NOT use the CREATE ANY DIRECTORY system privilege, issue the following statement:
AUDIT DIRECTORY;
Oracle provides shortcuts for specifying groups of system privileges and statement options at once. However, Oracle encourages you to choose individual system privileges and statement options for auditing, because these shortcuts may not be supported in future versions of Oracle. The shortcuts are follows:
|
CONNECT |
is equivalent to specifying the CREATE SESSION system privilege. |
|
RESOURCE |
is equivalent to specifying the following system privileges: |
|
|
|
|
DBA |
is equivalent to the SYSTEM GRANT statement option and the following system privileges: |
|
|
|
|
ALL |
equivalent to specifying all statement options shown in Table 4-6, but not the additional statement options shown in Table 4-7. |
|
ALL PRIVILEGES |
is equivalent to specifying all system privileges. |
To choose a specific schema object for auditing. To choose particular SQL commands for auditing, see AUDIT (SQL Statements).
Auditing keeps track of operations performed by database users. For a brief conceptual overview of auditing, including how to enable auditing, see the AUDIT (SQL Statements). Note that auditing options established by the AUDIT command (Schema Objects) apply to current sessions as well as to subsequent sessions.
The object you choose for auditing must be in your own schema or you must have AUDIT ANY system privilege. In addition, if the object you choose for auditing is a directory object, even if you created it, you must have AUDIT ANY system privilege.
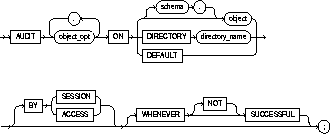
|
object_opt |
specifies a particular operation for auditing. Table 4-8 shows each object option and the types of objects to which it applies. See also "Object Options". |
|
|
schema |
is the schema containing the object chosen for auditing. If you omit schema, Oracle assumes the object is in your own schema. |
|
|
object |
identifies the object chosen for auditing. The object must be a table; view; sequence; stored procedure, function, or package; snapshot; or library. |
|
|
|
You can also specify a synonym for a table, view, sequence, procedure, stored function, package, or snapshot. |
|
|
ON DEFAULT |
establishes the specified object options as default object options for subsequently created objects. See also "Default Auditing". |
|
|
DIRECTORY directory_name |
identifies the name of the directory chosen for auditing. |
|
|
BY SESSION |
means that Oracle writes a single record for all operations of the same type on the same object issued in the same session. |
|
|
BY ACCESS |
means that Oracle writes one record for each audited operation. |
|
|
If you omit both of the preceding options, Oracle audits by session. |
||
|
WHENEVER SUCCESSFUL |
chooses auditing only for SQL statements that complete successfully. |
|
|
|
NOT chooses auditing only for statements that fail, or result in errors. |
|
|
|
If you omit the WHENEVER clause entirely, Oracle audits all SQL statements, regardless of success or failure. |
|
Table 4-8 shows the object options you can choose for each type of object.
The name of each object option specifies a command to be audited. For example, if you choose to audit a table with the ALTER option, Oracle audits all ALTER TABLE statements issued against the table. If you choose to audit a sequence with the SELECT option, Oracle audits all statements that use any of the sequence's values.
Oracle provides a shortcut for specifying object auditing options:
|
ALL |
is equivalent to specifying all object options applicable for the type of object. You can use this shortcut rather than explicitly specifying all options for an object. |
You can use the DEFAULT option of the AUDIT command to specify auditing options for objects that have not yet been created. Once you have established these default auditing options, any subsequently created object is automatically audited with those options. Note that the default auditing options for a view are always the union of the auditing options for the view's base tables.
If you change the default auditing options, the auditing options for previously created objects remain the same. You can change the auditing options for an existing object only by specifying the object in the ON clause of the AUDIT command.
To choose auditing for every SQL statement that queries the EMP table in the schema SCOTT, issue the following statement:
AUDIT SELECT
    ON scott.emp;
To choose auditing for every statement that successfully queries the EMP table in the schema SCOTT, issue the following statement:
AUDIT SELECT
    ON scott.emp
    WHENEVER SUCCESSFUL;
To choose auditing for every statement that queries the EMP table in the schema SCOTT and results in an Oracle error, issue the following statement:
AUDIT SELECT
    ON scott.emp
    WHENEVER NOT SUCCESSFUL;
To choose auditing for every statement that inserts or updates a row in the DEPT table in the schema BLAKE, issue the following statement:
AUDIT INSERT, UPDATE
    ON blake.dept;
To choose auditing for every statement that performs any operation on the ORDER sequence in the schema ADAMS, issue the following statement:
AUDIT ALL
    ON adams.order;
The above statement uses the ALL short cut to choose auditing for the following statements that operate on the sequence:
To choose auditing for every statement that reads files from the BFILE_DIR1 directory, issue the following statement:
AUDIT READ ON DIRECTORY bfile_dir1;
The following statement specifies default auditing options for objects created in the future:
AUDIT ALTER, GRANT, INSERT, UPDATE, DELETE
    ON DEFAULT;
Any objects created later are automatically audited with the specified options that apply to them, provided that auditing has been enabled:
To add a comment about a table, view, snapshot, or column into the data dictionary. See also "Using Comments".
The table, view, or snapshot must be in your own schema or you must have COMMENT ANY TABLE system privilege.
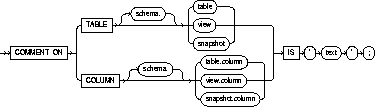
|
TABLE |
specifies the schema and name of the table, view, or snapshot to be commented. |
|
COLUMN |
specifies the name of the column of a table, view, or snapshot to be commented. If you omit schema, Oracle assumes the table, view, or snapshot is in your own schema. |
|
IS 'text' |
is the text of the comment. See the syntax description of 'text' in "Text". |
You can effectively drop a comment from the database by setting it to the empty string ' '. For information on the data dictionary views that contain comments, see Oracle8 Reference.
To insert an explanatory remark on the NOTES column of the SHIPPING table, you might issue the following statement:
COMMENT ON COLUMN shipping.notes
    IS 'Special packing or shipping instructions';
To drop this comment from the database, issue the following statement:
COMMENT ON COLUMN shipping.notes IS ' ';
To end your current transaction and make permanent all changes performed in the transaction. This command also erases all savepoints in the transaction and releases the transaction's locks. See also "About Transactions".
You can also use this command to commit an in-doubt distributed transaction manually. See "Ending Transactions" for more information on transactions.
You need no privileges to commit your current transaction.
To manually commit a distributed in-doubt transaction that you originally committed, you must have FORCE TRANSACTION system privilege. To manually commit a distributed in-doubt transaction that was originally committed by another user, you must have FORCE ANY TRANSACTION system privilege.

A transaction (or a logical unit of work) is a sequence of SQL statements that Oracle treats as a single unit. A transaction begins with the first executable SQL statement after a COMMIT, ROLLBACK, or connection to the database. A transaction ends with a COMMIT, ROLLBACK, or disconnection (intentional or unintentional) from the database. Note that Oracle issues an implicit COMMIT before and after any data definition language (DDL) statement.
You can also use a COMMIT or ROLLBACK statement to terminate a read-only transaction begun by a SET TRANSACTION statement.
This example inserts a row into the DEPT table and commits this change:
INSERT INTO dept   VALUES (50, 'MARKETING', 'TAMPA');
COMMIT WORK;
The following statement commits the current transaction and associates a comment with it:
COMMIT WORK
    COMMENT 'In-doubt transaction Code 36, Call (415) 555-2637';
If a network or machine failure prevents this distributed transaction from committing properly, Oracle stores the comment in the data dictionary along with the transaction ID. The comment indicates the part of the application in which the failure occurred and provides information for contacting the administrator of the database where the transaction was committed.
Oracle with the distributed option allows you to perform distributed transactions, or transactions that modify data on multiple databases. To commit a distributed transaction, you need only issue a COMMIT statement as you would to commit any other transaction. Each component of the distributed transaction is then committed on each database.
If a network or machine failure occurs during the commit process for a distributed transaction, the state of the transaction may be unknown, or in-doubt. After consultation with the administrators of the other databases involved in the transaction, you may decide to manually commit or roll back the transaction on your local database. You can manually commit the transaction on your local database by using the FORCE clause of the COMMIT command. For more information on these topics, see Oracle8 Distributed Database Systems.
Note that a COMMIT statement with a FORCE clause only commits the specified transaction. Such a statement does not affect your current transaction.
The following statement manually commits an in-doubt distributed transaction:
COMMIT FORCE '22.57.53';
Oracle recommends that you explicitly end every transaction in your application programs with a COMMIT or ROLLBACK statement, including the last transaction, before disconnecting from Oracle. If you do not explicitly commit the transaction and the program terminates abnormally, the last uncommitted transaction is automatically rolled back.
A normal exit from most Oracle utilities and tools causes the current transaction to be committed. A normal exit from an Oracle precompiler program does not commit the transaction and relies on Oracle to roll back the current transaction.
To define an integrity constraint. An integrity constraint is a rule that restricts the values for one or more columns in a table or an index-organized table.
CONSTRAINT clauses can appear in either CREATE TABLE or ALTER TABLE commands. To define an integrity constraint, you must have the privileges necessary to issue one of these commands. See CREATE TABLE and ALTER TABLE.
Defining a constraint may also require additional privileges or preconditions, depending on the type of constraint. For information on these privileges, see the descriptions of each type of integrity constraint in "Defining Integrity Constraints".
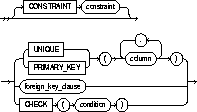 table_constraint::=

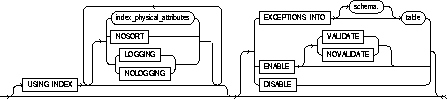
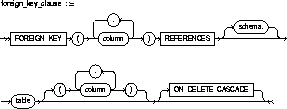
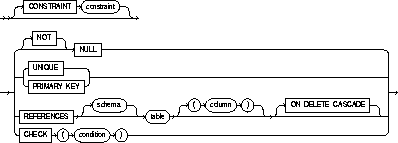 column_constraint::=

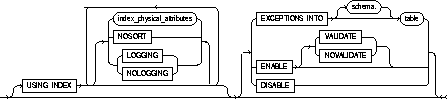
storage_clause: See the STORAGE clause.
|
CONSTRAINT |
identifies the integrity constraint by the name constraint. Oracle stores this name in the data dictionary along with the definition of the integrity constraint. If you omit this identifier, Oracle generates a name with this form: SYS_Cn. See also "Defining Integrity Constraints". |
|
|
|
If you do not specify NULL or NOT NULL in a column definition, NULL is the default. |
|
|
UNIQUE |
designates a column or combination of columns as a unique key. You cannot define UNIQUE constraints on index-organized tables. See also "UNIQUE Constraints". |
|
|
PRIMARY KEY |
designates a column or combination of columns as the table's primary key. See also "PRIMARY KEY Constraints". |
|
|
FOREIGN KEY |
designates a column or combination of columns as the foreign key in a referential integrity constraint. |
|
|
REFERENCES |
identifies the primary or unique key that is referenced by a foreign key in a referential integrity constraint. See also "Referential Integrity Constraints". |
|
|
ON DELETE CASCADE |
specifies that Oracle maintains referential integrity by automatically removing dependent foreign key values if you remove a referenced primary or unique key value. |
|
|
NULL |
specifies that a column can contain null values. |
|
|
NOT NULL |
specifies that a column cannot contain null values. See also "NOT NULL Constraints". |
|
|
CHECK |
specifies a condition that each row in the table must satisfy. See also "CHECK Constraints". |
|
|
DEFERRABLE |
indicates that constraint checking can be deferred until the end of the transaction by using the SET CONSTRAINT(S) command. |
|
|
NOT DEFERRABLE |
indicates that this constraint is checked at the end of each DML statement. You cannot defer a NOT DEFERRABLE constraint with the SET CONSTRAINT(S) command. If you do not specify DEFERRABLE or NOT DEFERRABLE, then NOT DEFERRABLE is the default. See also "DEFERRABLE Constraints". |
|
|
|
INITIALLY IMMEDIATE |
indicates that at the start of every transaction, the default is to check this constraint at the end of every DML statement. If no INITIALLY clause is specified, INITIALLY IMMEDIATE is the default. |
|
|
INITIALLY DEFERRED |
implies that this constraint is DEFERRABLE and specifies that, by default, the constraint is checked only at the end of each transaction. |
|
USING INDEX |
specifies parameters for the index Oracle uses to enable a UNIQUE or PRIMARY KEY constraint. The name of the index is the same as the name of the constraint. You can choose the values of the INITRANS, MAXTRANS, TABLESPACE, STORAGE, PCTFREE, LOGGING, and NOLOGGING parameters for the index. For information on these parameters, see CREATE TABLE. |
|
|
|
Use this clause only when enabling UNIQUE and PRIMARY KEY constraints. |
|
|
NOSORT |
indicates that the rows are stored in the database in ascending order and therefore Oracle does not have to sort the rows when creating the index. |
|
|
EXCEPTIONS INTO |
specifies a table into which Oracle places the ROWIDs of all rows violating the constraint. Note: You must create an appropriate exceptions report table to accept information from the EXCEPTIONS option of the ENABLE clause before enabling the constraint. You can create an exception table by submitting the script UTLEXCPT.SQL, which creates a table named EXCEPTIONS. You can create additional exceptions tables with different names by modifying and resubmitting the script. |
|
|
|
The EXCEPTIONS INTO clause is a valid option only when validating a constraint (see the ENABLE clause) or when enabling a constraint with an ALTER TABLE command. See ALTER TABLE. |
|
|
ENABLE VALIDATE |
ensures that all new insert, delete, and update operations on the constrained data comply with the constraint. Checks that all old data also obeys the constraint. An enabled and validated constraint guarantees that all data is and will continue to be valid. This is the default. |
|
|
ENABLE NOVALIDATE |
ensures that all new insert, update, and delete operations on the constrained data comply with the constraint. Oracle does not verify that existing data in the table complies with the constraint. |
|
|
DISABLE |
disables the integrity constraint. If an integrity constraint is disabled, Oracle does not enable it. If you do not specify this option, Oracle automatically enables the integrity constraint. |
|
|
You can also enable and disable integrity constraints with the ENABLE and DISABLE clauses of the CREATE TABLE and ALTER TABLE commands. See the ENABLE clause and the DISABLE clause. See also "Enabling and Disabling Constraints". |
||
|
Disabled constraints can be made enabled with ALTER TABLE. |
||
To define an integrity constraint, include a CONSTRAINT clause in a CREATE TABLE or ALTER TABLE statement. The CONSTRAINT clause has two syntactic forms:
The table_constraint syntax and the column_constraint syntax are simply different syntactic means of defining integrity constraints. A constraint that references more than one column must be defined as a table constraint. There is no other functional difference between an integrity constraint defined with table_constraint syntax and the same constraint defined with column_constraint syntax.
The NOT NULL constraint specifies that a column cannot contain nulls. To satisfy this constraint, every row in the table must contain a value for the column.
The NULL keyword indicates that a column can contain nulls. It does not actually define an integrity constraint. If you do not specify either NOT NULL or NULL, the column can contain nulls by default.
You can specify NOT NULL or NULL with column_constraint syntax only in a CREATE TABLE or ALTER TABLE statement, not with table_constraint syntax.
The following statement alters the EMP table and defines and enables a NOT NULL constraint on the SAL column:
ALTER TABLE emp
   MODIFY (sal  NUMBER  CONSTRAINT nn_sal NOT NULL);
NN_SAL ensures that no employee in the table has a null salary.
The UNIQUE constraint designates a column or combination of columns as a unique key. To satisfy a UNIQUE constraint, no two rows in the table can have the same value for the unique key. However, the unique key made up of a single column can contain nulls.
A unique key column cannot be of datatype LONG or LONG RAW. You cannot designate the same column or combination of columns as both a unique key and a primary key or as both a unique key and a cluster key. However, you can designate the same column or combination of columns as both a unique key and a foreign key.
You can define a unique key on a single column with column_constraint syntax.
The following statement creates the DEPT table and defines and enables a unique key on the DNAME column:
CREATE TABLE dept
    (deptno  NUMBER(2),
     dname   VARCHAR2(9)  CONSTRAINT unq_dname UNIQUE,
      loc     VARCHAR2(10) );
The constraint UNQ_DNAME identifies the DNAME column as a unique key. This constraint ensures that no two departments in the table have the same name. However, the constraint does allow departments without names.
Alternatively, you can define and enable this constraint with the table_constraint syntax:
CREATE TABLE dept
    (deptno  NUMBER(2),
     dname   VARCHAR2(9),
     loc     VARCHAR2(10),
        CONSTRAINT unq_dname
        UNIQUE (dname)
    USING INDEX PCTFREE 20
        TABLESPACE user_x
        STORAGE (INITIAL 8K  NEXT 6K) );
The above statement also uses the USING INDEX option to specify storage characteristics for the index that Oracle creates to enable the constraint.
A composite unique key is a unique key made up of a combination of columns. Oracle creates an index on the columns of a unique key, so a composite unique key can contain a maximum of 16 columns. To define a composite unique key, you must use table_constraint syntax rather than column_constraint syntax.
To satisfy a constraint that designates a composite unique key, no two rows in the table can have the same combination of values in the key columns. Any row that contains nulls in all key columns automatically satisfies the constraint. However, two rows that contain nulls for one or more key columns and the same combination of values for the other key columns violate the constraint.
The following statement defines and enables a composite unique key on the combination of the CITY and STATE columns of the CENSUS table:
ALTER TABLE census
    ADD CONSTRAINT unq_city_state
    UNIQUE (city, state)
    USING INDEX PCTFREE 5
        TABLESPACE user_y
    EXCEPTIONS INTO bad_keys_in_ship_cont;
The UNQ_CITY_STATE constraint ensures that the same combination of CITY and STATE values does not appear in the table more than once.
The CONSTRAINT clause also specifies other properties of the constraint:
A PRIMARY KEY constraint designates a column or combination of columns as the table's primary key. To satisfy a PRIMARY KEY constraint, both of the following conditions must be true:
A table can have only one primary key.
A primary key column cannot be of datatype LONG or LONG RAW. You cannot designate the same column or combination of columns as both a primary key and a unique key or as both a primary key and a cluster key. However, you can designate the same column or combination of columns as both a primary key and a foreign key.
You can use the column_constraint syntax to define a primary key on a single column.
The following statement creates the DEPT table and defines and enables a primary key on the DEPTNO column:
CREATE TABLE dept
    (deptno  NUMBER(2) CONSTRAINT pk_dept PRIMARY KEY,
    dname   VARCHAR2(9),
    loc     VARCHAR2(10) );
The PK_DEPT constraint identifies the DEPTNO column as the primary key of the DEPT table. This constraint ensures that no two departments in the table have the same department number and that no department number is NULL.
Alternatively, you can define and enable this constraint with table_constraint syntax:
CREATE TABLE dept
    (deptno  NUMBER(2),
    dname   VARCHAR2(9),
    loc   VARCHAR2(10),
    CONSTRAINT pk_dept PRIMARY KEY (deptno) );
A composite primary key is a primary key made up of a combination of columns. Oracle creates an index on the columns of a primary key; therefore, a composite primary key can contain a maximum of 16 columns. To define a composite primary key, you must use the table_constraint syntax rather than the column_constraint syntax.
The following statement defines a composite primary key on the combination of the SHIP_NO and CONTAINER_NO columns of the SHIP_CONT table:
ALTER TABLE ship_cont
    ADD PRIMARY KEY (ship_no, container_no) DISABLE;
This constraint identifies the combination of the SHIP_NO and CONTAINER_NO columns as the primary key of the SHIP_CONT table. The constraint ensures that no two rows in the table have the same values for both the SHIP_NO column and the CONTAINER_NO column.
The CONSTRAINT clause also specifies the following properties of the constraint:
A referential integrity constraint designates a column or combination of columns as a foreign key and establishes a relationship between that foreign key and a specified primary or unique key, called the referenced key. In this relationship, the table containing the foreign key is called the child table and the table containing the referenced key is called the parent table. Note the following restrictions:
To satisfy a referential integrity constraint, each row of the child table must meet one of the following conditions:
A referential integrity constraint is defined in the child table. A referential integrity constraint definition can include any of the following keywords:
Before you define a referential integrity constraint in the child table, the referenced UNIQUE or PRIMARY KEY constraint on the parent table must already be defined. Also, the parent table must be in your own schema or you must have REFERENCES privilege on the columns of the referenced key in the parent table. Before you enable a referential integrity constraint, its referenced constraint must be enabled.
You cannot define a referential integrity constraint in a CREATE TABLE statement that contains an AS clause. Instead, you can create the table without the constraint and then add it later with an ALTER TABLE statement.
A foreign key column cannot be of datatype LONG or LONG RAW. You can designate the same column or combination of columns as both a foreign key and a primary or unique key. You can also designate the same column or combination of columns as both a foreign key and a cluster key.
You can define multiple foreign keys in a table. Also, a single column can be part of more than one foreign key.
You can use column_constraint syntax to define a referential integrity constraint in which the foreign key is made up of a single column.
The following statement creates the EMP table and defines and enables a foreign key on the DEPTNO column that references the primary key on the DEPTNO column of the DEPT table:
CREATE TABLE emp
   (empno      NUMBER(4),
    ename      VARCHAR2(10),
    job        VARCHAR2(9),
    mgr        NUMBER(4),
    hiredate   DATE,
    sal        NUMBER(7,2),
    comm       NUMBER(7,2),
    deptno     CONSTRAINT fk_deptno REFERENCES dept(deptno) );
The constraint FK_DEPTNO ensures that all departments given for employees in the EMP table are present in the DEPT table. However, employees can have null department numbers, meaning they are not assigned to any department. If you wish to prevent the latter, you could create a NOT NULL constraint on the deptno column in the EMP table, in addition to the REFERENCES constraint.
Before you define and enable this constraint, you must define and enable a constraint that designates the DEPTNO column of the DEPT table as a primary or unique key. For the definition of such a constraint, see the example.
Note that the referential integrity constraint definition does not use the FOREIGN KEY keyword to identify the columns that make up the foreign key. Because the constraint is defined with a column constraint clause on the DEPTNO column, the foreign key is automatically on the DEPTNO column.
Note that the constraint definition identifies both the parent table and the columns of the referenced key. Because the referenced key is the parent table's primary key, the referenced key column names are optional.
Note that the above statement omits the DEPTNO column's datatype. Because this column is a foreign key, Oracle automatically assigns it the datatype of the DEPT.DEPTNO column to which the foreign key refers.
Alternatively, you can define a referential integrity constraint with table_constraint syntax:
CREATE TABLE emp
  (empno     NUMBER(4),
   ename     VARCHAR2(10),
   job       VARCHAR2(9),
   mgr       NUMBER(4),
   hiredate  DATE,
   sal       NUMBER(7,2),
   comm      NUMBER(7,2),
   deptno,
   CONSTRAINT fk_deptno
      FOREIGN  KEY (deptno)
      REFERENCES  dept(deptno) );
Note that the foreign key definitions in both statements of this example omit the ON DELETE CASCADE option, causing Oracle to forbid the deletion of a department if any employee works in that department.
If you use the ON DELETE CASCADE option, Oracle permits deletions of referenced key values in the parent table and automatically deletes dependent rows in the child table to maintain referential integrity.
This example creates the EMP table, defines and enables the referential integrity constraint FK_DEPTNO, and uses the ON DELETE CASCADE option:
CREATE TABLE emp
  (empno    NUMBER(4),
   ename    VARCHAR2(10),
   job      VARCHAR2(9),
   mgr      NUMBER(4),
   hiredate DATE,
   sal      NUMBER(7,2),
   comm     NUMBER(7,2),
   deptno   NUMBER(2)   CONSTRAINT fk_deptno
            REFERENCES dept(deptno)
            ON DELETE CASCADE );
Because of the ON DELETE CASCADE option, Oracle cascades any deletion of a DEPTNO value in the DEPT table to the DEPTNO values of its dependent rows of the EMP table. For example, if Department 20 is deleted from the DEPT table, Oracle deletes the department's employees from the EMP table.
A composite foreign key is a foreign key made up of a combination of columns. A composite foreign key can contain as many as 16 columns. To define a referential integrity constraint with a composite foreign key, you must use table_constraint syntax. You cannot use column_constraint syntax, because this syntax can impose rules only on a single column. A composite foreign key must refer to a composite unique key or a composite primary key.
To satisfy a referential integrity constraint involving composite keys, each row in the child table must satisfy one of the following conditions:
The following statement defines and enables a foreign key on the combination of the AREACO and PHONENO columns of the PHONE_CALLS table:
ALTER TABLE phone_calls
    ADD CONSTRAINT fk_areaco_phoneno
        FOREIGN KEY (areaco, phoneno)
        REFERENCES customers(areaco, phoneno)
        EXCEPTIONS INTO wrong_numbers;
The constraint FK_AREACO_PHONENO ensures that all the calls in the PHONE_CALLS table are made from phone numbers that are listed in the CUSTOMERS table. Before you define and enable this constraint, you must define and enable a constraint that designates the combination of the AREACO and PHONENO columns of the CUSTOMERS table as a primary or unique key.
The EXCEPTIONS option causes Oracle to write information to the WRONG_NUMBERS table about any rows in the PHONE_CALLS table that violate the constraint.
The CHECK constraint explicitly defines a condition. To satisfy the constraint, each row in the table must make the condition either TRUE or unknown (due to a null). For information on conditions, see the syntax description of condition in "Conditions". The condition of a CHECK constraint can refer to any column in the table, but it cannot refer to columns of other tables. CHECK constraint conditions cannot contain the following constructs:
Whenever Oracle evaluates a CHECK constraint condition for a particular row, any column names in the condition refer to the column values in that row.
If you create multiple CHECK constraints for a column, design them carefully so their purposes do not conflict. Oracle does not verify that CHECK conditions are not mutually exclusive.
The following statement creates the DEPT table and defines a CHECK constraint in each of the table's columns:
CREATE TABLE dept  (deptno NUMBER  CONSTRAINT check_deptno
          CHECK (deptno BETWEEN 10 AND 99)
          DISABLE,
dname VARCHAR2(9)  CONSTRAINT check_dname
          CHECK (dname = UPPER(dname))
          DISABLE,
loc VARCHAR2(10)  CONSTRAINT check_loc
          CHECK (loc IN ('DALLAS','BOSTON',
          'NEW YORK','CHICAGO'))
          DISABLE);
Each constraint restricts the values of the column in which it is defined:
Because each CONSTRAINT clause contains the DISABLE option, Oracle only defines the constraints and does not enable them.
Unlike other types of constraints, a CHECK constraint defined with column_constraint syntax can impose rules on any column in the table, rather than only on the column in which it is defined.
The following statement creates the EMP table and uses a table constraint clause to define and enable a CHECK constraint:
CREATE TABLE emp
    (empno          NUMBER(4),
     ename          VARCHAR2(10),
     job            VARCHAR2(9),
     mgr            NUMBER(4),
     hiredate       DATE,
     sal            NUMBER(7,2),
     comm           NUMBER(7,2),
     deptno         NUMBER(2),
     CHECK (sal + comm <= 5000) );
This constraint uses an inequality condition to limit an employee's total compensation, the sum of salary and commission, to $5000:
Because the CONSTRAINT clause in this example does not supply a constraint name, Oracle generates a name for the constraint.
The following statement defines and enables a PRIMARY KEY constraint, two referential integrity constraints, a NOT NULL constraint, and two CHECK constraints:
CREATE TABLE order_detail
  (CONSTRAINT pk_od PRIMARY KEY (order_id, part_no),
   order_id NUMBER
      CONSTRAINT fk_oid REFERENCES scott.order (order_id),
   part_no            NUMBER
      CONSTRAINT fk_pno REFERENCES scott.part (part_no),
   quantity            NUMBER
      CONSTRAINT nn_qty NOT NULL
      CONSTRAINT check_qty_low CHECK (quantity > 0),
   cost            NUMBER
      CONSTRAINT check_cost CHECK (cost > 0) );
The constraints enable the following rules on table data:
This example also illustrates the following points about constraint clauses and column definitions:
You can specify table and column constraints as DEFERRABLE or NOT DEFERRABLE. DEFERRABLE means that the constraint will not be checked until the transaction is committed. The default is NOT DEFERRABLE.
If you specify DEFERRABLE, you can also specify the constraint's initial state as INITIALLY DEFERRED and thereby start the transaction in DEFERRED mode. Or you can specify a DEFERRABLE constraint's initial state as INITIALLY IMMEDIATE and start the transaction in NOT DEFERRED mode.
The following statement creates table GAMES with a NOT DEFERRABLE INITIALLY IMMEDIATE constraint check on the SCORES column:
CREATE TABLE games (scores NUMBER CHECK (scores >= 0));
To define a unique constraint on a column as INITIALLY DEFERRED DEFERRABLE, issue the following statement:
CREATE TABLE orders
  (ord_num NUMBER CONSTRAINT unq_num UNIQUE (ord_num)
   INITIALLY DEFERRED DEFERRABLE);
A constraint cannot be defined as NOT DEFERRABLE INITIALLY DEFERRED.
Use SET CONSTRAINT(S) to set, for a single transaction, whether a deferrable constraint is checked following each DML statement or when the transaction is committed. You cannot alter a constraint's deferrability status; you must drop the constraint and re-create it.
See Oracle8 Administrator's Guide and Oracle8 Concepts for more information about deferred constraints.
Constraints can have one of three states: DISABLE, ENABLE NOVALIDATE, or ENABLE VALIDATE.
Taking a constraint from a disabled to enable validated state requires an exclusive lock on the table, because while all old data is being checked for validity, no new data can be entered into the table. Due to this behavior, only one constraint can be enabled at a time, and each new constraint must check all existing rows by serial scan.
To avoid locking the table, place the constraint in the ENABLE NOVALIDATE state, using the ENABLE clause. This state ensures that all new DML statements on the table are validated, therefore Oracle does not need to prevent concurrent access to the table.
ENABLE NOVALIDATE also allows you to place several of the table's constraints in the ENABLE VALIDATE state concurrently. Each scan that Oracle performs to validate existing data can also be performed in parallel when possible.
Placing constraints concurrently in the ENABLE VALIDATE state requires that you issue multiple ALTER TABLE commands from separate sessions.
Enabling a primary key or unique key constraint automatically creates a unique index to enforce the constraint. This index is dropped if the constraint is subsequently disabled, thus causing Oracle to rebuild the index every time the constraint is enabled.
To avoid this behavior, create new primary key and unique key constraints initially disabled; then create nonunique indexes or use existing nonunique indexes to enforce the constraint. Because Oracle does not drop the nonunique index when the constraint is disabled, any ENABLE operation on a primary key or unique key constraint occurs almost instantly, because the index already exists. Redundant indexes are also eliminated.
For more information about PRIMARY KEY and UNIQUE constraints, see the ENABLE clause.
To create a cluster. A cluster is a schema object that contains one or more tables, all of which have one or more columns in common. See also "About Clusters" and "Adding Tables to a Cluster".
To create a cluster in your own schema, you must have CREATE CLUSTER system privilege. To create a cluster in another user's schema, you must have CREATE ANY CLUSTER system privilege. Also, the owner of the schema to contain the cluster must have either space quota on the tablespace containing the cluster or UNLIMITED TABLESPACE system privilege.
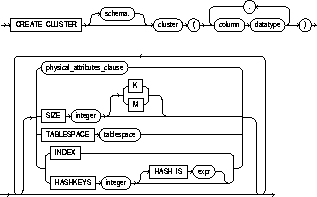

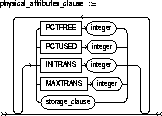
storage_clause: See the STORAGE clause.
parallel_clause: See the PARALLEL clause.
|
schema |
is the schema to contain the cluster. If you omit schema, Oracle creates the cluster in your current schema. |
|
cluster |
is the name of the cluster to be created. |
|
column |
is the name of a column in the cluster key. See also "Cluster Keys". |
|
datatype |
is the datatype of a cluster key column. A cluster key column can have any datatype except LONG or LONG RAW. You cannot use the HASH IS clause if any column datatype is not INTEGER or NUMBER with scale 0. For information on datatypes, see the section "Datatypes". |
|
physical_attributes_clause: |
|
|
PCTUSED |
specifies the limit that Oracle uses to determine when additional rows can be added to a cluster's data block. The value of this parameter is expressed as a whole number and interpreted as a percentage. |
|
PCTFREE |
specifies the space reserved in each of the cluster's data blocks for future expansion. The value of the parameter is expressed as a whole number and interpreted as a percentage. |
|
INITRANS |
specifies the initial number of concurrent update transactions allocated for data blocks of the cluster. The value of this parameter for a cluster cannot be less than 2 or more than the value of the MAXTRANS parameter. The default value is the greater of the INITRANS value for the cluster's tablespace and 2. |
|
MAXTRANS |
specifies the maximum number of concurrent update transactions for any given data block belonging to the cluster. The value of this parameter cannot be less than the value of the INITRANS parameter. The maximum value of this parameter is 255. The default value is the MAXTRANS value for the tablespace to contain the cluster. |
|
|
For a complete description of the PCTUSED, PCTFREE, INITRANS, and MAXTRANS parameters, see CREATE TABLE. |
|
SIZE |
specifies the amount of space in bytes to store all rows with the same cluster key value or the same hash value. You can use K or M to specify this space in kilobytes or megabytes. If you omit this parameter, Oracle reserves one data block for each cluster key value or hash value. See also "Cluster Size". |
|
TABLESPACE |
specifies the tablespace in which the cluster is created. |
|
storage_clause |
specifies how data blocks are allocated to the cluster. See the STORAGE clause. |
|
INDEX |
creates an indexed cluster. In an indexed cluster, rows are stored together based on their cluster key values. See also "Types of Clusters". |
|
HASHKEYS |
creates a hash cluster and specifies the number of hash values for a hash cluster. Oracle rounds the HASHKEYS value up to the nearest prime number to obtain the actual number of hash values. The minimum value for this parameter is 2. If you omit both the INDEX option and the HASHKEYS parameter, Oracle creates an indexed cluster by default. See also "Types of Clusters". |
|
HASH IS |
specifies a expression to be used as the hash function for the hash cluster. The expression: |
|
|
|
|
|
If you omit the HASH IS clause, Oracle uses an internal hash function for the hash cluster. |
|
|
The cluster key of a hash column can have one or more columns of any datatype. Hash clusters with composite cluster keys or cluster keys made up of noninteger columns must use the internal hash function. |
|
parallel_clause |
specifies the degree of parallelism to use when creating the cluster and the default degree of parallelism to use when querying the cluster after creation. See the PARALLEL clause. |
|
CACHE |
specifies that the blocks retrieved for this table are placed at the most recently used end of the LRU list in the buffer cache when a full table scan is performed. This option is useful for small lookup tables. |
|
NOCACHE |
specifies that the blocks retrieved for this table are placed at the least recently used end of the LRU list in the buffer cache when a full table scan is performed. This is the default behavior. |
A cluster is a schema object that contains one or more tables that all have one or more columns in common. Rows of one or more tables that share the same value in these common columns are physically stored together within the database.
Clustering provides more control over the physical storage of rows within the database. Clustering can reduce both the time it takes to access clustered tables and the space needed to store the table. After you create a cluster and add tables to it, the cluster is transparent. You can access clustered tables with SQL statements just as you can nonclustered tables.
If you cannot fit all rows for one hash value into a data block, do not use hash clusters. Performance is very poor in this circumstance because an insert or update of a row in a hash cluster with a size exceeding the data block size fills the block and performs row chaining to contain the rest of the row.
Generally, you should only cluster tables that are frequently joined on the cluster key columns in SQL statements. Clustering multiple tables improves the performance of joins, but it is likely to reduce the performance of full table scans, INSERT statements, and UPDATE statements that modify cluster key values. Before clustering, consider its benefits and trade-offs in light of the operations you plan to perform on your data. For more information on the performance implications of clustering, see Oracle8 Tuning.
The columns defined by the CREATE CLUSTER command make up the cluster key. These cluster columns must correspond in both datatype and size to columns in each of the clustered tables, although they need not correspond in name.
You cannot specify integrity constraints as part of the definition of a cluster key column. Instead, you can associate integrity constraints with the tables that belong to the cluster.
A cluster can be either an indexed cluster or a hash cluster.
In an indexed cluster, Oracle stores together rows having the same cluster key value. Each distinct cluster key value is stored only once in each data block, regardless of the number of tables and rows in which it occurs. This saves disk space and improves performance for many operations.
You may want to use indexed clusters in the following cases:
After you create an indexed cluster, you must create an index on the cluster key before you can issue any data manipulation language (DML) statements against a table in the cluster. This index is called the cluster index. For information on creating a cluster index, see CREATE INDEX. As with the columns of any index, the order of the columns in the cluster key affects the structure of the cluster index.
A cluster index provides quick access to rows within a cluster based on the cluster key. If you issue a SQL statement that searches for a row in the cluster based on its cluster key value, Oracle searches the cluster index for the cluster key value and then locates the row in the cluster based on its ROWID.
In a hash cluster, Oracle stores together rows that have the same hash key value. The hash value for a row is the value returned by the cluster's hash function. When you create a hash cluster, you can either specify a hash function or use the Oracle internal hash function. Hash values are not actually stored in the cluster, although cluster key values are stored for every row in the cluster.
You may want to use hash clusters in the following cases:
The hash function provides access to rows in the table based on the cluster key value. If you issue a SQL statement that locates a row in the cluster based on its cluster key value, Oracle applies the hash function to the given cluster key value and uses the resulting hash value to locate the matching rows. Because multiple cluster key values can map to the same hash value, Oracle must also check the row's cluster key value. This process often results in less I/O than the process for the indexed cluster, because the index search is not required.
Oracle's internal hash function returns values ranging from 0 to the value of HASHKEYS - 1. If you specify a column with the HASH IS clause, the column values need not fall into this range. Oracle divides the column value by the HASHKEYS value and uses the remainder as the hash value. The hash value for null is HASHKEYS - 1. Oracle also rounds the HASHKEYS value up to the nearest prime number to obtain the actual number of hash values. This rounding reduces the likelihood of hash collisions, or multiple cluster key values having the same hash value.
You cannot create a cluster index for a hash cluster, and you need not create an index on a hash cluster key.
Oracle uses the value of the SIZE parameter to determine the space reserved for rows corresponding to one cluster key value or one hash value. This space then determines the maximum number of cluster or hash values stored in a data block. If the SIZE value is not a divisor of the data block size, Oracle uses the next largest divisor. If the SIZE value is larger than the data block size, Oracle uses the operating system block size, reserving at least one data block per cluster or hash value.
Oracle also considers the length of the cluster key when determining how much space to reserve for the rows having a cluster key value. Larger cluster keys require larger sizes. To see the actual size, query the KEY_SIZE column of the USER_CLUSTERS data dictionary view. This does not apply to hash clusters because hash values are not actually stored in the cluster.
Although the maximum number of cluster and hash key values per data block is fixed on a per `-cluster basis, Oracle does not reserve an equal amount of space for each cluster or hash key value. Varying this space stores data more efficiently, because the data stored per cluster or hash key value is rarely fixed.
A SIZE value smaller than the space needed by the average cluster or hash key value may require the data for one cluster key or hash key value to occupy multiple data blocks. A SIZE value much larger results in wasted space.
When you create a hash cluster, Oracle immediately allocates space for the cluster based on the values of the SIZE and HASHKEYS parameters. For more information on how Oracle allocates space for clusters, see Oracle8 Concepts.
You can add tables to an existing cluster by issuing a CREATE TABLE statement with the CLUSTER clause. A cluster can contain as many as 32 tables, although the performance gains of clustering are often lost in clusters of more than four or five tables.
All tables in the cluster have the cluster's storage characteristics as specified by the PCTUSED, PCTFREE, INITRANS, MAXTRANS, TABLESPACE, and STORAGE parameters.
The following statement creates an indexed cluster named PERSONNEL with the cluster key column DEPARTMENT_NUMBER, a cluster size of 512 bytes, and storage parameter values:
CREATE CLUSTER personnel
    ( department_number  NUMBER(2) )
    SIZE 512
    STORAGE (INITIAL 100K NEXT 50K PCTINCREASE 10);
The following statements add the EMP and DEPT tables to the cluster:
CREATE TABLE emp
    (empno     NUMBER        PRIMARY KEY,
     ename     VARCHAR2(10)  NOT NULL
                             CHECK (ename = UPPER(ename)),
     job       VARCHAR2(9),
     mgr       NUMBER        REFERENCES scott.emp(empno),
     hiredate  DATE          CHECK (hiredate >= SYSDATE),
     sal       NUMBER(10,2)  CHECK (sal > 500),
     comm      NUMBER(9,0)   DEFAULT NULL,
     deptno   NUMBER(2)      NOT NULL )
     CLUSTER personnel (deptno);

CREATE TABLE dept
    (deptno  NUMBER(2),
     dname   VARCHAR2(9),
     loc     VARCHAR2(9))
     CLUSTER personnel (deptno);
The following statement creates the cluster index on the cluster key of PERSONNEL:
CREATE INDEX idx_personnel ON CLUSTER personnel;
After creating the cluster index, you can insert rows into either the EMP or DEPT tables.
The following statement creates a hash cluster named PERSONNEL with the cluster key column DEPARTMENT_NUMBER, a maximum of 503 hash key values, each of size 512 bytes, and storage parameter values:
CREATE CLUSTER personnel
( department_number  NUMBER )
SIZE 512  HASHKEYS 500
    STORAGE (INITIAL 100K  NEXT 50K  PCTINCREASE 10);
Because the above statement omits the HASH IS clause, Oracle uses the internal hash function for the cluster.
The following statement creates a hash cluster named PERSONNEL with the cluster key made up of the columns HOME_AREA_CODE and HOME_PREFIX, and uses a SQL expression containing these columns for the hash function:
CREATE CLUSTER personnel
    ( home_area_code  NUMBER,
    home_prefix     NUMBER )
    HASHKEYS 20
    HASH IS MOD(home_area_code + home_prefix, 101);
To re-create a control file in one of the following cases:
See also "Re-creating Control Files".
You must have the OSDBA role enabled. The database must not be mounted by any instance.
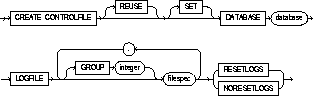
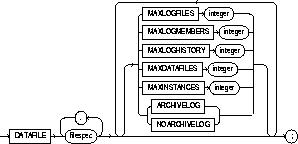
filespec: See "Filespec".
|
REUSE |
specifies that existing control files identified by the initialization parameter CONTROL_FILES can be reused, thus ignoring and overwriting any information they may currently contain. If you omit this option and any of these control files already exists, Oracle returns an error. |
|
DATABASE |
specifies the name of the database. The value of this parameter must be the existing database name established by the previous CREATE DATABASE statement or CREATE CONTROLFILE statement. |
|
SET DATABASE |
changes the name of the database. The name of a database can be as long as eight bytes. |
|
LOGFILE |
specifies the redo log file groups for your database. You must list all members of all redo log file groups. See the syntax description of filespec in "Filespec". |
|
RESETLOGS |
ignores the contents of the files listed in the LOGFILE clause. These files do not have to exist. Each filespec in the LOGFILE clause must specify the SIZE parameter. Oracle assigns all redo log file groups to thread 1 and enables this thread for public use by any instance. After using this option, you must open the database using the RESETLOGS option of the ALTER DATABASE command. |
|
NORESETLOGS |
specifies that all files in the LOGFILE clause should be used as they were when the database was last open. These files must exit and must be the current redo log files rather than restored backups. Oracle reassigns the redo log file groups to the threads to which they were previously assigned and reenables the threads as they were previously enabled. If you specify GROUP values, Oracle verifies these values with the GROUP values when the database was last open. |
|
DATAFILE |
specifies the datafiles of the database. You must list all datafiles. These files must all exist, although they may be restored backups that require media recovery. See the syntax description of filespec in "Filespec". |
|
MAXLOGFILES |
specifies the maximum number of redo log file groups that can ever be created for the database. Oracle uses this value to determine how much space in the control file to allocate for the names of redo log files. The default and maximum values depend on your operating system. The value that you specify should not be less than the greatest GROUP value for any redo log file group. |
|
|
Note that the number of redo log file groups accessible to your instance is also limited by the initialization parameter LOG_FILES. |
|
MAXLOGMEMBERS |
specifies the maximum number of members, or copies, for a redo log file group. Oracle uses this value to determine how much space in the control file to allocate for the names of redo log file. The minimum value is 1. The maximum and default values depend on your operating system. |
|
MAXLOGHISTORY |
specifies the maximum number of archived redo log file groups for automatic media recovery of the Oracle8 Parallel Server. Oracle uses this value to determine how much space in the control file to allocate for the names of archived redo log files. The minimum value is 0. The default value is a multiple of the MAXINSTANCE value and depends on your operating system. The maximum value is limited only by the maximum size of the control file. This parameter is useful only if you are using Oracle with the Parallel Server option in both parallel mode and archivelog mode. |
|
MAXDATAFILES |
specifies the initial sizing of the datafiles section of the control file at CREATE DATABASE or CREATE CONTROLFILE time. An attempt to add a file whose number is greater than MAXDATAFILES, but less than or equal to DB_FILES, causes the Oracle8 control file to expand automatically so that the datafiles section can accommodate more files. |
|
|
Note that the number of datafiles accessible to your instance is also limited by the initialization parameter DB_FILES. |
|
MAXINSTANCES |
specifies the maximum number of instances that can simultaneously have the database mounted and open. This value takes precedence over the value of the initialization parameter INSTANCES. The minimum value is 1. The maximum and default values depend on your operating system. |
|
ARCHIVELOG |
establishes the mode of archiving the contents of redo log files before reusing them. This option prepares for the possibility of media recovery as well as instance recovery. |
|
NOARCHIVELOG |
If you omit both the ARCHIVELOG and NOARCHIVELOG options, Oracle chooses noarchivelog mode by default. After creating the control file, you can change between archivelog mode and noarchivelog mode with the ALTER DATABASE command. |
Oracle recommends that you take a full backup of all files in the database before issuing a CREATE CONTROLFILE statement.
When you issue a CREATE CONTROLFILE statement, Oracle creates a new control file based on the information you specify in the statement. If you omit any of the options from the statement, Oracle uses the default options, rather than the options for the previous control file. After successfully creating the control file, Oracle mounts the database in the mode specified by the initialization parameter PARALLEL_SERVER. You then must perform media recovery before opening the database. It is recommended that you then shutdown the instance and take a full backup of all files in the database.
For more information about using this command, see the Oracle8 Administrator's Guide.
This example re-creates a control file:
CREATE CONTROLFILE REUSE
DATABASE orders_2
LOGFILE GROUP 1 ('diskb:log1.log', 'diskc:log1.log') SIZE 50K,
GROUP 2 ('diskb:log2.log', 'diskc:log2.log') SIZE 50K
NORESETLOGS
DATAFILE 'diska:dbone.dat' SIZE 2M
MAXLOGFILES 5
MAXLOGHISTORY 100
MAXDATAFILES 10
MAXINSTANCES 2
ARCHIVELOG;
To create a database, making it available for general use, with the following options:
For examples of some of these purposes, see "Examples".
This command erases all data in any specified datafiles that already exist to prepare them for initial database use. If you use the command on an existing database, all data in the datafiles is lost.
After creating the database, this command mounts it in the mode specified by the PARALLEL_SERVER initialization parameter and opens it, making it available for normal use.
You must have the OSDBA role enabled.
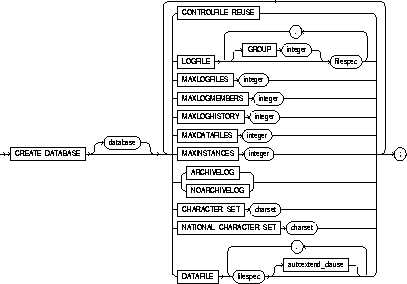
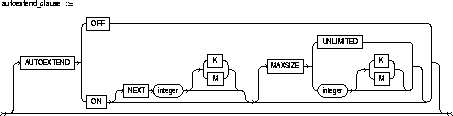
|
database |
is the name of the database to be created and can be up to eight bytes long. The database name can contain only ASCII characters. Oracle writes this name into the control file. If you subsequently issue an ALTER DATABASE statement and that explicitly specifies a database name, Oracle verifies that name with the name in the control file. Database names should also adhere to the rules described in "Schema Object Naming Rules". |
|
|
|
Note: You cannot use special characters from European or Asian character sets in a database name. For example, the umlaut is not allowed. |
|
|
|
If you omit the database name from a CREATE DATABASE statement, Oracle uses the name specified by the initialization parameter DB_NAME. |
|
|
CONTROLFILE REUSE |
reuses existing control files identified by the initialization parameter CONTROL_FILES, thus ignoring and overwriting any information they currently contain. Normally you use this option only when you are re-creating a database, rather than creating one for the first time. You cannot use this option if you also specify a parameter value that requires that the control file be larger than the existing files. These parameters are MAXLOGFILES, MAXLOGMEMBERS, MAXLOGHISTORY, MAXDATAFILES, and MAXINSTANCES. |
|
|
|
If you omit this option and any of the files specified by CONTROL_FILES already exist, Oracle returns an error message. |
|
|
LOGFILE |
specifies one or more files to be used as redo log files. Each filespec specifies a redo log file group containing one or more redo log file members, or copies. See the syntax description of filespec in "Filespec". All redo log files specified in a CREATE DATABASE statement are added to redo log thread number 1. |
|
|
|
GROUP |
uniquely identifies a redo log file group and can range from 1 to the value of the MAXLOGFILES parameter. You cannot specify multiple redo log file groups having the same GROUP value. If you omit this parameter, Oracle generates its value automatically. You can examine the GROUP value for a redo log file group through the dynamic performance table V$LOG. |
|
|
If you omit the LOGFILE clause, Oracle creates two redo log file groups by default. The names and sizes of the default files depends on your operating system. |
|
|
MAXLOGFILES |
specifies the maximum number of redo log file groups that can ever be created for the database. Oracle uses this value to determine how much space in the control file to allocate for the names of redo log files. The default, minimum, and maximum values depends on your operating system. |
|
|
|
The number of redo log file groups accessible to your instance is also limited by the initialization parameter LOG_FILES. |
|
|
MAXLOGMEMBERS |
specifies the maximum number of members, or copies, for a redo log file group. Oracle uses this value to determine how much space in the control file to allocate for the names of redo log files. The minimum value is 1. The maximum and default values depend on your operating system. |
|
|
MAXLOGHISTORY |
specifies the maximum number of archived redo log files for automatic media recovery of Oracle with the Parallel Server option. Oracle uses this value to determine how much space in the control file to allocate for the names of archived redo log files. The minimum value is 0. The default value is a multiple of the MAXINSTANCES value and depends on your operating system. The maximum value is limited only by the maximum size of the control file. Note: This parameter is useful only if you are using Oracle with the Parallel Server option in parallel mode, and archivelog mode enabled. |
|
|
MAXDATAFILES |
specifies the initial sizing of the datafiles section of the control file at CREATE DATABASE or CREATE CONTROLFILE time. An attempt to add a file whose number is greater than MAXDATAFILES, but less than or equal to DB_FILES, causes the Oracle8 control file to expand automatically so that the datafiles section can accommodate more files. |
|
|
|
Note that the number of datafiles accessible to your instance is also limited by the initialization parameter DB_FILES. |
|
|
MAXINSTANCES |
specifies the maximum number of instances that can simultaneously have this database mounted and open. This value takes precedence over the value of initialization parameter INSTANCES. The minimum value is 1. The maximum and default values depend on your operating system. |
|
|
ARCHIVELOG |
establishes archivelog mode for redo log file groups. In this mode, the contents of a redo log file group must be archived before the group can be reused. This option prepares for the possibility of media recovery. |
|
|
NOARCHIVELOG |
establishes noarchivelog mode for redo log files groups. In this mode, the contents of a redo log file group need not be archived before the group can be reused. This option does not prepare for the possibility of media recovery. |
|
|
|
The default is noarchivelog mode. After creating the database, you can change between archivelog mode and noarchivelog mode with the ALTER DATABASE command. |
|
|
CHARACTER SET |
specifies the character set the database uses to store data. You cannot change the database character set after creating the database. The supported character sets and default value of this parameter depend on your operating system. |
|
|
|
You can specify any supported character set except the following fixed-width, multibyte character sets, which can be used only as the national character set: For more information about valid character sets, see in the Oracle8 Reference. |
|
|
NATIONAL CHARACTER SET |
specifies the national character set used to store data in columns specifically defined as NCHAR, NCLOB, or NVARCHAR2. You cannot change the national character set after creating the database. If not specified, the national character set defaults to the database character set. See Oracle8 Reference for valid character set names. |
|
|
DATAFILE |
specifies one or more files to be used as datafiles. See the syntax description of filespec in "Filespec". All these files become part of the SYSTEM tablespace. If you omit this clause, Oracle creates one datafile by default. The name and size of this default file depend on your operating system. Note: Oracle recommends that the total initial space allocated for the SYSTEM tablespace be a minimum of 5 megabytes. |
|
|
AUTOEXTEND |
enables or disables the automatic extension of a datafile. If you do not specify this clause, datafiles are not automatically extended. |
|
|
|
OFF |
disables autoextend if it is turned on. NEXT and MAXSIZE are set to zero. Values for NEXT and MAXSIZE must be respecified in ALTER DATABASE AUTOEXTEND or ALTER TABLESPACE AUTOEXTEND commands. |
|
|
ON |
enables autoextend. |
|
|
NEXT |
specifies the size in bytes of the next increment of disk space to be allocated to the datafile automatically when more extents are required. You can also use K or M to specify this size in kilobytes or megabytes. The default is one data block. |
|
|
MAXSIZE |
specifies the maximum disk space allowed for automatic extension of the datafile. |
|
|
UNLIMITED |
sets no limit on the allocation of disk space to the datafile. |
The following statement creates a small database using defaults for all arguments:
CREATE DATABASE;
The following statement creates a database and fully specifies each argument:
CREATE DATABASE newtest
CONTROLFILE REUSE
LOGFILE
GROUP 1 ('diskb:log1.log', 'diskc:log1.log') SIZE 50K,
GROUP 2 ('diskb:log2.log', 'diskc:log2.log') SIZE 50K
MAXLOGFILES 5
MAXLOGHISTORY 100
DATAFILE 'diska:dbone.dat' SIZE 2M
MAXDATAFILES 10
MAXINSTANCES 2
ARCHIVELOG
CHARACTER SET US7ASCII
NATIONAL CHARACTER SET JA16SJISFIXED
DATAFILE
'disk1:df1.dbf' AUTOEXTEND ON
'disk2:df2.dbf' AUTOEXTEND ON NEXT 10M MAXSIZE UNLIMITED;
To create a database link. A database link is a schema object in the local database that allows you to access objects on a remote database. The remote database can be either an Oracle or a non-Oracle system. See also "Creating Database Links".
To create a private database link, you must have CREATE DATABASE LINK system privilege. To create a public database link, you must have CREATE PUBLIC DATABASE LINK system privilege. Also, you must have CREATE SESSION privilege on the remote Oracle database. Net8 must be installed on both the local and remote Oracle databases. To access non-Oracle systems you must use the Oracle8 Heterogeneous Services.
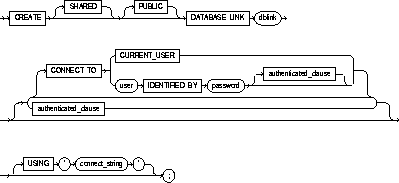

|
SHARED |
uses a single network connection to create a public database link that can be shared between multiple users. This option is available only with the multithreaded server configuration. For more information about shared database links, see Oracle8 Distributed Database Systems. |
|
|
PUBLIC |
creates a public database link available to all users. If you omit this option, the database link is private and is available only to you. |
|
|
dblink |
is the complete or partial name of the database link. For guidelines for naming database links, see "Referring to Objects in Remote Databases" and "Current-User Database Links". |
|
|
CONNECT TO |
enables a connection to the remote database. |
|
|
|
CURRENT_USER |
creates a current user database link. To use a current database link, the current user must be a global user authenticated by the Oracle Security Server. See also "Current-User Database Links". |
|
|
user IDENTIFIED BY password |
is the username and password used to connect to the remote database (fixed user database link). If you omit this clause, the database link uses the username and password of each user who is connected to the database (connected user database link). |
|
authenticated_clause |
specifies the username and password on the target instance. This clause authenticates the user to the remote server and is required for security. The specified username and password must be a valid username and password on the remote instance. The username and password are used only for authentication; no other operations are performed on behalf of this user. |
|
|
|
You must specify this clause when using the SHARED option. |
|
|
USING 'connect string' |
specifies the service name of a remote database. For information on specifying remote databases, see Net8 Administrator's Guide. |
|
You cannot create a database link in another user's schema, and you cannot qualify dblink with the name of a schema. Periods are permitted in names of database links, so Oracle interprets the entire name, such as RALPH.LINKTOSALES, as the name of a database link in your schema rather than as a database link named LINKTOSALES in the schema RALPH.
Once you have created a database link, you can use it to refer to tables and views on the remote database. You can refer to a remote table or view in a SQL statement by appending @dblink to the table or view name. You can query a remote table or view with the SELECT command. If you are using Oracle with the distributed option, you can also access remote tables and views using any of the following commands:
See Oracle8 Application Developer's Guide for information about accessing remote tables or views with PL/SQL functions, procedures, packages, and datatypes.
The number of different database links that can appear in a single statement is limited to the value of the initialization parameter OPEN_LINKS.
A current user database link is one that contains no user credentials and that enables a connection to a remote database as the current user. To use the link, the current user must be a global user with global accounts on both the local and remote databases. Both databases must be members of the same security domain.
To create a global user, see CREATE USER. For detailed information about current database links, see Oracle8 Distributed Database Systems.
When executing a stored object (such as a procedure, view, or trigger) that initiates a database link, CURRENT_USER is the username that created the stored object, and not the username that called the object. For example if the database link appears inside procedure SCOTT.P (created by SCOTT), and user JANE calls procedure SCOTT.P, the current user is SCOTT.
If the database link is used directly, that is, NOT from within a stored object, then the current user is the same as the connected user.
The following example defines a current-user database link:
CREATE DATABASE LINK sales.hq.acme.com
CONNECT TO CURRENT_USER
USING 'sales';
The following statement defines a fixed-user database link named SALES.HQ.ACME.COM:
CREATE DATABASE LINK sales.hq.acme.com
CONNECT TO scott IDENTIFIED BY tiger
USING 'sales'
Once this database link is created, you can query tables in the schema SCOTT on the remote database in this manner:
SELECT *
FROM emp@sales.hq.acme.com
You can also use DML commands to modify data on the remote database:
INSERT INTO accounts@sales.hq.acme.com(acc_no, acc_name, balance)
VALUES (5001, 'BOWER', 2000)

UPDATE accounts@sales.hq.acme.com
SET balance = balance + 500

DELETE FROM accounts@sales.hq.acme.com
WHERE acc_name = 'BOWER'
You can also access tables owned by other users on the same database. This example assumes SCOTT has access to ADAM's DEPT table:
SELECT *
FROM adams.dept@sales.hq.acme.com
The previous statement connects to the user SCOTT on the remote database and then queries ADAM's DEPT table.
A synonym may be created to hide the fact that SCOTT's EMP table is on a remote database. The following statement causes all future references to EMP to access a remote EMP table owned by SCOTT:
CREATE SYNONYM emp
FOR scott.emp@sales.hq.acme.com;
The following statement defines a shared public fixed user database link named SALES.HQ.ACME.COM that refers to user SCOTT with password TIGER on the database specified by the string service name 'SALES':
CREATE SHARED PUBLIC DATABASE LINK sales.hq.acme.com
CONNECT TO scott IDENTIFIED BY tiger
AUTHENTICATED BY anupam IDENTIFIED BY bhide
USING 'sales';
The following example creates a current user database link:
CREATE DATABASE LINK sales.hq.acme.com
CONNECT TO CURRENT_USER
USING 'sales';
Use CREATE DIRECTORY to create a directory object, which represents an operating system directory for administering access to, and the use of, BFILEs stored outside the database. A directory is an alias for a full pathname on the server's file system where the files are actually located.
You must have CREATE ANY DIRECTORY system privileges to create directories.
You must also create a corresponding operating system directory for file storage. Your system or database administrator must ensure that the operating system directory has the correct read permissions for Oracle processes.

|
OR REPLACE |
re-creates the directory database object if it already exists. You can use this option to change the definition of an existing directory without dropping, re-creating, and regranting database object privileges previously granted on the directory. Users who had previously been granted privileges on a redefined directory can still access the directory without being regranted the privileges. |
|
|
directory |
is the name of the directory object to be created. The maximum length of directory is 30 bytes. You cannot qualify a directory object with a schema name. See also "Directory Objects". Note: Oracle does not verify that the directory you specify actually exists; therefore, take care that you specify a valid directory in your operating system. In addition, if your operating system uses case-sensitive pathnames, be sure you specify the directory in the correct format. (However, you need not include a trailing slash at the end of the pathname.) |
|
|
'path_name' |
is the full pathname of the operating system directory on the server where the files are located. Note that the single quotes are required, with the result that the path name is case sensitive. |
|
A directory object specifies an alias name for a directory on the server's file system where external binary file LOBs (BFILEs) are located. You can use directory names when referring to BFILEs in your PL/SQL code and OCI calls, rather than hard-coding the operating system pathname, thereby allowing greater file management flexibility.
The Oracle BFILE datatype provides access to the external file system. A BFILE column or attribute contains a locator to an external file on the operating system, rather than the file itself. The locator maintains the directory alias and the filename.
All directories are created in a single namespace and are not owned by an individual's schema. You can secure access to the BFILEs stored within the directory structure by granting object privileges on the directories to specific users. When you create a directory, you are automatically granted the READ object privilege and can grant READ privileges to other users and roles. The DBA can also grant this privilege to other users and roles.
Privileges granted for the directory are created independently of the permissions defined for the operating system directory; therefore, the two may or may not correspond exactly. For example, an error occurs if user SCOTT is granted READ privilege on the directory schema object, but the corresponding operating system directory does not have READ permission defined for Oracle processes.
The following statement redefines directory database object BFILE_DIR to enable access to BFILEs stored in the operating system directory /PRIVATE1/LOB/FILES:
CREATE OR REPLACE DIRECTORY bfile_dir AS '/private1/LOB/files';
To create a stored function or to register an external function.
A stored function (also called a user function) is a set of PL/SQL statements you can call by name. Stored functions are very similar to procedures, except that a function returns a value to the environment in which it is called. User functions can be used as part of a SQL expression. For a general discussion of procedures and functions, see CREATE PROCEDURE. For examples of creating functions, see "Examples"
An external function is a third-generation language (3GL) routine stored in a shared library that can be called from SQL or PL/SQL. To call an external function, you must provide information in your PL/SQL function about where to find the external function, how to call it, and what to pass to it.
The CREATE FUNCTION command creates a function as a standalone schema object. You can also create a function as part of a package. For information on creating packages, see CREATE PACKAGE.
For more information about registering external functions, see the PL/SQL User's Guide and Reference.
Before a stored function can be created, the user SYS must run the SQL script DBMSSTDX.SQL. The exact name and location of this script depend on your operating system.
To create a function in your own schema, you must have CREATE PROCEDURE system privilege. To create a function in another user's schema, you must have CREATE ANY PROCEDURE system privilege.
To call an external function, you must have EXECUTE privileges on the callout library in which the function resides.
To create a stored function, you must be using Oracle with PL/SQL installed. For more information, see PL/SQL User's Guide and Reference.
To embed a CREATE FUNCTION statement inside an Oracle precompiler program, you must terminate the statement with the keyword END-EXEC followed by the embedded SQL statement terminator for the specific language.
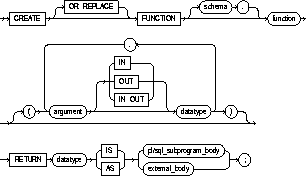
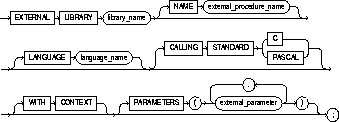 external_body::=
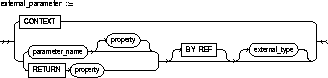
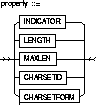
|
OR REPLACE |
re-creates the function if it already exists. Use this option to change the definition of an existing function without dropping, re-creating, and regranting object privileges previously granted on the function. If you redefine a function, Oracle recompiles it. For information on recompiling functions, see ALTER FUNCTION. |
|
|
Users who had previously been granted privileges on a redefined function can still access the function without being regranted the privileges. |
|
schema |
is the schema to contain the function. If you omit schema, Oracle creates the function in your current schema. |
|
function |
is the name of the function to be created. |
|
argument |
is the name of an argument to the function. If the function does not accept arguments, you can omit the parentheses following the function name. |
|
IN |
specifies that you must supply a value for the argument when calling the function. This is the default. |
|
OUT |
specifies the function will set the value of the argument. |
|
IN OUT |
specifies that a value for the argument can be supplied by you and may be set by the function. |
|
datatype |
is the datatype of an argument. An argument can have any datatype supported by PL/SQL. |
|
|
The datatype cannot specify a length, precision, or scale. Oracle derives the length, precision, or scale of an argument from the environment from which the function is called. |
|
RETURN datatype |
specifies the datatype of the function's return value. Because every function must return a value, this clause is required. The return value can have any datatype supported by PL/SQL. |
|
|
The datatype cannot specify a length, precision, or scale. Oracle derives the length, precision, or scale of the return value from the environment from which the function is called. For information on PL/SQL datatypes, see PL/SQL User's Guide and Reference. |
|
pl/sql_subprogram_body |
is the definition of the function. Function definitions are writing in PL/SQL. For information on PL/SQL, see PL/SQL User's Guide and Reference.
|
|
external_body_clause |
identifies the external function to be registered. |
|
AS EXTERNAL |
identifies an external 3GL function stored in a shareable library. The AS EXTERNAL clause is the interface between PL/SQL and the external function. |
|
LIBRARY |
specifies the shared library in which the external function is stored. You must have EXECUTE privileges on the library. See CREATE LIBRARY for the syntax. |
|
library_name |
is a PL/SQL identifier. Enclosing library_name in double quotes makes it case sensitive, but quotes are not required. |
|
NAME external_function_name |
specifies the external function to be called. Enclosing external_function_name in double quotes makes it case sensitive, but quotes are not required. If you omit the name, it defaults to the PL/SQL subprogram (uppercase) name. |
|
LANGUAGE |
specifies the 3GL in which the external function was written. Currently, the only language name supported is C. If you omit the name, it defaults to C. |
|
CALLING STANDARD |
specifies the calling standard (C or Pascal) under which the external function was compiled. If you omit the calling standard, it defaults to C. |
|
WITH CONTEXT |
specifies that a context pointer will be the first parameter passed to the external function. The context is opaque to the external function but is available to access functions called by the external function. For more information about the WITH CONTEXT clause, see PL/SQL User's Guide and Reference. |
|
PARAMETERS |
specifies the positions and datatypes of parameters passed to the external function. It can also specify parameter properties such as current length and maximum length, and the preferred parameter passing method (by value or by reference). For more information about parameter passing see PL/SQL User's Guide and Reference. |
The following statement creates the function GET_BAL:
CREATE FUNCTION get_bal(acc_no IN NUMBER)
RETURN NUMBER
IS
acc_bal NUMBER(11,2);
BEGIN
SELECT balance
INTO acc_bal
FROM accounts
WHERE account_id = acc_no;
RETURN(acc_bal);
END;
The GET_BAL function returns the balance of a specified account.
When you call the function, you must specify the argument ACC_NO, the number of the account whose balance is sought. The datatype of ACC_NO is NUMBER.
The function returns the account balance. The RETURN clause of the CREATE FUNCTION statement specifies the datatype of the return value to be NUMBER.
The function uses a SELECT statement to select the BALANCE column from the row identified by the argument ACC_NO in the ACCOUNTS table. The function uses a RETURN statement to return this value to the environment in which the function is called.
The function created above can be used in a SQL statement. For example:
SELECT get_bal(100) FROM DUAL;
The following statement creates PL/SQL standalone function GET_VAL that registers the C routine C_GET_VAL as an external function:
CREATE FUNCTION get_val
( x_val IN BINARY_INTEGER,
y_val IN BINARY_INTEGER,
image IN LONG RAW )
RETURN BINARY_INTEGER AS EXTERNAL LIBRARY c_utils
NAME "c_get_val"
LANGUAGE C;
To create an index on
 one or more scalar typed object attributes of a table or a cluster
 a nested table storage table for indexing a nested table column
An index is a schema object that contains an entry for each value that appears in the indexed column(s) of the table or cluster and provides direct, fast access to rows. A partitioned index consists of partitions containing an entry for each value that appears in the indexed column(s) of the table. See also "Creating Indexes".
To create an index in your own schema, one of the following conditions must be true:
To create an index in another schema, you must have CREATE ANY INDEX system privilege.
Also, the owner of the schema to contain the index must have either space quota on the tablespaces to contain the index or index partitions, or UNLIMITED TABLESPACE system privilege.
See also "Index Columns".
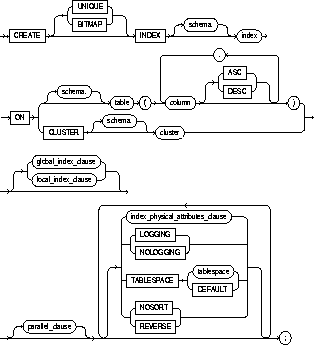

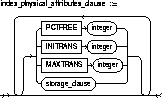
parallel_clause: See PARALLEL clause.
storage_clause: See STORAGE clause
|
UNIQUE |
specifies that the value of the column (or combination of columns) in the table to be indexed must be unique. |
|
|
If the index is local nonprefixed (see LOCAL clause below), then the index key must contain the partitioning key. |
|
BITMAP |
specifies that index is to be created as a bitmap, rather than as a B-tree. See also "Creating Bitmap Indexes". Note: You cannot use this keyword when creating a global partitioned index. |
|
You can specify either UNIQUE or BITMAP, but you cannot create a unique bitmap index. |
|
|
schema |
is the schema to contain the index. If you omit schema, Oracle creates the index in your own schema. |
|
index |
is the name of the index to be created. (See also "Multiple Indexes Per Table".) An index can contain several partitions. |
|
|
You cannot range partition a cluster index or an index defined on a clustered table. |
|
table |
is the name of the table for which the index is to be created. If you do not qualify table with schema, Oracle assumes the table is contained in your own schema. |
|
|
If the index is LOCAL, then table must be partitioned. |
|
|
You cannot create an index on an index-organized table. |
|
|
|
|
column |
is the name of a column in the table. An index can have as many as 32 columns. A column of an index cannot be of datatype LONG or LONG RAW. See also "Index Columns". |
|
|
See also "Nulls". |
|
ASC / DESC |
are allowed for DB2 syntax compatibility, although indexes are always created in ascending order. Indexes on character data are created in ascending order of the character values in the database character set. |
|
CLUSTER |
specifies the cluster for which a cluster index is to be created. If you do not qualify cluster with schema, Oracle assumes the cluster is contained in your current schema. You cannot create a cluster index for a hash cluster. See also "Creating Cluster Indexes". |
|
index_physical_attributes_clause |
establishes values for the INITRANS, MAXTRANS, and PCTFREE parameters and storage characteristics for the index. See CREATE TABLE. |
|
PCTFREE |
is the percentage of space to leave free for updates and insertions within each of the index's data blocks. |
|
storage_clause |
establishes the storage characteristics for the index. See the STORAGE clause. |
|
TABLESPACE |
is the name of the tablespace to hold the index or index partition. If you omit this option, Oracle creates the index in the default tablespace of the owner of the schema containing the index. |
|
|
For a partitioned index, this is the tablespace name. |
|
|
For a local index, you can specify the keyword DEFAULT in place of tablespace. New partitions added to the local index will be created in the same tablespace(s) as the corresponding partition(s) of the underlying table. |
|
NOSORT |
indicates to Oracle that the rows are stored in the database in ascending order; therefore Oracle does not have to sort the rows when creating the index. You cannot specify REVERSE with this option. See also "The NOSORT Option". |
|
REVERSE |
stores the bytes of the index block in reverse order, excluding the ROWID. You cannot specify NOSORT with this option. |
|
|
You cannot reverse a bitmap index. |
|
LOGGING /NOLOGGING |
specifies that the creation of the index will be logged (LOGGING) or not logged (NOLOGGING) in the redo log file. It also specifies that subsequent Direct Loader (SQL*Loader) and direct-load INSERT operations against the index are logged or not logged. LOGGING is the default. |
|
|
If index is nonpartitioned, this is the logging attribute of the index. |
|
|
For partitioned index, the logging attribute specified is the default physical attribute of the segments associated with the index partitions. The default logging value applies to all partitions specified in the CREATE statement (and on subsequent ALTER TABLE ADD PARTITION statements) unless you specify LOGGING/NOLOGGING in the PARTITION description clause. |
|
|
In NOLOGGING mode, data is modified with minimal logging (to mark new extents invalid and to record dictionary changes). When applied during media recovery, the extent invalidation records mark a range of blocks as logically corrupt, since the redo data is not logged. Thus if you cannot afford to lose this index, it is important to take a backup after the NOLOGGING operation. |
|
|
If the database is run in ARCHIVELOG mode, media recovery from a backup taken before the LOGGING operation will re-create the index. However, media recovery from a backup taken before the NOLOGGING operation will not re-create the index. |
|
|
The logging attribute of the index is independent of that of its base table. |
|
|
If the [NO]LOGGING clause is omitted, the logging attribute of the index defaults to the logging attribute of the tablespace in which it resides. |
|
|
For more information about the LOGGING option and Parallel DML, see "NOLOGGING", Oracle8 Concepts and Oracle8 Parallel Server Concepts and Administration. |
|
GLOBAL |
specifies that the partitioning of the index is user defined and is not equipartitioned with the underlying table. By default, nonpartitioned indexes are global indexes. |
|
PARTITION BY RANGE |
specifies that the global index is partitioned on the ranges of values from the columns specified in column_list. You cannot specify this clause for a LOCAL index. |
|
(column_list) |
is the name of the column(s) of a table on which the index is partitioned. The column_list must specify a left prefix of the index column list. |
|
|
You cannot specify more than 32 columns in column_list, and the columns cannot contain the ROWID pseudocolumn or a column of type ROWID. |
|
LOCAL |
specifies that the index is range partitioned on the same columns, with the same number of partitions, and the same partition bounds as table. Oracle automatically maintains LOCAL index partitioning as the underlying table is repartitioned. |
|
PARTITION partition_name |
describes the individual partitions. The number of clauses determines the number of partitions. If the index is local, the number of index partitions must be equal to the number of the table partitions, and in the same order. |
|
|
The partition_name is the name of the physical index partition. If partition_name is omitted, Oracle generates a name with the form SYS_Pn. |
|
|
For local indexes, if partition_name is omitted, Oracle generates a name that is consistent with the corresponding table partition. If the name conflicts with an existing index partition name, the form SYS_Pn is used. See also "Creating Partitioned Indexes". |
|
VALUES LESS THAN (value_list) |
specifies the (noninclusive) upper bound for the current partition in a global index. The value_list is a comma-separated, ordered list of literal values corresponding to column_list in the PARTITION BY RANGE clause. Always specify MAXVALUE as the value_list of the last partition. |
|
|
You cannot specify this clause for a local index. |
|
parallel_clause |
specifies the degree of parallelism for creating the index. See the PARALLEL clause. |
An index is an ordered list of all the values that reside in a group of one or more columns at a given time. Such a list makes queries that test the values in those columns vastly more efficient. However, indexes take up data storage space and must be changed whenever the data is changed. Therefore, you should make a cost-benefit analysis in each case to determine whether and how indexes should be used. Oracle can use indexes to improve performance when:
When you initially insert rows into a new table, it is generally faster to create the table, insert the rows, and then create the index. If you create the index before inserting the rows, Oracle must update the index for every row inserted.
Oracle recommends that you do not explicitly define UNIQUE indexes on tables; uniqueness is strictly a logical concept and should be associated with the definition of a table. Instead, define UNIQUE integrity constraints on the desired columns. Oracle enforces UNIQUE integrity constraints by automatically defining a unique index on the unique key. Exceptions to this recommendation are usually performance related. For example, using a CREATE TABLE ... AS SELECT with a UNIQUE constraint is very much slower than creating the table without the constraint and then manually creating the UNIQUE index.
If indexes contain NULLs, the NULLS generally are considered distinct values. There is, however, one exception: if all the non-NULL values in two or more rows of an index are identical, the rows are considered identical; therefore, UNIQUE indexes prevent this from occurring. This does not apply if there are no non-NULL values-in other words, if the rows are entirely NULL.
An index can contain a maximum of 32 columns. The index entry becomes the concatenation of all data values from each column. You can specify the columns in any order. The order you choose is important to how Oracle uses the index.
When appropriate, Oracle uses the entire index or a leading portion of the index. Assume an index named IDX1 is created on columns A, B, and C of table TAB1 (in the order A, B, C). Oracle uses the index for references to columns A, B, C (the entire index); A, B; or just column A. References to columns B and C do not use the IDX1 index. Of course, you can also create another index just for columns B and C.
You can create unlimited indexes for a table provided that the combination of columns differs for each index. You can create more than one index using the same columns provided that you specify distinctly different combinations of the columns. For example, the following statements specify valid combinations:
CREATE INDEX emp_idx1 ON emp (ename, job);
CREATE INDEX emp_idx2 ON emp (job, ename);
You cannot create an index that references only one column in a table if another such index already exists.
Note that each index increases the processing time needed to maintain the table during updates to indexed data. Thus, updating a table with a single index will take less time than if the table had five indexes.
The NOSORT option can substantially reduce the time required to create an index. Normal index creation first sorts the rows of the table based on the index columns and then builds the index. The sort operation is often a substantial portion of the total work involved. If the rows are already physically stored in ascending order (based on the indexed column values), then the NOSORT option causes Oracle to bypass the sort phase of the process.
You cannot use the NOSORT option to create a cluster index, partitioned index, or a bitmap index.
The NOSORT option also reduces the amount of space required to build the index. Oracle uses temporary segments during the sort. Since a sort is not performed, the index is created with much less temporary space.
To use the NOSORT option, you must guarantee that the rows are physically sorted in ascending order. However, you run no risk by trying the NOSORT option. If your rows are not in the ascending order, Oracle returns an error. You can issue another CREATE INDEX without the NOSORT option. Because of the physical data independence inherent in relational database management systems, especially Oracle, there is no way to force a physical internal order on a table. The CREATE INDEX command with the NOSORT option should be used immediately after the initial load of rows into a table.
The NOLOGGING option may substantially reduce the time required to create a large index. This feature is particularly useful after creating a large index in parallel. For backup and recovery considerations, see Oracle8 Backup and Recovery Guide and Oracle8 Administrator's Guide.
To quickly create an index in parallel on a table that was created using a fast parallel load (so all rows are already sorted), you might issue the following statement:
CREATE INDEX i_loc
ON big_table (akey)
NOSORT
NOLOGGING
PARALLEL (DEGREE 5);
Oracle does not index table rows in which all key columns are NULL, except in the case of bitmap indexes.
Consider the following statement:
SELECT ename
FROM emp
WHERE comm IS NULL;
The above query does not use an index created on the COMM column unless it is a bitmap index.
Oracle does not automatically create an index for a cluster when the cluster is initially created. Data manipulation language statements cannot be issued against clustered tables until a cluster index has been created.
To create an index for the EMPLOYEE cluster, issue the following statement:
CREATE INDEX ic_emp
ON CLUSTER employee
Note that no index columns are specified, because the index is automatically built on all the columns of the cluster key. For cluster indexes, all rows are indexed.
Indexes can be local prefixed (unique or nonunique), local nonprefixed (unique, but only when the partitioning key is a subset of the index key or nonunique), or global prefixed (unique or nonunique). Oracle does not support global nonprefixed indexes. Local indexes are always partitioned. Global indexes can be nonpartitioned or partitioned.
Index partitions must be listed in order. For a global index, this means that the partition bound of the first partition listed must be less than the partition bound of the second partition listed, and the partition bound of the second partition listed must be less than the third, and so on. For a local index, you must list the partitions in the same order as the partitions of the underlying table to which they correspond.
The following statement creates a global prefixed index STOCK_IX on table STOCK_XACTIONS with two partitions, one for each half of the alphabet. The index partition names are system generated:
CREATE INDEX stock_ix ON stock_xactions
  (stock_symbol, stock_series)
   GLOBAL PARTITION BY RANGE (stock_symbol)
     (PARTITION VALUES LESS THAN ('N') TABLESPACE ts3,
      PARTITION VALUES LESS THAN (MAXVALUE) TABLESPACE ts4);
Bitmap indexes store the ROWIDs associated with a key value as a bitmap. Each bit in the bitmap corresponds to a possible ROWID, and if the bit is set, it means that the row with the corresponding ROWID contains the key value. The internal representation of bitmaps is best suited for applications with low levels of concurrent transactions, such as data warehousing. See Oracle8 Concepts and Oracle8 Tuning for more information about using bitmap indexes.
To create a bitmap partitioned index on a table with four partitions, issue the following statement:
CREATE BITMAP INDEX partno_ix
ON lineitem(partno)
TABLESPACE ts1
LOCAL (PARTITION quarter1 TABLESPACE ts2,
PARTITION quarter2 STORAGE (INITIAL 10K NEXT 2K),
PARTITION quarter3 TABLESPACE ts2,
PARTITION quarter4);
You cannot create bitmap indexes, unique bitmap indexes, or global partitioned indexes.
 Creating Indexes on Nested Table Columns
Creating a table with nested table columns implicitly creates a storage table for each nested table column. The storage table stores the rows of the nested table values and the nested table identifier values assigned to each row. These identifier values are contained in a storage table pseudocolumn called NESTED_TABLE_ID.
You create an index on a nested table column by creating the index on the nested table storage table. You can include the NESTED_TABLE_ID pseudocolumn to create a UNIQUE index, which effectively ensures that the rows of a nested table value are distinct.
In the following example, UNIQUE index UNIQ_PROJ_INDX is created on storage table NESTED_PROJECT_TABLE. Including pseudocolumn NESTED_TABLE_ID ensures distinct rows in nested table column PROJS_MANAGED:
CREATE TYPE proj_table_type AS TABLE OF proj_type;

CREATE TABLE employee ( emp_num NUMBER, emp_name CHAR(31),
projs_managed proj_table_type )
NESTED TABLE projs_managed STORE AS nested_project_table;

CREATE UNIQUE INDEX uniq_proj_indx
ON nested_project_table ( NESTED_TABLE_ID, proj_num);
To create a schema object (library), which represents an operating-system shared library, from which SQL and PL/SQL can call external third-generation-language (3GL) functions and procedures. See "Examples".
You must have CREATE ANY LIBRARY system privileges. To use the procedures and functions stored in the library, you must have EXECUTE object privileges on the library.
The CREATE LIBRARY command is valid only on platforms that support shared libraries and dynamic linking.

filespec: See "Filespec".
The following statement creates library EXT_LIB:
CREATE LIBRARY ext_lib AS '/OR/lib/ext_lib.so';
The following example re-creates library EXT_LIB:
CREATE OR REPLACE ext_lib IS '/OR/newlib/ext_lib.so';
To create the specification for a stored package. A package is an encapsulated collection of related procedures, functions, and other program objects stored together in the database. The specification declares these objects.
Before a package can be created, the user SYS must run the SQL script DBMSSTDX.SQL. The exact name and location of this script depend on your operating system.
To create a package in your own schema, you must have CREATE PROCEDURE system privilege. To create a package in another user's schema, you must have CREATE ANY PROCEDURE system privilege.
To embed a CREATE PACKAGE statement inside an Oracle precompiler program, you must terminate the statement with the keyword END-EXEC followed by the embedded SQL statement terminator for the specific language.
For more information, see PL/SQL User's Guide and Reference.

|
OR REPLACE |
re-creates the package specification if it already exists. Use this option to change the specification of an existing package without dropping, re-creating, and regranting object privileges previously granted on the package. If you change a package specification, Oracle recompiles it. For information on recompiling package specifications, see ALTER PROCEDURE. |
|
|
Users who had previously been granted privileges on a redefined package can still access the package without being regranted the privileges. |
|
schema |
is the schema to contain the package. If you omit schema, Oracle creates the package in your own schema. |
|
package |
is the name of the package to be created. See also "Packages". |
|
pl/sql_package_spec |
is the package specification. The package specification can declare program objects. Package specifications are written in PL/SQL. For information on PL/SQL, including writing package specifications, see PL/SQL User's Guide and Reference. |
A package is an encapsulated collection of related program objects stored together in the database. Program objects are: procedures, functions, variables, constants, cursors, and exceptions.
Using packages is an alternative to creating procedures and functions as standalone schema objects. Packages have many advantages over stand-alone procedures and functions. They:
For more information on these and other benefits of packages, see Oracle8 Application Developer's Guide.
To create a package, you must perform two distinct steps:
See CREATE PACKAGE BODY.
Oracle stores the specification and body of a package separately in the database. Other schema objects that call or reference public program objects depend only on the package specification, not on the package body. This distinction allows you to change the definition of a program object in the package body without causing Oracle to invalidate other schema objects that call or reference the program object. Oracle invalidates dependent schema objects only if you change the declaration of the program object in the package specification.
This SQL statement creates the specification of the EMP_MGMT package:
CREATE PACKAGE emp_mgmt AS
   FUNCTION hire(ename VARCHAR2, job VARCHAR2, mgr NUMBER,
                 sal NUMBER, comm NUMBER, deptno NUMBER)
      RETURN NUMBER;
   FUNCTION create_dept(dname VARCHAR2, loc VARCHAR2)
      RETURN NUMBER;
   PROCEDURE remove_emp(empno NUMBER);
   PROCEDURE remove_dept(deptno NUMBER);
   PROCEDURE increase_sal(empno NUMBER, sal_incr NUMBER);
   PROCEDURE increase_comm(empno NUMBER, comm_incr NUMBER);
      no_comm EXCEPTION;
      no_sal EXCEPTION;
END emp_mgmt;
The specification for the EMP_MGMT package declares the following public program objects:
All of these objects are available to users who have access to the package. After creating the package, you can develop applications that call any of the package's public procedures or functions or raise any of the package's public exceptions.
Before you can call this package's procedures and functions, you must define these procedures and functions in the package body. For an example of a CREATE PACKAGE BODY statement that creates the body of the EMP_MGMT package, see CREATE PACKAGE BODY.
To create the body of a stored package. A package is an encapsulated collection of related procedures, stored functions, and other program objects stored together in the database. The body defines these objects.
Packages are an alternative to creating procedures and functions as standalone schema objects. For a discussion of packages, including how to create packages, see CREATE PACKAGE. For some illustrations, see "Examples".
Before a package can be created, the user SYS must run the SQL script DBMSSTDX.SQL. The exact name and location of this script depend on your operating system.
To create a package in your own schema, you must have CREATE PROCEDURE system privilege. To create a package in another user's schema, you must have CREATE ANY PROCEDURE system privilege.
To embed a CREATE PACKAGE BODY statement inside an Oracle precompiler program, you must terminate the statement with the keyword END-EXEC followed by the embedded SQL statement terminator for the specific language.
For more information, see PL/SQL User's Guide and Reference.
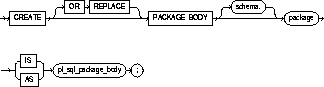
|
OR REPLACE |
re-creates the package body if it already exists. Use this option to change the body of an existing package without dropping, re-creating, and regranting object privileges previously granted on it. If you change a package body, Oracle recompiles it. For information on recompiling package bodies, see ALTER PACKAGE |
|
|
Users who had previously been granted privileges on a redefined package can still access the package without being regranted the privileges. |
|
schema |
is the schema to contain the package. If you omit schema, Oracle creates the package in your current schema. |
|
package |
is the name of the package to be created. |
|
pl/sql_package_body |
is the package body. The package body can declare and define program objects. Package bodies are written in PL/SQL. For information on PL/SQL, including writing package bodies, see PL/SQL User's Guide and Reference. |
This SQL statement creates the body of the EMP_MGMT package:
CREATE PACKAGE BODY emp_mgmt AS
   tot_emps  NUMBER;
   tot_depts NUMBER;

FUNCTION hire
   (ename VARCHAR2,
    job VARCHAR2,
    mgr NUMBER,
    sal NUMBER,
    comm NUMBER,
    deptno NUMBER)

RETURN NUMBER IS
   new_empno NUMBER(4);
BEGIN
   SELECT empseq.NEXTVAL
      INTO new_empno
      FROM DUAL;
   INSERT INTO emp
      VALUES (new_empno, ename, job, mgr, sal, comm, deptno,
         tot_emps := tot_emps + 1;
   RETURN(new_empno);
END;

FUNCTION create_dept(dname VARCHAR2, loc VARCHAR2)
   RETURN NUMBER IS
      new_deptno NUMBER(4);
   BEGIN
      SELECT deptseq.NEXTVAL
         INTO new_deptno
         FROM dual;
      INSERT INTO dept
         VALUES (new_deptno, dname, loc);
            tot_depts := tot_depts + 1;
      RETURN(new_deptno);
   END;

PROCEDURE remove_emp(empno NUMBER) IS
   BEGIN
      DELETE FROM emp
      WHERE emp.empno = remove_emp.empno;
         tot_emps := tot_emps - 1;
   END;

PROCEDURE remove_dept(deptno NUMBER) IS
   BEGIN
      DELETE FROM dept
      WHERE dept.deptno = remove_dept.deptno;
         tot_depts := tot_depts - 1;
      SELECT COUNT(*)
         INTO tot_emps
         FROM emp;
         /* In case Oracle deleted employees from the EMP table
         to enforce referential integrity constraints, reset
         the value of the variable TOT_EMPS to the total
         number of employees in the EMP table. */
   END;

PROCEDURE increase_sal(empno NUMBER, sal_incr NUMBER) IS
   curr_sal NUMBER(7,2);
   BEGIN
      SELECT sal
      INTO curr_sal
      FROM emp
      WHERE emp.empno = increase_sal.empno;
      IF curr_sal IS NULL
         THEN RAISE no_sal;
      ELSE
         UPDATE emp
         SET sal = sal + sal_incr
         WHERE empno = empno;
      END IF;
   END;

PROCEDURE increase_comm(empno NUMBER, comm_incr NUMBER) IS
      curr_comm NUMBER(7,2);
   BEGIN
      SELECT comm
      INTO curr_comm
      FROM emp
      WHERE emp.empno = increase_comm.empno
      IF curr_comm IS NULL
         THEN RAISE no_comm;
      ELSE
         UPDATE emp
         SET comm = comm + comm_incr;
      END IF;
   END;

END emp_mgmt;
This package body corresponds to the package specification in the example of the CREATE PACKAGE command earlier in this chapter. The package body defines the public program objects declared in the package specification:
These objects are declared in the package specification, so they can be called by application programs, procedures, and functions outside the package. For example, if you have access to the package, you can create a procedure INCREASE_ALL_COMMS separate from the EMP_MGMT package that calls the INCREASE_COMM procedure.
These objects are defined in the package body, so you can change their definitions without causing Oracle to invalidate dependent schema objects. For example, if you subsequently change the definition of HIRE, Oracle need not recompile INCREASE_ALL_COMMS before executing it.
The package body in this example also declares private program objects, the variables TOT_EMPS and TOT_DEPTS. These objects are declared in the package body rather than the package specification, so they are accessible to other objects in the package, but they are not accessible outside the package. For example, you cannot develop an application that explicitly changes the value of the variable TOT_DEPTS. However, the function CREATE_DEPT is part of the package, so CREATE_DEPT can change the value of TOT_DEPTS.
To create a standalone stored procedure or to register an external procedure. A procedure is a group of PL/SQL statements that you can call by name. An external procedure is a third-generation language (3GL) routine stored in a shared library which can be called from SQL or PL/SQL. To call an external procedure, you must provide information in your PL/SQL function about where to find the external procedure, how to call it, and what to pass to it. See also "Using Procedures".
For more information about registering external procedures, see the PL/SQL User's Guide and Reference.
Before creating a procedure, the user SYS must run the SQL script DBMSSTDX.SQL. The exact name and location of this script depends on your operating system.
To create a procedure in your own schema, you must have CREATE PROCEDURE system privilege. To create a procedure in another schema, you must have CREATE ANY PROCEDURE system privilege. To replace a procedure in another schema, you must have ALTER ANY PROCEDURE system privilege.
To call an external procedure, you must have EXECUTE privileges on the callout library in which the procedure resides.
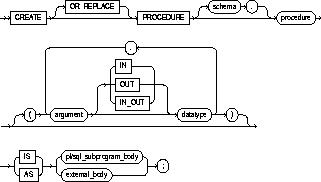
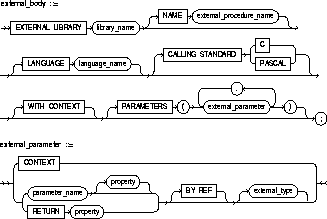

|
OR REPLACE |
re-creates the procedure if it already exists. Use this option to change the definition of an existing procedure without dropping, re-creating, and regranting object privileges previously granted on it. If you redefine a procedure, Oracle recompiles it. For information on recompiling procedures, see ALTER PROCEDURE. |
|
|
Users who had previously been granted privileges on a redefined procedure can still access the procedure without being regranted the privileges. |
|
schema |
is the schema to contain the procedure. If you omit schema, Oracle creates the procedure in your current schema. |
|
procedure |
is the name of the procedure to be created. |
|
argument |
is the name of an argument to the procedure. If the procedure does not accept arguments, you can omit the parentheses following the procedure name. |
|
IN |
specifies that you must specify a value for the argument when calling the procedure. |
|
OUT |
specifies that the procedure passes a value for this argument back to its calling environment after execution. |
|
IN OUT |
specifies that you must specify a value for the argument when calling the procedure and that the procedure passes a value back to its calling environment after execution. |
|
|
If you omit IN, OUT, and IN OUT, the argument defaults to IN. |
|
datatype |
is the datatype of the argument. As long as no length specifier is used, an argument can have any datatype supported by PL/SQL. For information on PL/SQL datatypes, see PL/SQL User's Guide and Reference. |
|
|
Datatypes are specified without a length, precision, or scale. For example, VARCHAR2(10) is not valid, but VARCHAR2 is valid. Oracle derives the length, precision, and scale of an argument from the environment from which the procedure is called. |
|
IS pl/sql_subprogram_body |
is the definition of the procedure. Procedure definitions are written in PL/SQL. For information on PL/SQL, including how to write a PL/SQL subprogram body, see PL/SQL User's Guide and Reference. |
|
AS external_body |
identifies an external 3GL procedure stored in a sharable library. The AS external_body clause is the interface between PL/SQL and the external procedure. |
|
LIBRARY |
specifies the shared library in which the external procedure is stored. You must have EXECUTE privileges on the library. See CREATE LIBRARY for the syntax. |
|
library_name |
is a PL/SQL identifier. Enclosing library_name in double quotes makes it case sensitive, but quotes are not required. |
|
NAME external_procedure_name |
specifies the external procedure to be called. Enclosing external_procedure_name in double quotes makes it case sensitive, but quotes are not required. If you omit the name, it defaults to the PL/SQL subprogram (uppercase) name. |
|
LANGUAGE |
specifies the 3GL in which the external procedure was written. Currently, the only language name supported is C. If you omit the name, it defaults to C. |
|
CALLING STANDARD |
specifies the calling standard (C or PASCAL) under which the external procedure was compiled. If you omit the calling standard, it defaults to C. |
|
WITH CONTEXT |
specifies that a context pointer will be the first parameter passed to the external procedure. The context is opaque to the external procedure but is available to access functions called by the external procedure. For more information about the WITH CONTEXT clause, see the PL/SQL User's Guide and Reference. |
|
PARAMETERS |
specifies the positions and datatypes of parameters passed to the external procedure. It can also specify parameter properties such as current length and maximum length, and the preferred parameter passing method (by value or by reference). For more information about parameter passing, see the PL/SQL User's Guide and Reference. |
|
To embed a CREATE PROCEDURE statement inside an Oracle precompiler program, you must terminate the statement with the keyword END-EXEC followed by the embedded SQL statement terminator for the specific language. |
|
A procedure is a group of PL/SQL statements that you can call by name. Stored procedures and stored functions are similar in many ways. This discussion applies to functions as well as to procedures. For information specific to functions, see CREATE FUNCTION.
With PL/SQL, you can group multiple SQL statements together with procedural PL/SQL statements similar to those in programming languages such as Ada and C. With the CREATE PROCEDURE command, you can create a procedure and store it in the database. You can call a stored procedure from any environment from which you can issue a SQL statement.
Stored procedures offer advantages in the areas of development, integrity, security, performance, and memory allocation. For more information on stored procedures, including how to call stored procedures, see Oracle8 Application Developer's Guide.
The CREATE PROCEDURE command creates a procedure as a standalone schema object. You can also create a procedure as part of a package. For information on creating packages, see CREATE FUNCTION.
The following statement creates the procedure CREDIT in the schema SAM:
CREATE PROCEDURE sam.credit (acc_no IN NUMBER, amount IN NUMBER)
AS BEGIN
UPDATE accounts
SET balance = balance + amount
WHERE account_id = acc_no;
END;
The CREDIT procedure credits a specified bank account with a specified amount. When you call the procedure, you must specify the following arguments:
|
ACC_NO |
is the number of the bank account to be credited. The argument's datatype is NUMBER. |
|
AMOUNT |
is the amount of the credit. The argument's datatype is NUMBER. |
The procedure uses an UPDATE statement to increase the value in the BALANCE column of the ACCOUNTS table by the value of the argument AMOUNT for the account identified by the argument ACC_NO.
In the following example, external procedure C_FIND_ROOT expects a pointer as a parameter. Procedure FIND_ROOT passes the parameter by reference using the BY REF phrase:
CREATE PROCEDURE
( x IN REAL ) AS
EXTERNAL
EXTERNAL
LIBRARY c_utils
NAME "c_find_root"
PARAMETERS
( x BY REF );
See the PL/SQL User's Guide and Reference for information about external procedures.
To create a profile. A profile is a set of limits on database resources. If you assign the profile to a user, that user cannot exceed these limits.
You must have CREATE PROFILE system privilege.
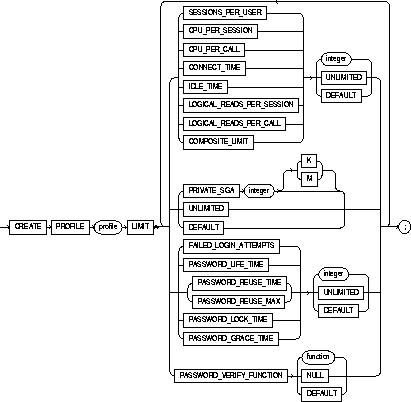
|
profile |
is the name of the profile to be created. See also "Using Profiles". |
|
|
SESSIONS_PER_USER |
limits a user to integer concurrent sessions. |
|
|
CPU_PER_SESSION |
limits the CPU time for a session, expressed in hundredth of seconds |
|
|
CPU_PER_CALL |
limits the CPU time for a call (a parse, execute, or fetch), expressed in hundredths of seconds. |
|
|
CONNECT_TIME |
limits the total elapsed time of a session, expressed in minutes. |
|
|
IDLE_TIME |
limits periods of continuous inactive time during a session, expressed in minutes. Long-running queries and other operations are not subject to this limit. |
|
|
LOGICAL_READS_PER_SESSION |
specifies the number of data blocks read in a session, including blocks read from memory and disk. |
|
|
LOGICAL_READS_PER_CALL |
specifies the number of data blocks read for a call to process a SQL statement (a parse, execute, or fetch). |
|
|
PRIVATE_SGA |
specifies the amount of private space a session can allocate in the shared pool of the system global area (SGA), expressed in bytes. You can use K or M to specify this limit in kilobytes or megabytes. This limit applies only if you are using multithreaded server architecture. The private space for a session in the SGA includes private SQL and PL/SQL areas, but not shared SQL and PL/SQL areas. |
|
|
FAILED_LOGIN_ATTEMPTS |
specifies the number of failed attempts to log in to the user account before the account is locked. |
|
|
PASSWORD_LIFE_TIME |
limits the number of days the same password can be used for authentication. The password expires if it is not changed within this period, and further connections are rejected. See also "Fractions in Dates". |
|
|
PASSWORD_REUSE_TIME |
specifies the number of days before which a password cannot be reused. If you set PASSWORD_REUSE_TIME to an integer value, then you must set PASSWORD_REUSE_MAX to UNLIMITED. |
|
|
PASSWORD_REUSE_MAX |
specifies the number of password changes required before the current password can be reused. If you set PASSWORD_REUSE_MAX to an integer value, then you must set PASSWORD_REUSE_TIME to UNLIMITED. |
|
|
PASSWORD_LOCK_TIME |
specifies the number of days an account will be locked after the specified number of consecutive failed login attempts. |
|
|
PASSWORD_GRACE_TIME |
specifies the number of days after the grace period begins during which a warning is issued and login is allowed. If the password is not changed during the grace period, the password expires. |
|
|
PASSWORD_VERIFY_FUNCTION |
allows a PL/SQL password complexity verification script to be passed as an argument to the CREATE PROFILE command. Oracle provides a default script, but you can create your own routine or use third-party software instead. |
|
|
|
function |
is the name of the password complexity verification routine. |
|
|
NULL |
indicates that no password verification is performed. |
|
|
DEFAULT |
omits a limit for this resource in this profile. A user assigned this profile is subject to the limit on the resource specified in the default profile. |
|
COMPOSITE_LIMIT |
specifies the total resources cost for a session, expressed in service units. Oracle calculates the total service units as a weighted sum of CPU_PER_SESSION, CONNECT_TIME, LOGICAL_READS_PER_SESSION, and PRIVATE_SGA. For information on how to specify the weight for each session resource, see ALTER RESOURCE COST. |
|
|
UNLIMITED |
indicates that a user assigned this profile can use an unlimited amount of this resource. |
|
|
DEFAULT |
omits a limit for this resource in this profile. A user assigned this profile is subject to the limit for this resource specified in the DEFAULT profile. See also "The DEFAULT Profile". |
|
A profile is a set of limits on database resources. You can use profiles to limit the database resources available to a user for a single call or a single session. Oracle enforces resource limits in the following ways:
You can use fractions of days for all parameters, with days as units. Fractions are expressed as x/y. For example, 1 hour is 1/24 and 1 minute is 1/1440.
For a detailed description and explanation of how to use password management and protection, see the Oracle8 Administrator's Guide .
To specify resource limits for a user, you must perform both of the following operations:
You can enable resource limits in one of two ways:
To specify a resource limit for a user, you must perform following steps:
Note that you can specify resource limits for users regardless of whether resource limits are enabled. However, Oracle does not enforce these limits until you enable them.
Oracle automatically creates a default profile named DEFAULT. This profile initially defines unlimited resources. You can change the limits defined in this profile with the ALTER PROFILE command.
Any user who is not explicitly assigned a profile is subject to the limits defined in the DEFAULT profile. Also, if the profile that is explicitly assigned to a user omits limits for some resources or specifies DEFAULT for some limits, the user is subject to the limits on those resources defined by the DEFAULT profile.
The following statement creates the profile SYSTEM_MANAGER:
CREATE PROFILE system_manager
LIMIT SESSIONS_PER_USER    UNLIMITED
CPU_PER_SESSION            UNLIMITED
CPU_PER_CALL               3000
CONNECT_TIME               45
LOGICAL_READS_PER_SESSION  DEFAULT
LOGICAL_READS_PER_CALL     1000
PRIVATE SGA                15K
COMPOSITE_LIMIT            5000000;
If you then assign the SYSTEM_MANAGER profile to a user, the user is subject to the following limits in subsequent sessions:
The following example creates the profile PROF:
CREATE PROFILE prof LIMIT PASSWORD_REUSE_MAX DEFAULT PASSWORD_REUSE_TIME UNLIMITED;
The following example creates profile MYPROFILE with password profile limits values set:
CREATE PROFILE myprofile LIMIT FAILED_LOGIN_ATTEMPTS 5 PASSWORD_LIFE_TIME 60 PASSWORD_REUSE_TIME 60 PASSWORD_REUSE_MAX UNLIMITED PASSWORD_VERIFY_FUNCTION verify_function PASSWORD_LOCK_TIME 1/24 PASSWORD_GRACE_TIME 10;
To create a role. A role is a set of privileges that can be granted to users or to other roles. See also "Using Roles".
For a detailed description and explanation of using global roles, see Oracle8 Distributed Database Systems.
You must have CREATE ROLE system privilege.

|
role |
is the name of the role to be created. Oracle recommends that the role contain at least one single-byte character regardless of whether the database character set also contains multibyte characters. See also "Roles Predefined by Oracle". |
|
|
NOT IDENTIFIED |
indicates that this role is authorized by the database and that no password is required to enable the role. |
|
|
IDENTIFIED |
indicates that a user must be authorized by the specified method before the role is enabled with the SET ROLE command: |
|
|
|
BY password |
The user must specify the password to Oracle when enabling the role. The password can contain only single-byte characters from your database character set regardless of whether this character set also contains multibyte characters. |
|
|
EXTERNALLY |
indicates that a user must be authorized by an external service (such as an operating system or third-party service) before enabling the role. |
|
|
|
Depending on the operating system, the user may have to specify a password to the operating system before the role is enabled. For more information about third-party service, see Oracle Security Server Guide. |
|
|
GLOBALLY |
indicates that a user must be authorized to use the role by the Oracle Security Service before the role is enabled with the SET ROLE command, or at login. |
|
If you omit both the NOT IDENTIFIED option and the IDENTIFIED clause, the role defaults to NOT IDENTIFIED. |
||
A role is a set of privileges that can be granted to users or to other roles. You can use roles to administer database privileges. You can add privileges to a role and then grant the role to a user. The user can then enable the role and exercise the privileges granted by the role. For information on enabling roles, see ALTER USER.
A role contains all privileges granted to the role and all privileges of other roles granted to it. A new role is initially empty. You add privileges to a role with the GRANT command.
When you create a role, Oracle grants you the role with ADMIN OPTION. The ADMIN OPTION allows you to
Some roles are defined by SQL scripts provided on your distribution media. The following roles are predefined:
The CONNECT, RESOURCE, and DBA roles are provided for compatibility with previous versions of Oracle. You should not rely on these roles; rather, Oracle recommends that you to design your own roles for database security. These roles may not be created automatically by future versions of Oracle.
The SELECT_CATALOG_ROLE, EXECUTE_CATALOG_ROLE, and DELETE_CATALOG_ROLE roles are provided for accessing exported data dictionary views and packages. For more information on these roles, see Oracle8 Application Developer's Guide.
The EXP_FULL_DATABASE and IMP_FULL_DATABASE roles are provided for convenience in using the Import and Export utilities.
Oracle also creates other roles that authorize you to administer the database. On many operating systems, these roles are called OSOPER and OSDBA. Their names may be different on your operating system.
The following example creates global role VENDOR:
CREATE ROLE vendor IDENTIFIED GLOBALLY;
The following statement creates the role TELLER:
CREATE ROLE teller IDENTIFIED BY cashflow;
Users who are subsequently granted the TELLER role must specify the password CASHFLOW to enable the role with the SET ROLE command.
To create a rollback segment. A rollback segment is an object that Oracle uses to store data necessary to reverse, or undo, changes made by transactions.
You must have CREATE ROLLBACK SEGMENT system privilege. Also, you must have either space quota on the tablespace to contain the rollback segment or UNLIMITED TABLESPACE system privilege.
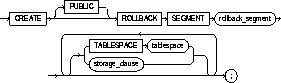
storage_clause: See the STORAGE clause.
|
PUBLIC |
specifies that the rollback segment is public and is available to any instance. If you omit this option, the rollback segment is private and is available only to the instance naming it in its initialization parameter ROLLBACK_SEGMENTS. |
|
|
rollback_segment |
is the name of the rollback segment to be created. |
|
|
TABLESPACE |
identifies the tablespace in which the rollback segment is created. If you omit this option, Oracle creates the rollback segment in the SYSTEM tablespace. See also "Rollback Segments and Tablespaces". |
|
|
storage_clause |
specifies the characteristics for the rollback segment. See the STORAGE clause. Note: The PCTINCREASE option of the storage_clause is not permitted with CREATE ROLLBACK SEGMENT. |
|
|
OPTIMAL |
This part of the STORAGE clause specifies an optimal size in bytes for a rollback segment. You can use K or M to specify this size in kilobytes or megabytes. Oracle tries to maintain this size for the rollback segment by dynamically deallocating extents when their data is no longer needed for active transactions. Oracle deallocates as many extents as possible without reducing the total size of the rollback segment below the OPTIMAL value. |
|
|
|
NULL |
specifies no optimal size for the rollback segment, meaning that Oracle never deallocates the rollback segment's extents. This is the default behavior. |
|
|
The value of this parameter cannot be less than the space initially allocated for the rollback segment specified by the MINEXTENTS, INITIAL, and NEXT parameters. The maximum value depends on your operating system. Oracle rounds values to the next multiple of the data block size. |
|
The tablespace must be online for you to add a rollback segment to it.
When you create a rollback segment, it is initially offline. To make it available for transactions by your Oracle instance, you must bring it online using one of the following:
For more information on creating rollback segments and making them available, see Oracle8 Administrator's Guide.
A tablespace can have multiple rollback segments. Generally, multiple rollback segments improve performance.
The following statement creates a rollback segment with default storage values in the system tablespace:
CREATE ROLLBACK SEGMENT rbs_2 TABLESPACE system;
The above statement is equivalent to the following:
CREATE ROLLBACK SEGMENT rbs_2 TABLESPACE system STORAGE ( INITIAL 10 K NEXT 10 K MAXEXTENTS UNLMIITED);
To create multiple tables and views and perform multiple grants in a single transaction. See also "Creating Schemas".
The CREATE SCHEMA statement can include, CREATE TABLE, CREATE VIEW, and GRANT statements. To issue a CREATE SCHEMA statement, you must have the privileges necessary to issue the included statements.

|
schema |
is the name of the schema. The schema name must be the same as your Oracle username. |
|
CREATE TABLE command |
is a CREATE TABLE statement to be issued as part of this CREATE SCHEMA statement. See the CREATE TABLE |
|
CREATE VIEW command |
is a CREATE VIEW statement to be issued as part of this CREATE SCHEMA statement. See the CREATE VIEW. |
|
GRANT command |
is a GRANT statement (Object Privileges) to be issued as part of this CREATE SCHEMA statement. See GRANT (Object Privileges). |
|
|
The CREATE SCHEMA statement supports the syntax of these commands only as defined by standard SQL, rather than the complete syntax supported by Oracle. |
With the CREATE SCHEMA command, you can issue multiple data definition language (DDL) statements in a single transaction. To execute a CREATE SCHEMA statement, Oracle executes each included statement. If all statements execute successfully, Oracle commits the transaction. If any statement results in an error, Oracle rolls back all the statements.
Terminate a CREATE SCHEMA statement just as you would any other SQL statement using the terminator character specific to your tool. For example, if you issue a CREATE SCHEMA statement in SQL*Plus or Server Manager, terminate the statement with a semicolon (;). Do not separate the individual statements within a CREATE SCHEMA statement with the terminator character.
The order in which you list the CREATE TABLE, CREATE VIEW, and GRANT statements is unimportant:
The statements within a CREATE SCHEMA statement can also reference existing objects:
The following statement creates a schema named BLAIR for the user BLAIR, creates the table SOX, creates the view RED_SOX, and grants SELECT privilege on the RED_SOX view to the user WAITES.
CREATE SCHEMA AUTHORIZATION blair CREATE TABLE sox (color VARCHAR2(10) PRIMARY KEY, quantity NUMBER) CREATE VIEW red_sox AS SELECT color, quantity FROM sox WHERE color = 'RED' GRANT select ON red_sox TO waites;
To create a sequence. A sequence is a database object from which multiple users may generate unique integers. You can use sequences to automatically generate primary key values. See also "Using Sequences", "Sequence Defaults", and "Accessing Sequence Values".
To create a sequence in your own schema, you must have CREATE SEQUENCE privilege.
To create a sequence in another user's schema, you must have CREATE ANY SEQUENCE privilege.
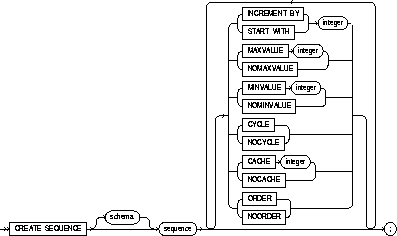
|
schema |
is the schema to contain the sequence. If you omit schema, Oracle creates the sequence in your own schema. |
|
sequence |
is the name of the sequence to be created. |
|
INCREMENT BY |
specifies the interval between sequence numbers. This integer value can be any positive or negative integer, but it cannot be 0. This value can have 28 or fewer digits. The absolute of this value must be less than the difference of MAXVALUE and MINVALUE. If this value is negative, then the sequence descends. If the increment is positive, then the sequence ascends. If you omit this clause, the interval defaults to 1. See also "Incrementing Sequence Values". |
|
START WITH |
specifies the first sequence number to be generated. Use this option to start an ascending sequence at a value greater than its minimum or to start a descending sequence at a value less than its maximum. For ascending sequences, the default value is the sequence's minimum value. For descending sequences, the default value is the sequence's maximum value. This integer value can have 28 or fewer digits. |
|
MAXVALUE |
specifies the maximum value the sequence can generate. This integer value can have 28 or fewer digits. MAXVALUE must be equal to or less than START WITH and must be greater than MINVALUE. |
|
NOMAXVALUE |
specifies a maximum value of 10^27 for an ascending sequence or -1 for a descending sequence. This is the default. |
|
MINVALUE |
specifies the sequence's minimum value. This integer value can have 28 or fewer digits. MINVALUE must be less than or equal to START WITH and must be less than MAXVALUE. |
|
NOMINVALUE |
specifies a minimum value of 1 for an ascending sequence or -(10^26) for a descending sequence. This is the default. |
|
CYCLE |
specifies that the sequence continues to generate values after reaching either its maximum or minimum value. After an ascending sequence reaches its maximum value, it generates its minimum value. After a descending sequence reaches its minimum, it generates its maximum. |
|
NOCYCLE |
specifies that the sequence cannot generate more values after reaching its maximum or minimum value. This is the default. |
|
CACHE |
specifies how many values of the sequence Oracle preallocates and keeps in memory for faster access. This integer value can have 28 or fewer digits. The minimum value for this parameter is 2. For sequences that cycle, this value must be less than the number of values in the cycle. You cannot cache more values than will fit in a given cycle of sequence numbers; thus, the maximum value allowed for CACHE must be less than the value determined by the following formula: |
|
|
(CEIL (MAXVALUE - MINVALUE)) / ABS (INCREMENT) See also "Caching Sequence Numbers". |
|
NOCACHE |
specifies that values of the sequence are not preallocated. |
|
If you omit both the CACHE parameter and the NOCACHE option, Oracle caches 20 sequence numbers by default. |
|
|
ORDER |
guarantees that sequence numbers are generated in order of request. You may want to use this option if you are using the sequence numbers as timestamps. Guaranteeing order is usually not important for sequences used to generate primary keys. |
|
NOORDER |
does not guarantee sequence numbers are generated in order of request. |
|
If you omit both the ORDER and NOORDER options, Oracle chooses NOORDER by default. Note that the ORDER option is necessary only to guarantee ordered generation if you are using Oracle with the Parallel Server option in parallel mode. If you are using exclusive mode, sequence numbers are always generated in order. |
|
You can use sequence numbers to automatically generate unique primary key values for your data, and you can also coordinate the keys across multiple rows or tables.
Values for a given sequence are automatically generated by special Oracle routines and, consequently, sequences avoid the performance bottleneck that results from implementation of sequences at the application level. For example, one common application-level implementation is to force each transaction to lock a sequence number table, increment the sequence, and then release the table. Under this implementation, only one sequence number can be generated at a time. In contrast, Oracle sequences permit the simultaneous generation of multiple sequence numbers while guaranteeing that every sequence number is unique.
When a sequence number is generated, the sequence is incremented, independent of the transaction committing or rolling back. If two users concurrently increment the same sequence, the sequence numbers each user acquires may have gaps because sequence numbers are being generated by the other user. One user can never acquire the sequence number generated by another user. Once a sequence value is generated by one user, that user can continue to access that value regardless of whether the sequence is incremented by another user.
Sequence numbers are generated independently of tables, so the same sequence can be used for one or for multiple tables. It is possible that individual sequence numbers will appear to be skipped, because they were generated and used in a transaction that ultimately rolled back. Additionally, a single user may not realize that other users are drawing from the same sequence.
The sequence defaults are designed so that if you specify none of the clauses, you create an ascending sequence that starts with 1 and increases by 1 with no upper limit. Specifying only INCREMENT BY -1 creates a descending sequence that starts with -1 and decreases with no lower limit.
You can create a sequence so that its values increment in one of following ways:
To create a sequence that increments without bound, omit the MAXVALUE parameter or specify the NOMAXVALUE option for ascending sequences or omit the MINVALUE parameter or specify the NOMINVALUE for descending sequences.
To create a sequence that stops at a predefined limit, specify a value for the MAXVALUE parameter for an ascending sequence or a value for the MINVALUE parameter for a descending sequence. Also specify the NOCYCLE option. Any attempt to generate a sequence number once the sequence has reached its limit results in an error.
To create a sequence that restarts after reaching a predefined limit, specify values for both the MAXVALUE and MINVALUE parameters. Also specify the CYCLE option. If you do not specify MINVALUE, then it defaults to NOMINVALUE; that is, the value 1.
The value of the START WITH parameter establishes the initial value generated after the sequence is created. Note that this value is not necessarily the value to which an ascending cycling sequence cycles after reaching its maximum or minimum value.
The number of values cached in memory for a sequence is specified by the value of the sequence's CACHE parameter. Cached sequences allow faster generation of sequence numbers. A cache for a given sequence is populated at the first request for a number from that sequence. The cache is repopulated every CACHE requests. If there is a system failure, all cached sequence values that have not been used in committed data manipulation language (DML) statements are lost. The potential number of lost values is equal to the value of the CACHE parameter.
A CACHE of 20 future sequence numbers is the default.
Once a sequence is created, you can access its values in SQL statements with the following pseudocolumns:
|
CURRVAL |
returns the current value of the sequence. |
|
NEXTVAL |
increments the sequence and returns the new value. |
For more information on using the above pseudocolumns, see the section "Pseudocolumns".
The following statement creates the sequence ESEQ:
CREATE SEQUENCE eseq INCREMENT BY 10
The first reference to ESEQ.NEXTVAL returns 1. The second returns 11. Each subsequent reference will return a value 10 greater than the one previous.
To create a snapshot. A snapshot is a table that contains the results of a query of one or more tables, often located on a remote database.
The following prerequisites apply to creating snapshots:
By default, Oracle creates all new snapshots as primary key snapshots. To create a snapshot:
When you create a snapshot, Oracle creates one table, one view, and at least one index in the schema of the snapshot. Oracle uses these objects to maintain the snapshot's data. You must have the privileges necessary to create these objects. For information on these privileges, see CREATE TABLE, CREATE VIEW, and CREATE INDEX.
For complete information about the prerequisites that apply to creating snapshots, see Oracle8 Replication.

physical_attributes_clause: See ALTER TABLE.
parallel_clause: See the PARALLEL clause.
index_physical_attributes_clause: See ALTER INDEX.
select_command: See SELECT.
LOB_storage_clause: See CREATE TABLE.
table_partition_clause: See CREATE TABLE.
|
schema |
is the schema to contain the snapshot. If you omit schema, Oracle creates the snapshot in your schema. |
||
|
snapshot |
is the name of the snapshot to be created. Oracle generates names for the table, view, and indexes used to maintain the snapshot by adding a prefix or suffix to the snapshot name. Oracle recommends that you limit your snapshot names to 19 bytes, so that the Oracle-generated names will be 30 bytes or less and will contain the entire snapshot name. See also "About Snapshots". |
||
|
|
|||
|
physical_attributes_clause |
establishes values for the PCTFREE, PCTUSED, INITRANS, and MAXTRANS parameters (or, when used in the USING INDEX clause, for the INITRANS and MAXTRANS parameters only) and the storage parameters for the internal table Oracle uses to maintain the snapshot's data. For information on the PCTFREE, PCTUSED, INITRANS, and MAXTRANS parameters, see CREATE TABLE. For information, about the STORAGE clause, see the STORAGE clause. |
||
|
TABLESPACE |
specifies the tablespace in which the snapshot is to be created. If you omit this option, Oracle creates the snapshot in the default tablespace of the owner of the snapshot's schema. |
||
|
LOB_storage_clause |
specifies the LOB storage characteristics. For detailed information about specifying the parameters of the LOB storage clause, see CREATE TABLE. |
||
|
STORAGE |
establishes storage characteristics for the table Oracle uses to maintain the snapshot's data. |
||
|
CLUSTER |
creates the snapshot as part of the specified cluster. Since a clustered snapshot uses the cluster's space allocation, do not use the physical_attributes_clause or the TABLESPACE option with the CLUSTER option. |
||
|
table_partition_clause |
specifies that the table is partitioned on specified ranges of values. For detailed information about specifying the parameters of the table partition clause, see CREATE TABLE. See also "Partitioned Snapshots". |
||
|
USING INDEX |
specifies parameters for the index Oracle creates to maintain the snapshot. See physical_attributes_clause, above. |
||
|
USING ROLLBACK SEGMENT |
specifies the local snapshot and/or remote master rollback segments to be used during snapshot refresh. |
||
|
|
rollback_segment |
is the name of the rollback segment to be used. |
|
|
|
DEFAULT |
specifies that Oracle will choose which rollback segment to use. |
|
|
|
MASTER |
specifies the rollback segment to be used at the remote master for the individual snapshot. |
|
|
|
LOCAL |
specifies the rollback segment to be used for the local refresh group that contains the snapshot. |
|
|
|
If you do not specify MASTER or LOCAL, Oracle uses LOCAL by default. If you do not specify rollback_segment, Oracle automatically chooses the rollback segment to be used. If you specify DEFAULT, you cannot specify rollback_segment. See also "Specifying Rollback Segments". |
||
|
REFRESH |
specifies how and when Oracle automatically refreshes the snapshot: |
||
|
|
FAST |
specifies a fast refresh, or a refresh using only the updated data stored in the snapshot log associated with the master table. |
|
|
|
COMPLETE |
specifies a complete refresh, or a refresh that reexecutes the snapshot's query. |
|
|
|
FORCE |
specifies a fast refresh if one is possible or complete refresh if a fast refresh is not possible. Oracle decides whether a fast refresh is possible at refresh time. |
|
|
|
If you omit the FAST, COMPLETE, and FORCE options, Oracle uses FORCE by default. See also "Refreshing Snapshots". |
||
|
|
START WITH |
specifies a date expression for the first automatic refresh time. |
|
|
|
NEXT |
specifies a date expression for calculating the interval between automatic refreshes. |
|
|
|
Both the START WITH and NEXT values must evaluate to a time in the future. If you omit the START WITH value, Oracle determines the first automatic refresh time by evaluating the NEXT expression when you create the snapshot. If you specify a START WITH value but omit the NEXT value, Oracle refreshes the snapshot only once. If you omit both the START WITH and NEXT values, or if you omit the REFRESH clause entirely, Oracle does not automatically refresh the snapshot. |
||
|
|
WITH PRIMARY KEY |
specifies that primary-key snapshots are to be created. Primary-key snapshots allow snapshot master tables to be reorganized without affecting the snapshot's ability to continue to fast refresh. |
|
|
|
|
Primary-key snapshots can also be defined as simple snapshots with subqueries. |
|
|
|
WITH ROWID |
specifies that ROWID snapshots are to be created. |
|
|
|
|
ROWID snapshots provide compatibility with Oracle7 Release 7.3 master tables. |
|
|
|
If you omit both WITH PRIMARY KEY and WITH ROWID, Oracle creates primary-key snapshots by default. See also "Specifying Primary-Key or ROWID Snapshots". |
||
|
FOR UPDATE |
allows a simple snapshot to be updated. When used in conjunction with the Replication Option, these updates will be propagated to the master. For more information, see Oracle8 Replication. |
||
|
AS select_command |
specifies the snapshot query. When you create the snapshot, Oracle executes this query and places the results in the snapshot. This query is any valid SQL query, but not all queries are fast refreshable. See also "Types of Snapshots". |
||
A snapshot is a table that contains the results of a query of one or more tables, often located on a remote database. The tables in the query are called master tables. The databases containing the master tables are called the master databases. Note that a snapshot query cannot select from tables or views owned by the user SYS.
Snapshots are useful in distributed databases. Snapshots allow you to maintain read-only copies of remote data on your local node. You can select data from a snapshot as you would from a table or view.
Oracle recommends that you qualify each table and view in the FROM clause of the snapshot query with the schema containing it. For some additional caveats, see "The View Query" (in the context of the CREATE VIEW command). The same recommendations apply to creating snapshots.
Snapshots cannot contain long columns.
For more information on snapshots, see Oracle8 Replication.
You can create two types of snapshots: simple and complex.
A simple snapshot is based on a single remote table, or is defined on multiple tables using restricted types of subqueries. For more information about simple snapshots with subqueries, see Oracle8 Replication.
Simple snapshots do not contain any of the following items in the snapshot query (select_command_clause):
A complex snapshot is one in which the snapshot query contains one or more of the constructs not allowed in the query of a simple snapshot. A complex snapshot can be based on multiple master tables on multiple master databases.
A snapshot's master tables can be modified, so the data in a snapshot must be updated occasionally to ensure that the snapshot accurately reflects the data currently in its master tables. The process of updating a snapshot for this purpose is called refreshing the snapshot. With the REFRESH clause of the CREATE SNAPSHOT command, you can schedule the times and specify the mode for Oracle to refresh the snapshot automatically.
After you create a snapshot, you can subsequently change its automatic refresh mode and time with the REFRESH clause of the ALTER SNAPSHOT command. You can also refresh a snapshot immediately with the DBMS_SNAPSHOT.REFRESH() procedure.
Use the FAST or COMPLETE options of the REFRESH clause to specify the refresh mode.
To perform a fast refresh, Oracle updates the snapshot with the changes to the master table recorded in its snapshot log. For more information on snapshot logs, see CREATE SNAPSHOT LOG.
Oracle can only perform a fast refresh if all of the following conditions are true:
If you specify a fast refresh and all of above conditions are true, then Oracle performs a fast refresh. If any of the conditions are not true, Oracle returns an error at refresh time and does not refresh the snapshot.
To perform a complete refresh, Oracle reexecutes the snapshot query and places the results in the snapshot. If you specify a complete refresh, Oracle performs a complete refresh regardless of whether a fast refresh is possible.
A fast refresh is often faster than a complete refresh because it sends less data from the master database across the network to the snapshot's database. A fast refresh sends only changes to master table data since the last refresh, while a complete refresh sends the complete result of the snapshot query.
You can also use the FORCE option of the REFRESH clause to allow Oracle to decide how to refresh the snapshot at the scheduled refresh time. If a fast refresh is possible based on the fast refresh conditions, then Oracle performs a fast refresh. If a fast refresh is not possible, then Oracle performs a complete refresh.
The following statement creates the simple snapshot EMP_SF that contains the data from SCOTT's employee table in New York:
CREATE SNAPSHOT emp_sf PCTFREE 5 PCTUSED 60 TABLESPACE users STORAGE INITIAL 50K NEXT 50K REFRESH FAST NEXT sysdate + 7 AS SELECT * FROM scott.emp@ny;
The statement does not include a START WITH parameter, so Oracle determines the first automatic refresh time by evaluating the NEXT value using the current SYSDATE. Provided a snapshot log currently exists for the employee table in New York, Oracle performs a fast refresh of the snapshot every 7 days, beginning 7 days after the snapshot is created.
The above statement also establishes for the table storage characteristics that Oracle uses to maintain the snapshot.
To cause Oracle to refresh a snapshot automatically, you must perform the following tasks:
For more information on these initialization parameters, see Oracle8 Reference.
The following statement creates the complex snapshot ALL_EMPS that queries the employee tables in Dallas and Baltimore:
CREATE SNAPSHOT all_emps PCTFREE 5 PCTUSED 60 TABLESPACE users STORAGE INITIAL 50K NEXT 50K USING INDEX STORAGE (INITIAL 25K NEXT 25K) REFRESH START WITH ROUND(SYSDATE + 1) + 11/24 NEXT NEXT_DAY(TRUNC(SYSDATE, 'MONDAY') + 15/24 AS SELECT * FROM fran.emp@dallas UNION SELECT * FROM marco.emp@balt;
Oracle automatically refreshes this snapshot tomorrow at 11:00 am and subsequently every Monday at 3:00 pm. This command does not specify either fast or complete refreshes, so Oracle must decide how to refresh the snapshot. Since ALL_EMPS is a complex snapshot, Oracle must perform a complete refresh.
The above statement also establishes storage characteristics for both the table and the index that Oracle uses to maintain the snapshot:
You can specify the rollback segments to be used during a refresh for both the master site and the local site.
The local snapshot rollback segment is stored at the refresh group level. If the auto-refresh parameters are specified, a new refresh group is automatically created to refresh the snapshot with a background process. The local rollback segment, if specified, is associated with this new refresh group. An error is raised if you specify a local rollback segment but do not specify the auto-refresh parameters.
The master rollback segment is stored on a per-snapshot basis. The master rollback segment is validated during snapshot creation and refresh. If the snapshot is complex, the master rollback segment, if specified, is ignored.
To direct Oracle to select the rollback segment automatically after one has been specified using CREATE SNAPSHOT or ALTER SNAPSHOT, specify DEFAULT with ALTER SNAPSHOT.
The following example creates snapshot SALE_EMP with rollback segment MASTER_SEG at the remote master and rollback segment SNAP_SEG for the local refresh group that contains the snapshot:
CREATE SNAPSHOT sales_emp REFRESH FAST START WITH SYSDATE NEXT SYSDATE + 7 USING MASTER ROLLBACK SEGMENT master_seg LOCAL ROLLBACK SEGMENT snap_seg AS SELECT * FROM bar;
The following statement is incorrect and generates an error because it specifies a segment name with a DEFAULT rollback segment:
CREATE SNAPSHOT bogus REFRESH FAST START WITH SYSDATE NEXT SYSDATE + 7 USING DEFAULT ROLLBACK SEGMENT snap_seg AS SELECT * FROM faux;
To create a primary-key snapshot you must:
To fast refresh primary-key snapshots, you must first create a snapshot master log specifying WITH PRIMARY KEY. The snapshot master log can also record ROWIDs.
Primary-key snapshots are the default if the WITH clause is not specified.
The above conditions must be met in order to create a primary-key snapshot.
The following example creates primary-key snapshot HUMAN_GENOME:
CREATE SNAPSHOT human_genome REFRESH FAST START WITH SYSDATE NEXT SYSDATE + 1/4096 WITH PRIMARY KEY AS SELECT * FROM genome_catalog;
The following example creates a ROWID snapshot:
CREATE SNAPSHOT emp_data WITH ROWID AS SELECT * FROM emp_table73;
Partitioned snapshots are the same as partitioned tables, because snapshots are basically tables. The options have the same syntax and semantics as the partitioned table options for CREATE TABLE and ALTER TABLE. The only difference is that the following operations are not allowed on snapshots and snapshot logs:
You cannot perform bulk deletions by dropping or truncating partitions on master tables. Thus, after dropping or truncating a partition, all snapshots must be manually refreshed. A fast refresh will probably produce incorrect results, but Oracle will not raise an error.
To create a snapshot log. A snapshot log is a table associated with the master table of a snapshot. Oracle stores changes to the master table's data in the snapshot log and then uses the snapshot log to refresh the master table's snapshots. See also "Using Snapshot Logs".
The privileges required to create a snapshot log directly relate to the privileges necessary to create the underlying objects associated with a snapshot log.
In either case, the owner of the snapshot log must have sufficient quota in the tablespace intended to hold the snapshot log.
For detailed information about the prerequisites for creating a snapshot log, see Oracle8 Replication.
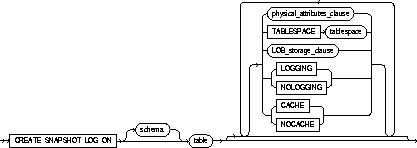
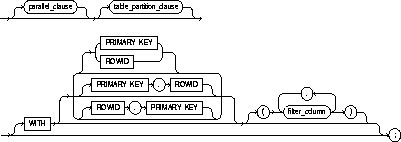
parallel_clause: See PARALLEL clause.
storage_clause: See STORAGE clause.
LOB_storage_clause: See CREATE TABLE.
table_partition_clause: See CREATE TABLE.
physical_attributes_clause: See CREATE TABLE.
|
schema |
is the schema containing the snapshot log's master table. If you omit schema, Oracle assumes the master table is contained in your own schema. Oracle creates the snapshot log in the schema of its master table. You cannot create a snapshot log for a table in the schema of the user SYS. |
|
|
table |
is the name of the master table for which the snapshot log is to be created. You cannot create a snapshot log for a view. |
|
|
WITH |
specifies whether the snapshot log should record the primary key, ROWID, or both primary key and ROWID when rows in the master are updated. |
|
|
|
This clause also specifies whether the snapshot log records filter columns-non-primary-key columns referenced by snapshots defined as simple snapshots with subqueries. See also "Recording Primary Keys, ROWIDs, and Filter Columns". |
|
|
|
PRIMARY KEY |
specifies that the primary key of all rows updated should be recorded in the snapshot log. |
|
|
ROWID |
specifies that the ROWID of all rows updated should be recorded in the snapshot log. |
|
|
filter_column |
is a comma-separated list that specifies the list of filter columns to be recorded in the snapshot log. |
|
|
Oracle records the primary key of all rows updated in the master by default. |
|
|
physical_attributes_clause |
establishes values for the PCTFREE, PCTUSED, INITRANS, and MAXTRANS parameters and the storage characteristics for the snapshot log. See the descriptions of these parameters in CREATE TABLE and STORAGE clause. |
|
|
TABLESPACE |
specifies the tablespace in which the snapshot log is to be created. If you omit this option, Oracle creates the snapshot log in the default tablespace the owner of the snapshot log's schema. |
|
|
STORAGE |
establishes storage characteristics for the snapshot log. See the STORAGE clause. |
|
|
LOB_storage_clause |
specifies the LOB storage characteristics. For detailed information about specifying the parameters of the LOB storage clause, see STORAGE clause. |
|
|
table_partition_clause |
specifies that the table is partitioned on specified ranges of values. For detailed information about specifying the parameters of the table partition clause, see CREATE TABLE. |
|
A snapshot log is a table associated with the master table of a snapshot. When changes are made to the master table's data, Oracle adds rows describing these changes to the snapshot log. Later Oracle can use these rows to refresh snapshots based on the master table. This process is called a fast refresh. Without a snapshot log, Oracle must reexecute the snapshot query to refresh the snapshot. This process is called a complete refresh. Usually, a fast refresh takes less time than a complete refresh.
A snapshot log is located in the master database in the same schema as the master table. You need only a single snapshot log for a master table. Oracle can use this snapshot log to perform fast refreshes for all simple snapshots based on the master table. For more information on snapshots, including how Oracle refreshes snapshots, see CREATE SNAPSHOT and Oracle8 Replication.
The following statement creates a snapshot log on an employee table that records only primary-key values:
CREATE SNAPSHOT LOG ON emp PCTFREE 5 TABLESPACE users STORAGE (INITIAL 10K NEXT 10K PCTINCREASE 50);
Oracle can use this snapshot log to perform a fast refresh on any simple primary key snapshot subsequently created on the EMP table.
For Oracle to perform primary-key snapshots, the primary key of updated rows in the master table must be recorded in the snapshot log. Similarly, for ROWID snapshots, the ROWID must be recorded in the snapshot log. Both primary keys and ROWIDs can be recorded to support configurations with both primary-key and ROWID snapshots.
For primary-key snapshots defined as simple snapshots with subqueries, all filter columns referenced by the defining subquery must be recorded in the snapshot log.
The following examples create snapshot logs that record only the primary keys of updated rows:
CREATE SNAPSHOT LOG ON emp; CREATE SNAPSHOT LOG ON emp WITH PRIMARY KEY;
The following example creates a snapshot log that records both primary keys and ROWIDs of updated rows:
CREATE SNAPSHOT LOG ON sales WITH ROWID, PRIMARY KEY;
The following example creates a snapshot log that records primary keys and updates to the filter column ZIP:
CREATE SNAPSHOT LOG ON address WITH (zip);
To create a synonym. A synonym is an alternative name for a table, view, sequence, procedure, stored function, package, snapshot, or another synonym. See also "Using Synonyms".
To create a private synonym in your own schema, you must have CREATE SYNONYM system privilege.
To create a private synonym in another user's schema, you must have CREATE ANY SYNONYM system privilege.
To create a PUBLIC synonym, you must have CREATE PUBLIC SYNONYM system privilege.
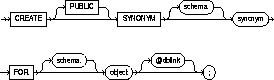
|
PUBLIC |
creates a public synonym. Public synonyms are accessible to all users. If you omit this option, the synonym is private and is accessible only within its schema. |
|
schema |
is the schema to contain the synonym. If you omit schema, Oracle creates the synonym in your own schema. You cannot specify schema if you have specified PUBLIC. See also "Scope of Synonyms". |
|
synonym |
is the name of the synonym to be created. |
|
FOR |
identifies the object for which the synonym is created. If you do not qualify object with schema, Oracle assumes that the schema object is in your own schema. The schema object can be of the following types:
|
|
|
The schema object cannot be contained in a package. |
|
|
Note that the schema object need not currently exist and you need not have privileges to access the object. |
|
dblink |
You can use a complete or partial dblink to create a synonym for a schema object on a remote database where the object is located. For more information on referring to database links, see "Referring to Objects in Remote Databases". If you specify dblink and omit schema, the synonym refers to an object in the schema specified by the database link. Oracle recommends that you specify the schema containing the object in the remote database. |
|
|
If you omit dblink, Oracle assumes the object is located on the local database. |
You can use a synonym to stand for its base object in any of the following statements:
| DML Statements | DDL Statements |
|
SELECT |
AUDIT |
|
INSERT |
NOAUDIT |
|
UPDATE |
GRANT |
|
DELETE |
REVOKE |
|
EXPLAIN PLAN |
COMMENT |
|
LOCK TABLE |
|
Synonyms are used for security and convenience. Creating a synonym for an object allows you to:
Synonyms provide both data independence and location transparency; synonyms permit applications to function without modification regardless of which user owns the table or view and regardless of which database holds the table or view.
A private synonym name must be unique in its schema. Oracle attempts to resolve references to objects at the schema level before resolving them at the PUBLIC synonym level. Oracle uses a public synonym only when resolving references to an object if both of the following cases are true:
For example, assume the schemas SCOTT and BLAKE each contain tables named DEPT and the user SYSTEM creates a PUBLIC synonym named DEPT for BLAKE.DEPT. If the user SCOTT then issues the following statement, Oracle returns rows from SCOTT.DEPT:
SELECT * FROM dept;
To retrieve rows from BLAKE.DEPT, the user SCOTT must preface DEPT with the schema name:
SELECT * FROM blake.dept;
If the user ADAM's schema does not contain an object named DEPT, then ADAM can access the DEPT table in BLAKE's schema by using the public synonym DEPT:
SELECT * FROM dept;
To define the synonym MARKET for the table MARKET_RESEARCH in the schema SCOTT, issue the following statement:
CREATE SYNONYM market FOR scott.market_research;
To create a PUBLIC synonym for the EMP table in the schema SCOTT on the remote SALES database, you could issue the following statement:
CREATE PUBLIC SYNONYM emp FOR scott.emp@sales;
Note that a synonym may have the same name as the base table, provided the base table is contained in another schema.
To create a table, the basic structure to hold user data, specifying the following information:
 column definitions using objects
For illustrations of some of these purposes, "Examples".
 Use CREATE TABLE to create an object table or a table that uses an object type for a column definition. An object table is a table explicitly defined to hold object instances of a particular type.
 You can also create an object type and then use it in a column when creating a relational table. For more information about creating objects, see Oracle8 Application Developer's Guide and CREATE TYPE.
To create a relational table in your own schema, you must have CREATE TABLE system privilege. To create a table in another user's schema, you must have CREATE ANY TABLE system privilege. Also, the owner of the schema to contain the table must have either space quota on the tablespace to contain the table or UNLIMITED TABLESPACE system privilege.
 In addition to the table privileges above, to create a table that uses types, the owner of the table must have the EXECUTE object privilege in order to access all types referenced by the table, or you must have the EXECUTE ANY TYPE system privilege. These privileges must be granted explicitly and not acquired through a role.
Additionally, if the table owner intends to grant access to the table to other users, the owner must have been granted the EXECUTE privileges to the referenced types with the GRANT OPTION, or have the EXECUTE ANY TYPE system privilege with the ADMIN OPTION. If not, the table owner has insufficient privileges to grant access on the table to other users.
For more information about the privileges required to create tables using types, see Oracle8 Application Developer's Guide.
Relational table definition ::=
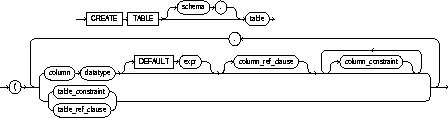
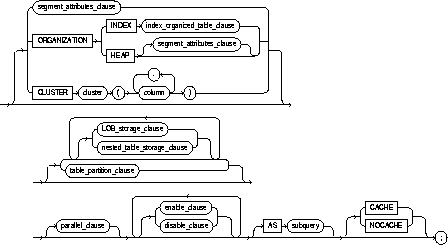 ,
,
 Object table definition ::=
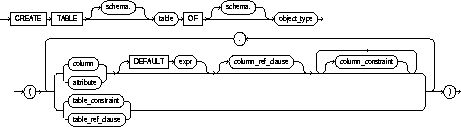

column_ref_clause::=
table_ref_clause::=
segment_attributes_clause::=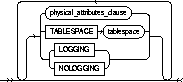
physical_attributes_clause::=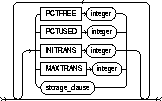
storage_clause: See the STORAGE clause.

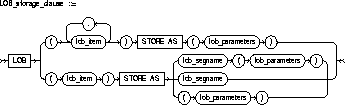
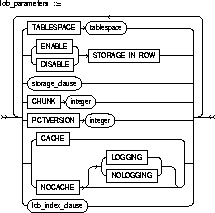
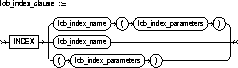
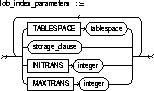

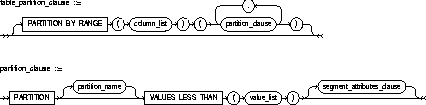
disable_clause: See the DISABLE clause.
enable_clause: See the ENABLE clause.
parallel_clause: See the PARALLEL clause
storage_clause: see STORAGE clause
subquery: See "Subqueries"
|
schema |
is the schema to contain the table. If you omit schema, Oracle creates the table in your own schema. |
|
|
table |
is the name of the table (or object table) to be created. A partitioned table cannot be a clustered table or an object table. |
|
|
|
explicitly creates an object table of type object_type. The columns of an object table correspond to the top-level attributes of type object_type. Each row will contain an object instance, and each instance will be assigned a unique, system-generated object identifier (OID) when a row is inserted. If you omit schema, Oracle creates the object table in your own schema. For more information about creating objects, see CREATE TYPE. See also "Object Tables". |
|
|
column |
specifies the name of a column of the table. A table can have up to 1000 columns. You may omit column definitions only when using the AS subquery clause. See also "LOB Column Example". |
|
|
|
specifies the qualified column name of an item in an object. |
|
|
datatype |
is the datatype of a column. Oracle-supplied datatypes are defined in "Datatypes". You can omit the datatype only if the statement also designates the column as part of a foreign key in a referential integrity constraint. Oracle automatically assigns to the column the datatype of the corresponding column of the referenced key of the referential integrity constraint.
|
|
|
DEFAULT |
specifies a value to be assigned to the column if a subsequent INSERT statement omits a value for the column. The datatype of the expression must match the datatype of the column. The column must also be long enough to hold this expression. For the syntax of expr, see "Expressions". A DEFAULT expression cannot contain references to other columns, the pseudocolumns CURRVAL, NEXTVAL, LEVEL, and ROWNUM, or date constants that are not fully specified. |
|
|
column_ref_clause |
lets you further specify a column of type REF: |
|
|
|
|
stores the ROWID and the REF value in column or attribute. Storing a REF value with a ROWID can improve the performance of dereferencing operations, but will also use more space. Default storage of REF values is without ROWIDs. |
|
|
|
restricts the scope of the column REF values to scope_table_name. The REF values for the column must come from REF values obtained from the object table specified in the clause. You can only specify one scope table per REF column. |
|
|
|
The scope_table_name is the name of the object table in which object instances (of the same type as the REF column) are stored. The values in the REF column point to objects in the scope table. You must have SELECT privileges on the table or SELECT ANY TABLE system privileges. |
|
column_constraint |
defines an integrity constraint as part of the column definition. See the syntax description of column_constraint in the CONSTRAINT clause. |
|
|
table_constraint |
defines an integrity constraint as part of the table definition. See the syntax description of table_constraint in the CONSTRAINT clause. |
|
|
table_ref_clause |
||
|
|
|
restricts the scope of the REF values in ref_column or ref_attribute to scope_table_name. The REF values for the column or attribute must come from REF values obtained from the object table specified in the clause. |
|
|
|
The ref_column or ref_attribute is the name of a REF column in an object table or an embedded REF attribute within an object column of a relational table. The values in the REF column or attribute point to objects in the scope table. |
|
|
|
is a reference to a row in an object table. You can specify either a REF column name of an object or relational table (ref_column) or an embedded REF attribute within an object column (ref_attribute). |
|
|
specifies an index on the hidden object identifier column and/or the storage specification for the index. Either index or storage_specification must be specified. |
|
|
|
|
is the name of the index on the hidden object identifier column. If not specified, Oracle generates a name. |
|
physical_attributes_clause |
specifies the value of the PCTFREE, PCTUSED, INITRANS, and MAXTRANS parameters and the storage characteristics of the table. Note: For a nonpartitioned table, each parameter and storage characteristic specified is the actual physical attribute of the segment associated with the table. For partitioned tables, the value specified for the parameter or storage characteristic is the default physical attribute of the segments associated with all partitions specified in the CREATE statement (and in subsequent ALTER TABLE ADD PARTITION statements), unless you explicitly override that value in the PARTITION clause of this command. |
|
|
PCTFREE |
specifies the percentage of space in each data block of the table, object table OIDINDEX, or partition reserved for future updates to the table's rows. The value of PCTFREE must be a value from 0 to 99. A value of 0 allows the entire block to be filled by inserts of new rows. The default value is 10. This value reserves 10% of each block for updates to existing rows and allows inserts of new rows to fill a maximum of 90% of each block. |
|
|
|
PCTFREE has the same function in the PARTITION description clause and in the commands that create and alter clusters, indexes, snapshots, and snapshot logs. The combination of PCTFREE and PCTUSED determines whether new rows will be inserted into existing data blocks or into new blocks. |
|
|
PCTUSED |
specifies the minimum percentage of used space that Oracle maintains for each data block of the table, object table OIDINDEX, or index-organized table overflow data segment. A block becomes a candidate for row insertion when its used space falls below PCTUSED. PCTUSED is specified as a positive integer from 1 to 99 and defaults to 40. |
|
|
|
PCTUSED has the same function in the PARTITION description clause and in the commands that create and alter clusters, snapshots, and snapshot logs. |
|
|
|
PCTUSED is not a valid table storage characteristic for an index-organized table (ORGANIZATION INDEX). |
|
|
|
The sum of PCTFREE and PCTUSED must be less than 100. You can use PCTFREE and PCTUSED together to utilize space within a table more efficiently. For information on the performance effects of different values PCTUSED and PCTFREE, see Oracle8 Tuning. |
|
|
INITRANS |
specifies the initial number of transaction entries allocated within each data block allocated to the table, object table OIDINDEX, partition, LOB index segment, or overflow data segment. This value can range from 1 to 255 and defaults to 1. In general, you should not change the INITRANS value from its default. |
|
|
|
Each transaction that updates a block requires a transaction entry in the block. The size of a transaction entry depends on your operating system. |
|
|
|
This parameter ensures that a minimum number of concurrent transactions can update the block and helps avoid the overhead of dynamically allocating a transaction entry. |
|
|
|
The INITRANS parameter serves the same purpose in the PARTITION description clause, clusters, indexes, snapshots, and snapshot logs as in tables. The minimum and default INITRANS value for a cluster or index is 2, rather than 1. |
|
|
MAXTRANS |
specifies the maximum number of concurrent transactions that can update a data block allocated to the table, object table OIDINDEX, partition, LOB index segment, or index-organized overflow data segment. This limit does not apply to queries. This value can range from 1 to 255 and the default is a function of the data block size. You should not change the MAXTRANS value from its default. |
|
|
|
If the number concurrent transactions updating a block exceeds the INITRANS value, Oracle dynamically allocates transaction entries in the block until either the MAXTRANS value is exceeded or the block has no more free space. |
|
|
|
The MAXTRANS parameter serves the same purpose in the PARTITION description clause, clusters, snapshots, and snapshot logs as in tables. |
|
|
storage_clause |
specifies the storage characteristics for the table, object table OIDINDEX, partition, LOB storage, LOB index segment, or index-organized table overflow data segment. This clause has performance ramifications for large tables. Storage should be allocated to minimize dynamic allocation of additional space. See the STORAGE clause. |
|
|
TABLESPACE |
specifies the tablespace in which Oracle creates the table, object table OIDINDEX, partition, LOB storage, LOB index segment, or index-organized table overflow data segment. If you omit this option, then Oracle creates that item in the default tablespace of the owner of the schema containing the table. |
|
|
|
For nonpartitioned tables, the value specified for TABLESPACE is the actual physical attribute of the segment associated with the table. For partitioned tables, the value specified for TABLESPACE is the default physical attribute of the segments associated with all partitions specified in the CREATE statement (and on subsequent ALTER TABLE ADD PARTITION statements), unless you specify TABLESPACE in the PARTITION description clause. |
|
|
LOGGING/NOLOGGING |
specifies whether the creation of the table (and any indexes required because of constraints), partition, or LOB storage characteristics will be logged in the redo log file. It also specifies that subsequent Direct Loader (SQL*Loader) and direct-load INSERT operations against the table, partition, or LOB storage are logged (LOGGING) or not logged (NOLOGGING). If you omit the LOGGING/NOLOGGING clause, the logging attribute of the table or table partition defaults to the logging attribute of the tablespace in which it resides. For LOBs, if you omit the LOGGING/NOLOGGING clause,
For nonpartitioned tables, the value specified for LOGGING is the actual physical attribute of the segment associated with the table. For partitioned tables, the logging attribute value specified is the default physical attribute of the segments associated with all partitions specified in the CREATE statement (and in subsequent ALTER TABLE ADD PARTITION statements), unless you specify LOGGING/NOLOGGING in the PARTITION description clause. |
|
|
|
In NOLOGGING mode, data is modified with minimal logging (to mark new extents invalid and to record dictionary changes). When applied during media recovery, the extent invalidation records mark a range of blocks as logically corrupt, because the redo data is not fully logged. Therefore, if you cannot afford to lose this table, you should take a backup after the NOLOGGING operation. |
|
|
|
The size of a redo log generated for an operation in NOLOGGING mode is significantly smaller than the log generated with the LOGGING option set. If the database is run in ARCHIVELOG mode, media recovery from a backup taken before the LOGGING operation restores the table. However, media recovery from a backup taken before the NOLOGGING operation does not restore the table. |
|
|
|
The logging attribute of the table is independent of that of its indexes. |
|
|
|
NOLOGGING is not a valid keyword for creating index-organized tables. |
|
|
|
For more information about the LOGGING option and Parallel DML, see Oracle8 Concepts and Oracle8 Administrator's Guide. |
|
|
|
Note: In future versions of Oracle, the LOGGING keyword will replace the RECOVERABLE option. RECOVERABLE is still available as a valid keyword in Oracle when creating nonpartitioned tables, however, it is not recommended. |
|
|
ORGANIZATION INDEX |
specifies that table is created as an index-organized table. In an index-organized table, the data rows are held in an index defined on the primary key for the table. See also "Index-Organized Tables". |
|
|
ORGANIZATION HEAP |
specifies that the data rows of table are stored in no particular order. This is the default. |
|
|
index_organized_table_clause |
PCTTHRESHOLD integer |
specifies the percentage of space reserved in the index block for an index-organized table row. Any portion of the row that exceeds the specified threshold is stored in the area. PCTTHRESHOLD must be a value from 0 to 50. |
|
|
OVERFLOW |
specifies that index-organized table data rows exceeding the specified threshold are placed in the data segment listed in this clause. If OVERFLOW is not specified, then rows exceeding the PCTTHRESHOLD limit are rejected. |
|
|
INCLUDING column_name |
specifies a column at which to divide an index-organized table row into index and overflow portions. All columns that follow column_name are stored in the overflow data segment. A column_name is either the name of the last primary-key column or any nonprimary-key column. |
|
RECOVERABLE |
is a deprecated option. RECOVERABLE is not a valid keyword for creating partitioned tables or LOB storage characteristics. |
|
|
UNRECOVERABLE |
is a deprecated option. It specifies that the creation of the table (and any indices required because of constraints) will not be logged in the redo log file. This keyword can only be specified with the AS subquery clause. UNRECOVERABLE is not a valid keyword for creating partitioned or index-organized tables. |
|
|
|
Note: In future versions of Oracle, the LOGGING keyword will replace the RECOVERABLE option. RECOVERABLE is still available as a valid keyword in Oracle when creating nonpartitioned tables, however, it is not recommended. |
|
|
LOB_storage_clause |
LOB |
specifies the LOB storage characteristics. For detailed information about LOBs, see Oracle8 Application Developer's Guide. |
|
|
lob_item |
is the LOB column name or LOB object attribute for which you are explicitly defining tablespace and storage characteristics that are different from those of the table. |
|
STORE AS |
lob_segname |
specifies the name of the LOB data segment. You cannot use lob_segname if you specify more than one lob_item. |
|
lob_parameters |
ENABLE STORAGE IN ROW |
specifies that the LOB value is stored in the row (in-line) if its length is less than approximately 4000 bytes minus system control information. This is the default. |
|
|
DISABLE STORAGE IN ROW |
specifies that the LOB value is stored outside of the row regardless of the length of the LOB value. |
|
|
Note that the LOB locator is always stored in the row regardless of where the LOB value is stored. You cannot change the value of STORAGE IN ROW once it is set. |
|
|
|
CHUNK integer |
specifies the number of bytes to be allocated for LOB manipulation. If integer is not a multiple of the database block size, Oracle rounds up (in bytes) to the next multiple. For example, if the database block size is 2048 and integer is 2050, Oracle allocates 4096 bytes (2 blocks). The maximum value is 32768 (32K), which is the largest Oracle block size allowed. Note: The value of CHUNK must be less than or equal to the values of both INITIAL and NEXT (either the default values or those specified in the storage clause). If CHUNK exceeds the value of either INITIAL or NEXT, Oracle returns an error. |
|
|
PCTVERSION integer |
is the maximum percentage of overall LOB storage space used for creating new versions of the LOB. The default value is 10, meaning that older versions of the LOB data are not overwritten until 10% of the overall LOB storage space is used. |
|
|
INDEX lob_index_name |
is the name of the LOB index segment. You cannot specify lob_index_name if you specify more than one lob_item in the associated lob_item list. Note that you cannot alter the LOB index through the ALTER INDEX statement. You can alter a LOB index specification only through the ALTER TABLE statement (see ALTER TABLE). Note also that a user cannot drop the LOB index. It is a system index created and maintained by the system. |
|
|
specifies storage_table as the name of the storage table in which the rows of all nested_item values reside. You must include this clause when creating a table with columns or column attributes whose type is a nested table. See also "Nested Table Storage" |
|
|
|
||
|
CLUSTER |
specifies that the table is to be part of the cluster. The columns listed in this clause are the table columns that correspond to the cluster's columns. Generally, the cluster columns of a table are the column or columns that make up its primary key or a portion of its primary key. |
|
|
|
Specify one column from the table for each column in the cluster key. The columns are matched by position, not by name. A clustered table uses the cluster's space allocation. Therefore, do not use the PCTFREE, PCTUSED, INITRANS, or MAXTRANS parameters, the TABLESPACE option, or the STORAGE clause with the CLUSTER option. |
|
|
|
|
|
|
table_partitioning_clause: |
PARTITION BY RANGE |
specifies that the table is partitioned on ranges of values from column_list. See also "Partitioned Tables". |
|
|
column_list |
is an ordered list of columns used to determine into which partition a row belongs. You cannot specify more than 16 columns in column_list. The column_list cannot contain the ROWID pseudocolumn or any columns of datatype ROWID or LONG. |
|
|
PARTITION partition_name |
specifies the physical partition clause. If partition_name is omitted, Oracle generates a name with the form SYS_Pn for the partition. The partition_name must conform to the rules for naming schema objects and their part as described in "Schema Object Naming Rules". |
|
|
VALUES LESS THAN |
specifies the noninclusive upper bound for the current partition. |
|
|
value_list |
is an ordered list of literal values corresponding to column_list in the PARTITION BY RANGE clause. You can substitute the keyword MAXVALUE for any literal in value_list. MAXVALUE specifies a maximum value that will always sort higher than any other value, including NULL. Specifying a value other than MAXVALUE for the highest partition bound imposes an implicit integrity constraint on the table. See Oracle8 Concepts for more information about partition bounds. |
|
parallel_clause |
specifies the degree of parallelism for creating the table and the default degree of parallelism for queries on the table once created. This is not a valid option when creating index-organized tables. For more information, see PARALLEL clause. |
|
|
enable_clause |
enables an integrity constraint. See the ENABLE clause. |
|
|
disable_clause |
disables an integrity constraint. See the DISABLE clause. |
|
|
|
Constraints specified in the ENABLE and DISABLE clauses of a CREATE TABLE statement must be defined in the statement. You can also enable and disable constraints with the ENABLE and DISABLE keywords of the CONSTRAINT clause. If you define a constraint but do not explicitly enable or disable it, Oracle enables it by default. |
|
|
|
You cannot use the ENABLE and DISABLE clauses in a CREATE TABLE statement to enable and disable triggers. |
|
|
AS subquery |
inserts the rows returned by the subquery into the table upon its creation. See "Subqueries". Note: This subquery is not supported for index-organized tables with overflow. |
|
|
|
The number of columns in the table must equal the number of expressions in the subquery. The column definitions can specify only column names, default values, and integrity constraints, not datatypes. Oracle derives datatypes and lengths from the subquery. Oracle also follows the following rules for integrity constraints: |
|
|
|
|
|
|
|
If all expressions in the subquery are columns, rather than expressions, you can omit the columns from the table definition entirely. In this case, the names of the columns of table are the same as the columns in the subquery. |
|
|
|
|
|
|
CACHE |
for data that will be accessed frequently, specifies that the blocks retrieved for this table are placed at the most recently used end of the LRU list in the buffer cache when a full table scan is performed. This option is useful for small lookup tables. |
|
|
|
As a parameter in the LOB storage clause, CACHE specifies that Oracle preallocates and retains LOB data values in memory for faster access. This is not a valid keyword when creating index-organized tables. |
|
|
NOCACHE |
for data that will not be accessed frequently, specifies that the blocks retrieved for this table are placed at the least recently used end of the LRU list in the buffer cache when a full table scan is performed. For LOBs, the LOB value either is not brought into the buffer cache or is brought into the buffer cache and placed at the least recently used end of the LRU list. |
|
|
|
This is the default behavior except when creating index-organized tables. This is not a valid keyword when creating index-organized tables. |
|
|
|
As a parameter in the LOB storage clause, NOCACHE specifies that LOB values are not preallocated in memory. This is the LOB storage default. |
|
Tables are created with no data unless a query is specified. You can add rows to a table with the INSERT command.
After creating a table, you can define additional columns, partitions, and integrity constraints with the ADD clause of the ALTER TABLE command. You can change the definition of an existing column or partition with the MODIFY clause of the ALTER TABLE command. To modify an integrity constraint, you must drop the constraint and redefine it.
To define the EMP table owned by SCOTT, you could issue the following statement:
CREATE TABLE scott.emp (empno NUMBER CONSTRAINT pk_emp PRIMARY KEY, ename VARCHAR2(10) CONSTRAINT nn_ename NOT NULL CONSTRAINT upper_ename CHECK (ename = UPPER(ename)), job VARCHAR2(9), mgr NUMBER CONSTRAINT fk_mgr REFERENCES scott.emp(empno), hiredate DATE DEFAULT SYSDATE, sal NUMBER(10,2) CONSTRAINT ck_sal CHECK (sal > 500), comm NUMBER(9,0) DEFAULT NULL, deptno NUMBER(2) CONSTRAINT nn_deptno NOT NULL CONSTRAINT fk_deptno REFERENCES scott.dept(deptno) ) PCTFREE 5 PCTUSED 75;
This table contains 8 columns. The EMPNO column is of datatype NUMBER and has an associated integrity constraint named PK_EMP. The HIRDEDATE column is of datatype DATE and has a default value of SYSDATE, and so on.
This table definition specifies a PCTFREE of 5 and a PCTUSED of 75, which is appropriate for a relatively static table. The definition also defines integrity constraints on some columns of the EMP table.
To define the sample table SALGRADE in the HUMAN_RESOURCE tablespace with a small storage capacity and limited allocation potential, issue the following statement:
CREATE TABLE salgrade ( grade NUMBER CONSTRAINT pk_salgrade PRIMARY KEY USING INDEX TABLESPACE users_a, losal NUMBER, hisal NUMBER ) TABLESPACE human_resource STORAGE (INITIAL 6144 NEXT 6144 MINEXTENTS 1 MAXEXTENTS 5 PCTINCREASE 5);
The above statement also defines a PRIMARY KEY constraint on the GRADE column and specifies that the index Oracle creates to enforce this constraint is created in the USERS_A tablespace.
For more examples of defining integrity constraints, see the CONSTRAINT clause. For examples of enabling and disabling integrity constraints, see the ENABLE clause and the DISABLE clause.
When using parallel query, the fastest way to create a table that has the same columns as the EMP table, but only for those employees in department 10, is to issue a command similar to the following:
CREATE TABLE emp_tmp NOLOGGING PARALLEL (DEGREE 3) AS SELECT * FROM emp WHERE deptno = 10;
Using parallelism speeds up the creation of the table because Oracle uses three processes to create the table. After the table is created, querying the table is also faster, because the same degree of parallelism is used to access the table.
The following example creates table LOB_TAB with two LOB columns and specifies the LOB storage characteristics:
CREATE TABLE lob_tab (col1 BLOB, col2 CLOB) STORAGE (INITIAL 256 NEXT 256) LOB (col1, col2) STORE AS (TABLESPACE lob_seg_ts STORAGE (INITIAL 6144 NEXT 6144) CHUNK 4 NOCACHE LOGGING INDEX (TABLESPACE lob_index_ts STORAGE (INITIAL 256 NEXT 256) ) );
Index-organized tables are special kinds of tables that keep data sorted on the primary key and are therefore best suited for primary key-based access and manipulation.
An index-organized table is an alternative to
Index-organized tables differ from other kinds of tables in that Oracle maintains the table rows in a B*-tree index built on the primary key. However, the index row contains both the primary key column values and the associated non-key column values for the corresponding row.
You must specify a primary key for an index-organized table, because the primary key uniquely identifies a row. Use the primary key instead of the ROWID for directly accessing index-organized rows.
The following statement creates an index-organized table:
CREATE TABLE docindex ( token CHAR(20), doc_oid INTEGER, token_frequency SMALLINT, token_occurrence_data VARCHAR(512), CONSTRAINT pk_docindex PRIMARY KEY (token, doc_oid) ) ORGANIZATION INDEX TABLESPACE text_collection PCTTHRESHOLD 20 INCLUDING token_frequency OVERFLOW TABLESPACE text_collection_overflow;
A partitioned table consists of a number of pieces all of which have the same logical attributes. For example, all partitions share the same column and constraint definitions.
You can create a partitioned table with just one partition. Note, however, that a partitioned table with one partition is different from a nonpartitioned table. For instance, you cannot add a partition to a nonpartitioned table.
The following example creates a table with three partitions:
CREATE TABLE stock_xactions (stock_symbol CHAR(5), stock_series CHAR(1), num_shares NUMBER(10), price NUMBER(5,2), trade_date DATE) STORAGE (INITIAL 100K NEXT 50K) LOGGING PARTITION BY RANGE (trade_date) (PARTITION sx1992 VALUES LESS THAN (TO_DATE('01-JAN-1993','DD-MON-YYYY')) TABLESPACE ts0 NOLOGGING, PARTITION sx1993 VALUES LESS THAN (TO_DATE('01-JAN-1994','DD-MON-YYYY')) TABLESPACE ts1, PARTITION sx1994 VALUES LESS THAN (TO_DATE('01-JAN-1995','DD-MON-YYYY')) TABLESPACE ts2);
For information about partitioned table maintenance operations, see the Oracle8 Administrator's Guide.
 Object Tables
In order to have Oracle assign an object identifier to an object, the object must reside in a special kind of table called an object table. Objects residing in an object table are referenceable. For more information about using REFs, see "User-Defined Types", "User Functions", "Expressions", CREATE TYPE, andOracle8 Administrator's Guide.
The columns of an object table correspond to the top-level attributes of the corresponding type. Each row will contain an object instance, and each instance will be assigned a unique, system-generated object identifier (OID) when a row is inserted.
For example, consider object type DEPT_T:
CREATE TYPE dept_t AS OBJECT ( dname VARCHAR2(100), address VARCHAR2(200) );
Object table DEPT holds department objects of type DEPT_T:
CREATE TABLE dept OF dept_t;
 The following example creates object table SALESREPS with a user-defined object type, SALESREP_T:
CREATE OR REPLACE TYPE salesrep_t AS OBJECT ( repId NUMBER, repName VARCHAR2(64)); CREATE TABLE salesreps OF salesrep_t;
 Nested Table Storage
Creating a table with columns of type TABLE implicitly creates a storage table for each nested table column. The storage table is created in the same tablespace as its parent table (using the default storage characteristics) and stores the nested table values of the column for which it was created.
You cannot query or perform DML statements on the storage table directly, but you can modify the nested table column storage characteristics by using the name of storage table in an ALTER TABLE statement. For information about modifying nested table column storage characteristics, see ALTER TABLE.
The following example creates relational table EMPLOYEE with a nested table column PROJECTS:
CREATE TABLE employee (empno NUMBER, name CHAR(31), projects PROJ_TABLE_TYPE) NESTED TABLE projects STORE AS nested_proj_table;
 REFs
REFsA REF value is a reference to a row in an object table. A table can have top-level REF columns or REF attributes embedded within an object type column. In general, if a table has a REF column, each REF value in the column could reference a row in a different object table. A SCOPE clause restricts the scope of references to a single table.
For example, if you create an object table DEPT which stores all the departments in an organization, you could then create table EMP that contains a REF column (E_DEPT) to point to the department in which each employee works. Because all employees work in some department stored in the DEPT table, a scope clause can be specified on the E_DEPT column of EMP to restrict the scope of references to the DEPT table.
You can increase the performance of queries with dereference operations and decrease the amount of storage needed for REF values by using the scope clause. Note that a SCOPE clause does not have the same semantics as referential constraints. Referential constraints do not allow dangling references. Also, referential constraints do not necessarily restrict the scope of references to a single table (one can specify multiple referential constraints on the same foreign key, with each one of them pointing to a different table).
You can also store REF values with or without ROWIDs. Storing REF values WITH ROWID can enhance the performance of dereference operations, but takes up more space. The default behavior is to store REF values without the ROWID.
You cannot specify REF clauses on REF columns in nested tables using the CREATE TABLE statement. To specify REF clauses on REF columns in nested tables, use the ALTER TABLE to modify the nested table 's storage table.
The following example creates object type DEPT_T and object table DEPT to store instances of all departments. A table with a scoped REF is then created.
CREATE TYPE dept_t AS OBJECT ( dname VARCHAR2(100), address VARCHAR2(200) ); CREATE TABLE dept OF dept_t; CREATE TABLE emp ( ename VARCHAR2(100), enumber NUMBER, edept REF dept_t SCOPE IS dept );
 Constraints on Object Type Columns
You can create UNIQUE, PRIMARY KEY, and REFERENCES constraints on scalar attributes of object type columns. You can also create NOT NULL constraints on object type columns, and CHECK constraints that reference object type columns or any attribute of an object type column.
CREATE TYPE address AS OBJECT ( hno NUMBER, street VARCHAR2(40), city VARCHAR2(20), zip VARCHAR2(5), phone VARCHAR2(10) ); CREATE TYPE person AS OBJECT ( name VARCHAR2(40), dateofbirth DATE, homeaddress address, manager REF person ); CREATE TABLE persons OF person ( homeaddress NOT NULL UNIQUE (homeaddress.phone), CHECK (homeaddress.zip IS NOT NULL), CHECK (homeaddress.city <> 'San Francisco') );
To create a tablespace. A tablespace is an allocation of space in the database that can contain schema objects. See also "About Tablespaces".
You must have CREATE TABLESPACE system privilege. Also, the SYSTEM tablespace must contain at least two rollback segments including the SYSTEM rollback segment.
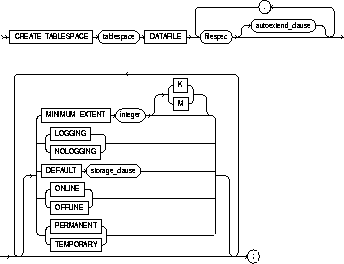
filespec: See "Filespec".
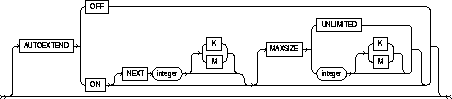 autoextend_clause::=
storage_clause: See STORAGE clause.
|
DATAFILE filespec |
is the name of the tablespace to be created. |
|
|
specifies the datafile or files to make up the tablespace. See "Filespec". |
||
|
|
|
|
|
autoextend_clause |
enables or disables the automatic extension of the datafile. |
|
|
|
OFF |
disables autoextend if it is turned on. NEXT and MAXSIZE are set to zero. Values for NEXT and MAXSIZE must be respecified in further ALTER TABLESPACE AUTOEXTEND commands. |
|
|
ON |
enables autoextend. |
|
|
NEXT |
specifies the disk space to allocate to the datafile when more extents are required. |
|
|
MAXSIZE |
specifies the maximum disk space allowed for allocation to the datafile. |
|
|
UNLIMITED |
sets no limit on allocating disk space to the datafile. |
|
MINIMUM EXTENT integer |
controls free space fragmentation in the tablespace by ensuring that every used and/or free extent size in a tablespace is at least as large as, and is a multiple of, integer. For more information about using MINIMUM EXTENT to control space fragmentation, see Oracle8 Administrator's Guide. |
|
|
LOGGING/NOLOGGING |
specifies the default logging attributes of all tables, index, and partitions within the tablespace. LOGGING is the default. |
|
|
|
The tablespace-level logging attribute can be overridden by logging specifications at the table, index, and partition levels. Only the following operations support the NOLOGGING mode: DML: DDL: |
|
|
|
In NOLOGGING mode, data is modified with minimal logging (to mark new extents invalid and to record dictionary changes). When applied during media recovery, the extent invalidation records mark a range of blocks as logically corrupt, because the redo data is not logged. Therefore, if you cannot afford to lose the object, you should take a backup after the NOLOGGING operation. |
|
|
DEFAULT storage_clause |
specifies the default storage parameters for all objects created in the tablespace. For information on storage parameters, see the STORAGE clause. |
|
|
ONLINE |
makes the tablespace available immediately after creation to users who have been granted access to the tablespace. |
|
|
OFFLINE |
makes the tablespace unavailable immediately after creation. |
|
|
|
If you omit both the ONLINE and OFFLINE options, Oracle creates the tablespace online by default. The data dictionary view DBA_TABLESPACES indicates whether each tablespace is online or offline. |
|
|
PERMANENT |
specifies that the tablespace will be used to hold permanent objects. This is the default. |
|
|
TEMPORARY |
specifies that the tablespace will be used only to hold temporary objects-for example, segments used by implicit sorts to handle ORDER BY clauses. |
|
A tablespace is an allocation of space in the database that can contain any of the following segments:
All databases have at least one tablespace, SYSTEM, which Oracle creates automatically when you create the database.
When you create a tablespace, it is initially a read-write tablespace. After creating the tablespace, you can subsequently use the ALTER TABLESPACE command to take it offline or online, add datafiles to it, or make it a read-only tablespace.
Many schema objects have associated segments that occupy space in the database. These objects are located in tablespaces. The user creating such an object can optionally specify the tablespace to contain the object. The owner of the schema containing the object must have space quota on the object's tablespace. You can assign space quota on a tablespace to a user with the QUOTA clause of the CREATE USER or ALTER USER commands.
This command creates a tablespace named TABSPACE_2 with one data file:
CREATE TABLESPACE tabspace_2 DATAFILE 'diska:tabspace_file2.dat' SIZE 20M DEFAULT STORAGE (INITIAL 10K NEXT 50K MINEXTENTS 1 MAXEXTENTS 999 PCTINCREASE 10) ONLINE;
This command creates a tablespace named TABSPACE_3 with one data file; when more space is required, 50 kilobyte extents will be added up to a maximum size of 10 megabytes:
CREATE TABLESPACE tabspace_5 DATAFILE 'diskb:tabspace_file3.dat' SIZE 500K REUSE AUTOEXTEND ON NEXT 500K MAXSIZE 10M;
This command creates tablespace TABSPACE_5 with one data file and allocates every extent as a multiple of 64K:
CREATE TABLESPACE tabspace_3 DATAFILE 'tabspace_file5.dbf' SIZE 2M MINIMUM EXTENT 64K DEFAULT STORAGE (INITIAL 128K NEXT 128K) LOGGING;
To create and enable a database trigger. A database trigger is a stored PL/SQL block associated with a table. Oracle automatically executes a trigger when a specified SQL statement is issued against the table. See also "Using Triggers".
Before a trigger can be created, the user SYS must run the SQL script DBMSSTDX.SQL. The exact name and location of this script depend on your operating system.
To issue this statement, you must have one of the following system privileges:
|
CREATE TRIGGER |
lets you create a trigger in your own schema on a table in your own schema. |
|
CREATE ANY TRIGGER |
lets you create a trigger in any user's schema on a table in any schema. |
If the trigger issues SQL statements or calls procedures or functions, then the owner of the schema to contain the trigger must have the privileges necessary to perform these operations. These privileges must be granted directly to the owner, rather than acquired through roles.
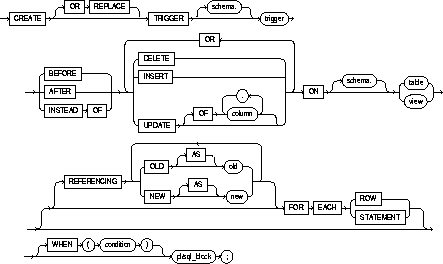
|
OR REPLACE |
re-creates the trigger if it already exists. Use this option to change the definition of an existing trigger without first dropping it. |
|
schema |
is the schema to contain the trigger. If you omit schema, Oracle creates the trigger in your own schema. |
|
trigger |
is the name of the trigger to be created. See also"Conditional Predicates", "Parts of a Trigger", and "Types of Triggers". |
|
BEFORE |
causes Oracle to fire the trigger before executing the triggering statement. For row triggers, this is a separate firing before each affected row is changed. |
|
|
You cannot specify a BEFORE trigger on a view or an object view. |
|
AFTER |
causes Oracle to fire the trigger after executing the triggering statement. For row triggers, this is a separate firing after each affected row is changed. See also "Snapshot Log Triggers". |
|
|
You cannot specify an AFTER trigger on a view or an object view. |
|
INSTEAD OF |
causes Oracle to fire the trigger instead of executing the triggering statement. By default, INSTEAD OF triggers are activated for each row. See also "INSTEAD OF Triggers". |
|
|
INSTEAD OF is a valid option only for views. You cannot specify an INSTEAD OF trigger on a table. |
|
DELETE |
causes Oracle to fire the trigger whenever a DELETE statement removes a row from the table. |
|
INSERT |
causes Oracle to fire the trigger whenever an INSERT statement adds a row to table. |
|
UPDATE |
causes Oracle to fire the trigger whenever an UPDATE statement changes a value in one of the columns specified in the OF clause. If you omit the OF clause, Oracle fires the trigger whenever an UPDATE statement changes a value in any column of the table. |
|
|
You cannot specify an OF clause with an INSTEAD OF trigger. Oracle fires INSTEAD OF triggers whenever an UPDATE changes a value in any column of the view. |
|
|
You cannot specify nested table or LOB columns in the OF clause. See also "User-Defined Types, LOB, and REF Columns". |
|
ON |
specifies the schema and table or view name of the of one of the following on which the trigger is to be created: If you omit schema, Oracle assumes the table is in your own schema. You can create triggers on index-organized tables. You cannot create a trigger on a table in the schema SYS. See also "User-Defined Types, LOB, and REF Columns". |
|
table |
is the name of a table or an object table. |
|
view |
is the name of a view or an object view. |
|
REFERENCING |
specifies correlation names. You can use correlation names in the PL/SQL block and WHEN clause of a row trigger to refer specifically to old and new values of the current row. The default correlation names are OLD and NEW. If your row trigger is associated with a table named OLD or NEW, use this clause to specify different correlation names to avoid confusion between the table name and the correlation name. |
|
|
|
|
FOR EACH ROW |
designates the trigger to be a row trigger. Oracle fires a row trigger once for each row that is affected by the triggering statement and meets the optional trigger constraint defined in the WHEN clause. Except for INSTEAD OF triggers, if you omit this clause, the trigger is a statement trigger. Oracle fires a statement trigger only once when the triggering statement is issued if the optional trigger constraint is met. INSTEAD OF trigger statements are implicitly activated for each row. |
|
WHEN (condition) |
specifies the trigger restriction-a SQL condition that must be satisfied for Oracle to fire the trigger. See the syntax description of condition in "Conditions". This condition must contain correlation names and cannot contain a query. You can specify a trigger restriction only for a row trigger. Oracle evaluates this condition for each row affected by the triggering statement. You cannot specify trigger restrictions for INSTEAD OF trigger statements.
|
|
pl/sql_block |
is the PL/SQL block that Oracle executes to fire the trigger. For information on PL/SQL, including how to write PL/SQL blocks, see PL/SQL User's Guide and Reference. |
|
|
Note: The PL/SQL block of a trigger cannot contain transaction control SQL statements (COMMIT, ROLLBACK, SAVEPOINT, and SET CONSTRAINT). |
Oracle automatically fires, or executes, a trigger when a triggering statement is issued. You can use triggers for the following purposes:
For more information on how to design triggers for the above purposes, see Oracle8 Application Developer's Guide.
An existing trigger must be in one of the following states:
When you create a trigger, Oracle enables it automatically. You can subsequently disable and enable a trigger with the DISABLE and ENABLE options of the ALTER TRIGGER command or the ALTER TABLE command.
For information on how to enable and disable triggers, see ALTER TRIGGER, ALTER TABLE, the ENABLE clause, and the DISABLE clause.
Before Release 7.3, Oracle parsed and compiled a trigger whenever it was fired. From Release 7.3 onward, Oracle stores a compiled version of a trigger in the data dictionary and calls this compiled version when the trigger is fired. This feature provides a significant performance improvement for applications that use many triggers.
If a trigger produces compilation errors, it is still created, but it fails on execution. This means it effectively blocks all triggering DML statements until it is disabled, replaced by a version without compilation errors, or dropped.
To embed a CREATE TRIGGER statement inside an Oracle precompiler program, you must terminate the statement with the keyword END-EXEC followed by the embedded SQL statement terminator for the specific language.
When you create a trigger for more than one DML operation, you can use conditional predicates within the trigger body to execute specific blocks of code, depending on the type of statement that fires the trigger. Conditional predicates are evaluated as follows:
For more information about creating and using conditional predicates in trigger bodies, see Oracle8 Application Developer's Guide.
The following example uses conditional predicates to provide information about which DML statement fires trigger AUDIT_TRIGGER:
CREATE TRIGGER audit_trigger BEFORE INSERT OR DELETE OR UPDATE ON classified_table FOR EACH ROW BEGIN IF INSERTING THEN INSERT INTO audit_table VALUES (USER || ' is inserting' || ' new key: ' || :new.key); ELSIF DELETING THEN INSERT INTO audit_table VALUES (USER || ' is deleting' || ' old key: ' || :old.key); ELSIF UPDATING('FORMULA') THEN INSERT INTO audit_table VALUES (USER || ' is updating' || ' old formula: ' || :old.formula || ' new formula: ' || :new.formula); ELSIF UPDATING THEN INSERT INTO audit_table VALUES (USER || ' is updating' || ' old key: ' || :old.key || ' new key: ' || :new.key); END IF; END;
The syntax of the CREATE TRIGGER statement includes the following parts of the trigger:
The definition of the triggering statement specifies what SQL statements cause Oracle to fire the trigger.
The trigger restriction specifies an additional condition that must be satisfied for a row trigger to be fired. You specify this condition with the WHEN clause. This condition must be a SQL condition, rather than a PL/SQL condition.
The trigger action specifies the PL/SQL block Oracle executes to fire the trigger.
Oracle evaluates the condition of the trigger restriction whenever a triggering statement is issued. If this condition is satisfied, then Oracle fires the trigger using the trigger action.
You can create different types of triggers. The type of a trigger determines:
The type of a trigger depends on the BEFORE, AFTER, and FOR EACH ROW options of the CREATE TRIGGER command. Using all combinations of these options for the above parts, you can create four types of triggers. Table 4-9 describes each type of trigger, its properties, and the options used to create it.
For a single table, you can create each type of trigger for each of the following commands:
You can also create triggers that fire for more than one command.
If you create multiple triggers of the same type that fire for the same command on the same table, the order in which Oracle fires these triggers is indeterminate. If your application requires that one trigger be fired before another of the same type for the same command, combine these triggers into a single trigger whose trigger action performs the trigger actions of the original triggers in the appropriate order.
When you create a snapshot log for a table, Oracle implicitly creates an AFTER ROW trigger on the table. This trigger inserts a row into the snapshot log whenever an INSERT, UPDATE, or DELETE statement modifies the table's data. You cannot control the order in which multiple row triggers fire; therefore, you should not write triggers intended to affect the content of the snapshot. For more information on snapshot logs, see CREATE SNAPSHOT LOG.
This example creates a BEFORE statement trigger named EMP_PERMIT_CHANGES in the schema SCOTT. This trigger ensures that changes to employee records are made only during business hours on working days:
CREATE TRIGGER scott.emp_permit_changes BEFORE DELETE OR INSERT OR UPDATE ON scott.emp DECLARE dummy INTEGER; BEGIN /* If today is a Saturday or Sunday, then return an error.*/ IF (TO_CHAR(SYSDATE, 'DY') = 'SAT' OR TO_CHAR(SYSDATE, 'DY') = 'SUN') THEN raise_application_error( -20501, 'May not change employee table during the weekend'); END IF; /* Compare today's date with the dates of all company holidays. If today is a company holiday, then return an error.*/ SELECT COUNT(*) INTO dummy FROM company_holidays WHERE day = TRUNC(SYSDATE); IF dummy > 0 THEN raise_application_error( -20501, 'May not change employee table during a holiday'); END IF; /*If the current time is before 8:00AM or after 6:00PM, then return an error. */ IF (TO_CHAR(SYSDATE, 'HH24') < 8 OR TO_CHAR(SYSDATE, 'HH24') >= 18) THEN raise_application_error( -20502, 'May only change employee table during working hours'); END IF; END;
Oracle fires this trigger whenever a DELETE, INSERT, or UPDATE statement affects the EMP table in the schema SCOTT. The trigger EMP_PERMIT_CHANGES is a BEFORE statement trigger, so Oracle fires it once before executing the triggering statement.
The trigger performs the following operations:
This example creates a BEFORE row trigger named SALARY_CHECK in the schema SCOTT. Whenever a new employee is added to the employee table or an existing employee's salary or job is changed, this trigger guarantees that the employee's salary falls within the established salary range for the employee's job:
CREATE TRIGGER scott.salary_check BEFORE INSERT OR UPDATE OF sal, job ON scott.emp FOR EACH ROW WHEN (new.job <> 'PRESIDENT') DECLARE minsal NUMBER; maxsal NUMBER; BEGIN /* Get the minimum and maximum salaries for the employee's job from the SAL_GUIDE table. */ SELECT minsal, maxsal INTO minsal, maxsal FROM sal_guide WHERE job = :new.job; /* If the employee's salary is below the minimum or */ /* above the maximum for the job, then generate an */ /* error.*/ IF (:new.sal < minsal OR :new.sal > maxsal) THEN raise_application_error( -20601, 'Salary ' || :new.sal || ' out of range for job ' || :new.job || ' for employee ' || :new.ename ); END IF; END;
Oracle fires this trigger whenever one of the following statements is issued:
SALARY_CHECK is a BEFORE row trigger, so Oracle fires it before changing each row that is updated by the UPDATE statement or before adding each row that is inserted by the INSERT statement.
SALARY_CHECK has a trigger restriction that prevents it from checking the salary of the company president. For each new or modified employee row that meets this condition, the trigger performs the following steps:
Use INSTEAD OF triggers to perform DELETE, UPDATE, or INSERT operations on views, which are not inherently modifiable. "The View Query" for a list of constructs that prevent inserts, updates, or deletes on a view. In the following example, customer data is stored in two tables. The object view ALL_CUSTOMERS is created as a UNION of the two tables, CUSTOMERS_SJ and CUSTOMERS_PA. An INSTEAD OF trigger is used to insert values:
CREATE TABLE customers_sj ( cust NUMBER(6), address VARCHAR2(50), credit NUMBER(9,2) ); CREATE TABLE customers_pa ( cust NUMBER(6), address VARCHAR2(50), credit NUMBER(9,2) ); CREATE TYPE customer_t AS OBJECT ( cust NUMBER(6), address VARCHAR2(50), credit NUMBER(9,2), location VARCHAR2(20) ); CREATE VIEW all_customers (cust) AS SELECT customer_t (cust, address, credit, 'SAN_JOSE') FROM customers_sj UNION ALL SELECT customer_t(cust, address, credit, 'PALO_ALTO') FROM customers_pa; CREATE TRIGGER instrig INSTEAD OF INSERT ON all_customers FOR EACH ROW BEGIN IF (:new.location = 'SAN_JOSE') THEN INSERT INTO customers_sj VALUES (:new.cust, :new.address, :new.credit); ELSE INSERT INTO customers_pa VALUES (:new.cust, :new.address, :new.credit); END IF; END;
 User-Defined Types, LOB, and REF Columns
You can reference and use object, VARRAY, nested table, LOB, and REF columns in the trigger action inside the PL/SQL block, but you cannot modify their values within the trigger action. For an UPDATE trigger, object type, VARRAY type, and REF type, you can specify columns in the OF clause to indicate that the trigger should be fired whenever an UPDATE statement changes a value in one of the columns.
When defining INSTEAD OF TRIGGERS for LOB columns, you can read both the :OLD and the :NEW value, but you cannot write either the :OLD or the :NEW values. When defining any other triggers for LOB columns, you can read the :OLD value but not the :NEW value; you cannot write either the :OLD or the :NEW value.
Using OCI functions or the DBMS_LOB package to update LOB values or LOB attributes of object columns does not cause Oracle to fire triggers defined on the table containing the columns or the attributes. Likewise, performing DML operations directly on nested table columns does not cause Oracle to fire triggers defined on the table containing the nested table column.
 CREATE TYPE
To create an object type, named varying array (VARRAY), nested table type, or an incomplete object type.
An incomplete type is a type created by a forward type definition. It is called "incomplete" because it has a name but no attributes or methods. However, it can be referenced by other types, and so can be used to define types that refer to each other. See also "Incomplete Object Types".
For more information about objects, incomplete types, VARRAYs, and nested tables see the PL/SQL User's Guide and Reference, Oracle8 Application Developer's Guide, and Oracle8 Concepts.
To create a type in your own schema, you must have the CREATE TYPE system privilege. To create a type in another user's schema, you must have the CREATE ANY TYPE system privilege. You can acquire these privileges explicitly or be granted them through a role.
The owner of the type must either be explicitly granted the EXECUTE object privilege in order to access all other types referenced within the definition of the type, or the type owner must be granted the EXECUTE ANY TYPE system privilege. The owner cannot obtain these privileges through roles.
If the type owner intends to grant other users access to the type, the owner must be granted the EXECUTE object privilege to the referenced types with the GRANT OPTION, or the EXECUTE ANY TYPE system privilege with the ADMIN OPTION. Otherwise, the type owner has insufficient privileges to grant access on the type to other users.
 create_incomplete_type::=
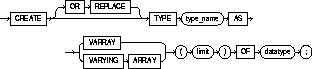 create_varray_type::=
 create_nested_table_type::=
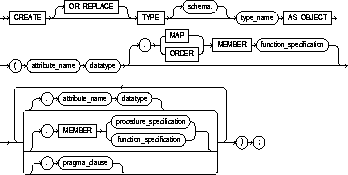 create_object_type::=
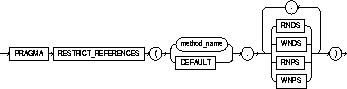 pragma_clause::=
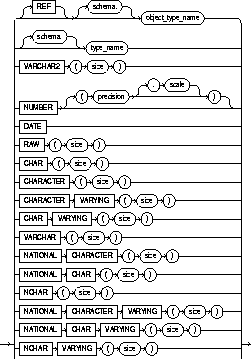 datatype::=
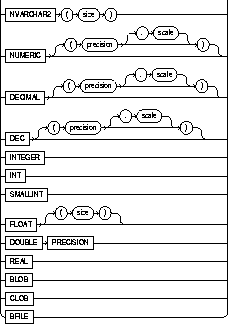
|
OR REPLACE |
re-creates the type if it already exists. Use this option to change the definition of an existing type without first dropping it. |
|
|
|
Users previously granted privileges on the re-created object type can use and reference the object type without being granted privileges again. |
|
|
schema |
is the schema to contain the type. If you omit schema, Oracle creates the type in your current schema. |
|
|
type_name |
is the name of an object type, a nested table type, or a VARRAY type. |
|
|
AS OBJECT |
creates the type as a user-defined object type. The variables that form the data structure are called attributes. The member subprograms that define the object's behavior are called methods. AS OBJECT is required when creating an object type. See also "Constructors". |
|
|
AS TABLE OF |
creates a named nested table of type datatype. When datatype is an object type, the nested table type describes a table whose columns match the name and attributes of the object type. When datatype is a scalar type, then the nested table type describes a table with a single, scalar type column called "column_value". |
|
|
|
Note that a collection type cannot contain any other collection type, either directly or indirectly. |
|
|
AS VARRAY(limit) |
creates the type as an ordered set of elements, each of which has the same datatype. You must specify a name and a maximum limit of zero or more. The array limit must be an integer literal. Only variable-length arrays are supported. Oracle does not support anonymous VARRAYs. |
|
|
|
The type name for the objects contained in the VARRAY must be one of the following: |
|
|
|
The type name for the objects contained in the VARRAY cannot be |
|
|
|
Note that a collection type cannot contain any other collection type, either directly or indirectly. |
|
|
OF datatype |
is the name of any Oracle built-in datatype or library type. ROWID, LONG, and LONG RAW are not valid datatypes. For a list of possible datatypes, see the syntax definition for CREATE TYPE. |
|
|
REF object_type_name |
associates an instance of a source type with an instance of the target object. A REF logically identifies and locates the target object. The target object must have an object identifier. |
|
|
attribute_name |
is an object attribute name. Attributes are data items with a name and a type specifier that form the structure of the object. |
|
|
MEMBER |
specifies a function or procedure subprogram associated with the object type which is referenced as an attribute. For information about overloading subprogram names within a package, see the PL/SQL User's Guide and Reference. |
|
|
|
You must specify a corresponding method body in the object type body for each procedure or function specification. See CREATE TYPE BODY. |
|
|
procedure_specification |
is the specification of a procedure subprogram. |
|
|
function_specification |
is the specification of a function subprogram. |
|
|
MAP MEMBER function_specification |
specifies a member function (map method) that returns the relative position of a given instance in the ordering of all instances of the object. A map method is called implicitly and induces an ordering of object instances by mapping them to values of a predefined scalar type. PL/SQL uses the ordering to evaluate Boolean expressions and to perform comparisons. |
|
|
|
A scalar value is always manipulated as a single unit. Scalars are mapped directly to the underlying hardware. An integer, for example, occupies 4 or 8 contiguous bytes of storage, in memory or on disk. |
|
|
|
An object specification can contain only one map method, which must be a function. The result type must be a predefined SQL scalar type, and the map function can have no arguments other than the implicit SELF argument. |
|
|
ORDER MEMBER function_specification |
specifies a member function (ORDER method) that takes an instance of an object as an explicit argument and the implicit SELF argument and returns either a negative, zero, or positive integer. The negative, positive, or zero indicates that the implicit SELF argument is less than, equal to, or greater than the explicit argument. |
|
|
|
When instances of the same object type definition are compared in an ORDER BY clause, the order method function_specification is invoked. |
|
|
|
An object specification can contain only one ORDER method, which must be a function having the return type INTEGER. |
|
|
You can define either a MAP method or an ORDER method in a type specification, but not both. If you declare either method, you can compare object instances in SQL. |
||
|
If neither a MAP nor an ORDER method is specified, only comparisons for equality or inequality can be performed; therefore and thus object instances cannot be ordered. Note that instances of the same type definition are equal only if each pair of their corresponding attributes is equal. No comparison method needs to be specified to determine the equality of two object types. For more information about object value comparisons, "Object Values" and Oracle8 Application Developer's Guide. |
||
|
pragma_clause: |
|
|
|
PRAGMA RESTRICT_REFERENCES |
is a compiler directive that denies member functions read/write access to database tables, packaged variables, or both, and thereby helps to avoid side effects. For more information, see the PL/SQL User's Guide and Reference. |
|
|
|
method_name |
is the name of the MEMBER function or procedure to which the pragma is being applied. |
|
|
WNDS |
specifies the constraint writes no database state (does not modify database tables). |
|
|
WNPS |
specifies the constraint writes no package state (does not modify packaged variables). |
|
|
RNDS |
specifies the constraint reads no database state (does not query database tables). |
|
|
RNPS |
specifies the constraint reads no package state (does not reference packages variables). |
You must fully specify an incomplete object type before you can use it to create a table or an object column or a column of a nested table type.
You cannot create nested VARRAY or nested table types. That is, VARRAY and nested table types cannot contain any elements that are VARRAYs or nested tables. You cannot create VARRAY types of LOB datatypes.
The following example creates object type PERSON_T with LOB attributes:
CREATE TYPE person_t AS OBJECT (name CHAR(20), resume CLOB, picture BLOB);
The following statement creates MEMBERS_TYPE as a VARRAY type with 100 elements:
CREATE TYPE members_type AS VARRAY(100) OF CHAR(5);
The following example creates a named table type PROJECT_TABLE of object type PROJECT_T:
CREATE TYPE project_t AS OBJECT (pno CHAR(5), pname CHAR(20), budgets DEC(7,2)); CREATE TYPE project_table AS TABLE OF project_t;
The following example invokes method constructor COL.GETBAR():
CREATE TYPE foo AS OBJECT (a1 NUMBER, MEMBER FUNCTION getbar RETURN NUMBER, pragma RESTRICT_REFERENCES(getbar, WNDS, WNPS)); CREATE TABLE footab(col foo); SELECT col.getbar() FROM footab;
Oracle implicitly defines a constructor method for each user-defined type that you create. A constructor is a system-supplied procedure that is used in SQL statements or in PL/SQL code to construct an instance of the type value. The name of the constructor method is the same as the name of the user-defined type.
The parameters of the object type constructor method are the data attributes of the object type; they occur in the same order as the attribute definition order for the object type. The parameters of a nested table or VARRAY constructor are the elements of the nested table or the VARRAY.
Unlike function invocations, method invocations require parentheses, even when the methods do not have additional arguments.
This example invokes the system-defined constructor to construct the FOO_T object and insert it into the FOO_TAB table:
CREATE TYPE foo_t AS OBJECT (a1 NUMBER, a2 NUMBER); CREATE TABLE foo_tab (b1 NUMBER, b2 foo_t); INSERT INTO foo_tab VALUES (1, foo_t(2,3));
For more information about constructors, see Oracle8 Application Developer's Guide and PL/SQL User's Guide and Reference.
 CREATE TYPE BODY
 To define or implement the member methods defined in the object type specification. See also "TYPE and TYPE BODY".
Every member declaration in the CREATE TYPE specification for object types must have a corresponding construct in the CREATE TYPE BODY statement.
To create or replace a type body in your own schema, you must have CREATE TYPE or CREATE ANY TYPE system privilege. To create an object type in another user's schema, you must have CREATE ANY TYPE system privileges. To replace an object type in another user's schema, you must have DROP ANY TYPE system privileges.
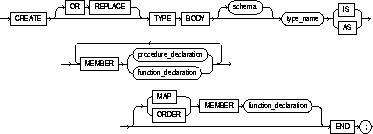
|
OR REPLACE |
re-creates the type body if it already exists. Use this option to change the definition of an existing type body without first dropping it. |
|
|
|
Users previously granted privileges on the re-created object type body can use and reference the object type body without being granted privileges again. |
|
|
|
You can use this option to add new member subprogram definitions to specifications added with the ALTER TYPE ... REPLACE command. |
|
|
schema |
is the schema to contain the type body. If you omit schema, Oracle creates the type body in your current schema. |
|
|
type_name |
is the name of an object type. |
|
|
MEMBER |
declares or implements a method function or procedure subprogram associated with the object type specification. For information about overloading subprogram names within a package, see PL/SQL User's Guide and Reference. |
|
|
|
You must define a corresponding method name, optional parameter list, and (for functions) a return type in the object type specification for each procedure or function declaration. See CREATE TYPE BODY. |
|
|
procedure_declaration |
is the declaration of a procedure subprogram. For more information about writing type bodies, see PL/SQL User's Guide and Reference. |
|
|
function_declaration |
is the declaration of a function subprogram. For more information about writing type bodies, see PL/SQL User's Guide and Reference. |
|
|
MAP MEMBER function_declaration |
declares or implements a member function (map method) that returns the relative position of a given instance in the ordering of all instances of the object. A map method is called implicitly and specifies an ordering of object instances by mapping them to values of a predefined scalar type. PL/SQL uses the ordering to evaluate Boolean expressions and to perform comparisons. |
|
|
|
An object type body can contain only one map method, which must be a function. The map function can have no arguments other than the implicit SELF argument. |
|
|
ORDER MEMBER function_specification |
specifies a member function (ORDER method) that takes an instance of an object as an explicit argument and the implicit SELF argument and returns either a negative, zero, or positive integer. The negative, positive, or zero indicates that the implicit SELF argument is less than, equal to, or greater than the explicit argument. |
|
|
|
When instances of the same object type definition are compared in an ORDER BY clause, Oracle invokes the order method function_specification. |
|
|
|
An object specification can contain only one ORDER method, which must be a function having the return type INTEGER. |
|
|
You can declare either a MAP method or an ORDER method, but not both. If you declare either method, you can compare object instances in SQL. |
||
|
If you do not declare either method, you can compare only object instances for equality or inequality. Note that instances of the same type definition are equal only if each pair of their corresponding attributes is equal. |
||
You create object types with the CREATE TYPE and the CREATE TYPE BODY commands. The CREATE TYPE command specifies the name of the object type, its attributes, methods, and other properties. The CREATE TYPE BODY command contains the code for the methods in the type.
For each method specified in an object type specification, there must be a corresponding method body in the object type body.
The following object type body implements member subprograms for RATIONAL:
CREATE TYPE BODY rational IS MAP MEMBER FUNCTION rat_to_real RETURN REAL IS BEGIN RETURN numerator/denominator; END; MEMBER PROCEDURE normalize IS gcd INTEGER := integer_operations.greatest_common_divisor (numerator, denominator); BEGIN numerator := numerator/gcd; denominator := denominator/gcd; END; MEMBER FUNCTION plus(x rational) RETURN rational IS r rational := rational_operations.make_rational (numerator*x.denominator + x.numerator*denominator, denominator*x.denominator); BEGIN RETURN r; END; END;
To create a database user, or an account through which you can log in to the database and establish the means by which Oracle permits access by the user. You can assign the following optional properties to the user:
For a detailed description and explanation of how to use password management and protection, see Oracle8 Administrator's Guide.
You must have CREATE USER system privilege.

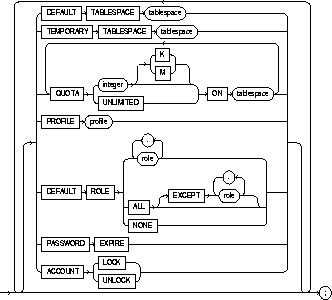
|
user |
is the name of the user to be created. This name can contain only characters from your database character set and must follow the rules described in the section "Schema Object Naming Rules". Oracle recommends that the user name contain at least one single-byte character regardless of whether the database character set also contains multi-byte characters. |
|
|
IDENTIFIED |
indicates how Oracle authenticates the user. See Oracle8 Application Developer's Guide and your operating system specific documentation for more information. |
|
|
|
BY password |
requires the user to specify this password to log on. Password must follow the rules described in the section "Schema Object Naming Rules" and can only contain single-byte characters from your database character set regardless of whether this character set also contains multibyte characters. |
|
|
EXTERNALLY |
indicates that a user must be authenticated by an external service (such as an operating system or a third-party service). See also "Verifying Users Through Your Operating System". |
|
|
GLOBALLY AS 'external_name' |
indicates that a user must be authenticated by the Oracle Security Service. The 'external_name' string is the X.509 name at the Oracle Security Service that identifies this user. See also "Verifying Users Through the Network". |
|
DEFAULT TABLESPACE |
identifies the default tablespace for objects that the user creates. If you omit this clause, objects default to the SYSTEM tablespace. |
|
|
TEMPORARY TABLESPACE |
identifies the tablespace for the user's temporary segments. If you omit this clause, temporary segments default to the SYSTEM tablespace. |
|
|
QUOTA |
allows the user to allocate space in the tablespace and optionally establishes a quota of integer bytes. This quota is the maximum space in the tablespace the user can allocate. You can also use K or M to specify the quota in kilobytes or megabytes. See also "Establishing Tablespace Quotas for Users". |
|
|
|
Note that a CREATE USER command can have multiple QUOTA clauses for multiple tablespaces. |
|
|
|
UNLIMITED |
allows the user to allocate space in the tablespace without bound. |
|
PROFILE |
reassigns the profile named to the user. The profile limits the amount of database resources the user can use. If you omit this clause, Oracle assigns the DEFAULT profile to the user. See also "Granting Privileges to a User". |
|
|
PASSWORD EXPIRE |
causes the user's password to expire. Change the password before attempting to log in to the database. |
|
|
ACCOUNT LOCK |
locks the user's account and disables access. |
|
|
ACCOUNT UNLOCK |
unlocks the user's account and enables access to the account. |
|
Using CREATE USER ... IDENTIFIED EXTERNALLY enables a database administrator to create a database user that can only be accessed from a specific operating system account. Effectively, you are relying on the login authentication of the operating system to ensure that a specific operating system user has access to a specific database user. Thus, the effective security of such database accounts is entirely dependent on the strength of that security mechanism. Oracle strongly recommends that you do not use IDENTIFIED EXTERNALLY with operating systems that have inherently weak login security. For more information, see Oracle8 Administrator's Guide.
Using CREATE USER ... IDENTIFIED GLOBALLY enables a database administrator to create a database user that can only be authorized by an external authentication service, such as Oracle Security Server (OSS), or any external authentication system. For more information about OSS, see The Oracle Security Server Guide and Oracle8 Distributed Database Systems.
To create an object or a temporary segment, the user must allocate space in some tablespace. To allow the user to allocate space, use the QUOTA clause. A CREATE USER statement can have multiple QUOTA clauses, each for a different tablespace. Other clauses can appear only once.
Note that you yourself need not have a quota on a tablespace to establish a quota for another user on that tablespace.
For a user to perform any database operation, the user's privilege domain must contain a privilege that authorizes that operation. A user's privilege domain contains all privileges granted to the user and all privileges in the privilege domains of the user's enabled roles.
Notes:
If you create a new user with PASSWORD EXPIRE, the user's password must be changed before attempting to log in to the database. You can create the user SIDNEY by issuing the following statement:
CREATE USER sidney IDENTIFIED BY carton DEFAULT TABLESPACE cases_ts QUOTA 10M ON cases_ts QUOTA 5M ON temp_ts QUOTA 5M ON system PROFILE engineer PASSWORD EXPIRE;
The user SIDNEY has the following characteristics:
To create a user accessible only by the operating system account GEORGE, prefix GEORGE by the value of the initialization parameter OS_AUTHENT_PREFIX. For example, if this value is "OPS$", you can create the user OPS$GEORGE with the following statement:
CREATE USER ops$george IDENTIFIED EXTERNALLY DEFAULT TABLESPACE accs_ts TEMPORARY TABLESPACE temp_ts QUOTA UNLIMITED ON accs_ts QUOTA UNLIMITED ON temp_ts;
The user OPS$GEORGE has the following additional characteristics:
The following example creates user CINDY as a global user:
CREATE USER cindy IDENTIFIED GLOBALLY AS 'CN=cindyuser' DEFAULT TABLESPACE legal_ts QUOTA 20M ON legal_ts PROFILE lawyer;
To define a view, a logical table based on one or more tables or views.
 Use CREATE VIEW to create an object view or a relational view that supports LOB and object datatypes (object types, REFs, nested table, or VARRAY types) on top of the existing view mechanism. An object view is a view of a user-defined type, where each row contains objects, each object with a unique object identifier.
For more information about creating and using object views, see "Using Views" and Oracle8 Application Developer's Guide. For examples of creating views, see "Examples".
To create a view in your own schema, you must have CREATE VIEW system privilege. To create a view in another user's schema, you must have CREATE ANY VIEW system privilege.
The owner of the schema containing the view must have the privileges necessary to either select, insert, update, or delete rows from all the tables or views on which the view is based. For information on these privileges, see SELECT, INSERT, UPDATE, and DELETE. The owner must be granted these privileges directly, rather than through a role.
 To use the basic constructor method of an object type when creating an object view, one of the following must be true:
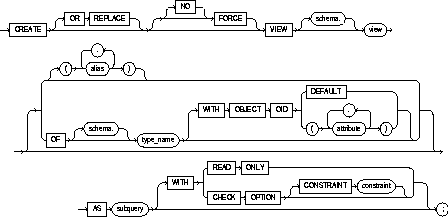
subquery: See "Subqueries"
|
OR REPLACE |
re-creates the view if it already exists. You can use this option to change the definition of an existing view without dropping, re-creating, and regranting object privileges previously granted on it. |
|
|
Note that INSTEAD OF triggers defined in the view are dropped when a view is re-created. See CREATE TRIGGER for more information about the INSTEAD OF option. |
|
FORCE |
creates the view regardless of whether the view's base tables or the referenced object types exist or the owner of the schema containing the view has privileges on them. Note that these conditions must be true before any SELECT, INSERT, UPDATE, or DELETE statements can be issued against the view. |
|
NO FORCE |
creates the view only if the base tables exist and the owner of the schema containing the view has privileges on them. This is the default. |
|
schema |
is the schema to contain the view. If you omit schema, Oracle creates the view in your own schema. |
|
view |
is the name of the view or the object view. |
|
alias |
specifies names for the expressions selected by the view's query. The number of aliases must match the number of expressions selected by the view. Aliases must follow the rules for naming schema objects in the section, "Referring to Schema Objects and Parts". Aliases must be unique within the view. |
|
|
If you omit the aliases, Oracle derives them from the columns or column aliases in the view's query. For this reason, you must use aliases if the view's query contains expressions rather than only column names. |
|
|
|
|
|
explicitly creates an object view of type type_name. The columns of an object view correspond to the top-level attributes of type type_name. Each row will contain an object instance and each instance will be associated with an object identifier (OID) as specified in the WITH OBJECT OID clause. See also "Object Views". |
|
|
If you omit schema, Oracle creates the object view in your own schema. For more information about creating objects, see CREATE TYPE. |
|
[ |
specifies the attributes of the object type that will be used as a key to uniquely identify each row in the object view. In most cases these attributes correspond to the primary-key columns of the base table. |
|
|
If the object view is defined on an object table or an object view, you can omit this clause or specify DEFAULT. |
|
|
specifies that the intrinsic object identifier of the underlying object table or object view will be used to uniquely identify each row. |
|
|
is an attribute of the object type from which the object identifier for the object view is to be created. |
|
AS subquery |
identifies columns and rows of the table(s) that the view is based on. A view's query can be any SELECT statement without the ORDER BY or FOR UPDATE clauses. Its select list can contain up to 1000 expressions. See "The View Query", "Join Views", and "Subqueries". |
|
|
|
|
|
|
|
WITH READ ONLY |
specifies that no delete, inserts, or updates can be performed through the view. |
|
WITH CHECK OPTION |
specifies that inserts and updates performed through the view must result in rows that the view query can select. The CHECK OPTION cannot make this guarantee if: |
|
CONSTRAINT constraint |
assigns the name of the CHECK OPTION constraint. If you omit this identifier, Oracle automatically assigns the constraint a name of the form SYS_Cn, where n is an integer that makes the constraint name unique within the database. |
A view is a logical table that allows you to access data from other tables and views. A view contains no data itself. The tables upon which a view is based are called base tables.
Views are used for the following purposes:
You can use a view anywhere you can use a table in these SQL statements:
See "Subqueries" for the syntax of the view's query in the description of the subquery syntax. Note the following caveats:
CREATE VIEW emp_vu AS SELECT * FROM emp;Oracle translates the asterisk into a list of all the columns in the table at the time the CREATE VIEW statement is issued. If you subsequently add new columns to the table, the view will not contain these columns unless you recreate the view by issuing another CREATE VIEW statement with the OR REPLACE option. Oracle recommends that you explicitly specify all columns in the select list of a view query, rather than use the asterisk.
The above caveats also apply to the query for a snapshot.
A view is inherently updatable if it can be inserted, updated, or deleted without using INSTEAD OF triggers and if it conforms to the restrictions listed below. However, if the view query contains any of the following constructs, it is not inherently updatable, and therefore you cannot perform inserts, updates, or deletes on the view except through INSTEAD OF triggers:
Note that if a view contains pseudocolumns or expressions, you can update the view only with an UPDATE statement that does not refer to any of the pseudocolumns or expressions.
 For more information about updating object views or relational views that support object types, see Oracle8 Application Developer's Guide.
A join view is a view with a subquery containing a join. The restrictions discussed in "The View Query" also apply to join views.
If at least one column in the subquery join has a unique index, then it may be possible to modify one base table in a join view. You can query USER_UPDATABLE_COLUMNS to see whether the columns in a join view are updatable. For example:
CREATE VIEW ed AS SELECT e.empno, e.ename, d.deptno, d.loc FROM emp e, dept d WHERE e.deptno = d.deptno View created. SELECT column_name, updatable FROM user_updatable_columns WHERE table_name = 'ED'; COLUMN_NAME UPD --------------- --- ENAME YES DEPTNO NO EMPNO YES LOC NO
In the above example, note the unique index on the DEPTNO column of the DEPT table. You can insert, update or delete a row from the EMP base table, because all the columns in the view mapping to the emp table are marked as updatable and because the primary key of emp is included in the view. For more information on updating join views, see the Oracle8 Application Developer's Guide.
You can select a ROWID from a join view, provided that there is one and only one key-preserved table in the join. The ROWID of that table becomes the ROWID of the view.
A join view is a view that contains a join. Join views are updatable under the conditions discussed in this section.
A key-preserved table is a table in a join view, all of whose key columns are present as keys in the join view. This means the keys must not only be in the join view, but must still be unique and not null in the join view. This implies that a key-preserved table generally cannot be an outer-joined table. A key-preserved table could be an outer-joined table only if the outer join did not in fact generate any nulls. This, however, is a function of the data and therefore inadmissible as a basis for operations.
Therefore, you can execute the DML statements INSERT, UPDATE, and DELETE on a join view only provided that all of the following are true:
Partition views were introduced in Release 7.3 to provide partitioning capabilities for applications requiring them. Partition views are supported in Oracle8 so that you can upgrade applications from Release 7.3 without any modification. In most cases, subsequent to migration to Oracle8 you will want to migrate partition views into partitions (see Oracle8 Migration and Oracle8 Application Developer's Guide).
With Oracle8, you can use the CREATE TABLE command to create partitioned tables easily. Partitioned tables offer the same advantages as partition views, while also addressing their shortcomings. Oracle recommends that you use partitioned tables rather than partition views in most operational environments. For more information about partitioned tables, see CREATE TABLE.
The following statement creates a view of the EMP table named DEPT20. The view shows the employees in Department 20 and their annual salary:
CREATE VIEW dept20 AS SELECT ename, sal*12 annual_salary FROM emp WHERE deptno = 20;
Note that the view declaration need not define a name for the column based on the expression SAL*12, because the subquery uses a column alias (ANNUAL_SALARY) for this expression.
The following statement creates an updatable view named CLERKS of all clerks in the EMP table; only the employees' IDs, names, and department numbers are visible in this view and only these columns can be updated in rows identified as clerks:
CREATE VIEW clerk (id_number, person, department, position) AS SELECT empno, ename, deptno, job FROM emp WHERE job = 'CLERK' WITH CHECK OPTION CONSTRAINT wco;
Because of the CHECK OPTION, you cannot subsequently insert a new row into CLERK if the new employee is not a clerk.
The following statement creates a read-only view named CLERKS of all clerks in the EMP table; only the employee's IDs, names, and department numbers are visible in this view:
CREATE VIEW clerk (id_number, person, department, position) AS SELECT empno, ename, deptno, job FROM emp WHERE job = 'CLERK' WITH READ ONLY;
 Object Views
An object view synthesizes objects based on queries of relational or object tables. The number of elements in the view subquery's select list must be the same as the number of top-level attributes of the object type. Each select element's datatype must be the same as (or convertible to) the corresponding top-level attribute.
The set of attributes in the WITH OBJECT OID clause must yield a unique key for the objects in the object view. If you try to dereference or pin a primary key REF that resolves to more than one instance in the object view, Oracle raises an error.
If a view is inherently updatable and has INSTEAD OF triggers, the triggers take preference. In other words, Oracle fires the triggers instead of performing DML on the view.
If a view has INSTEAD OF triggers, any views created on it must have INSTEAD OF triggers, even if the views are inherently updatable.
For more information about object views, refer to Oracle8 Concepts and the Oracle8 Application Developer's Guide.
The following example creates object view EMP_OBJECT_VIEW of EMPLOYEE_TYPE:
CREATE TYPE employee_type AS OBJECT ( empno NUMBER(4), ename VARCHAR2(20), job VARCHAR2(9), mgr NUMBER(4), hiredate DATE, sal NUMBER(7,2), comm NUMBER(7,2) ); CREATE OR REPLACE VIEW emp_object_view OF employee_type WITH OBJECT OID (empno) AS SELECT empno, ename, job, mgr, hiredate, sal, comm FROM emp;
To specify the amount of unused space to deallocate from extents. See also "Deallocating Unused Space".
This clause can be used only in the following commands:
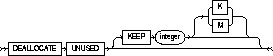
|
KEEP |
specifies the amount of unused space to keep. |
|
|
|
integer |
the number of bytes to keep. You can use K or M to specify the size in kilobytes or megabytes. |
For more information on the administration of schema objects, see Oracle8 Administrator's Guide.
Use the DEALLOCATE clause to reclaim unused space in extents in a cluster, table or index for reuse by other objects in the tablespace. Oracle credits the amount of the released space to the user quota for the tablespace in which the deallocation occurs.
Unused space is deallocated from the end of the object toward the high-water mark at the beginning of the object. If an extent is completely contained in the deallocation, then the whole extent is freed for reuse. If an extent is partially contained in the deallocation, then the used part up to the high water mark becomes the extent, and the remaining unused space is freed for reuse.
The exact amount of space freed depends on the values of the INITIAL, MINEXTENTS, and NEXT parameters (are described in STORAGE clause).
The following command frees all unused space for reuse in table EMP, where the high-water mark is above MINEXTENTS:
ALTER TABLE emp DEALLOCATE UNUSED
To remove rows from a table, a partitioned table, a view's base table, or a view's partitioned base table. See also "Using DELETE".
For you to delete rows from a table, the table must be in your own schema or you must have DELETE privilege on the table.
For you to delete rows from the base table of a view, the owner of the schema containing the view must have DELETE privilege on the base table. Also, if the view is in a schema other than your own, you must be granted DELETE privilege on the view.
The DELETE ANY TABLE system privilege also allows you to delete rows from any table or any view's base table.
If the SQ92_SECURITY initialization parameter is set to TRUE, then you must have SELECT privilege on the table to perform a DELETE that references table columns (such as the columns in a WHERE clause).
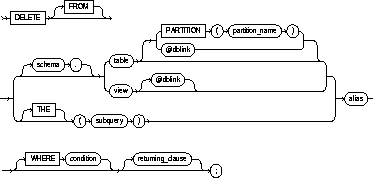
subquery: See "Subqueries".

|
schema |
is the schema containing the table or view. If you omit schema, Oracle assumes the table or view is in your own schema. |
|
|
table or view |
is the name of a table from which the rows are to be deleted. If you specify view, Oracle deletes rows from the view's base table. |
|
|
dblink |
is the complete or partial name of a database link to a remote database where the table or view is located. For information on referring to database links, see "Referring to Objects in Remote Databases". You can delete rows from a remote table or view only if you are using Oracle's distributed functionality. |
|
|
|
If you omit dblink, Oracle assumes that the table or view is located on the local database. |
|
|
PARTITION (partition_name) |
specifies partition-level row deletes for table. The partition_name is the name of the partition within table targeted for deletes. See also "Deleting from a Single Partition". |
|
|
|
informs Oracle that the column value returned by the subquery is a nested table, not a scalar value. A subquery prefixed by THE is called a flattened subquery. "Using Flattened Subqueries". |
|
|
|
subquery |
specifies which data is selected for deletion. Oracle executes the subquery and then uses the resulting rows as a table in the FROM clause. The subquery cannot query a table that appears in the same FROM clause as the subquery. See "Subqueries". |
|
alias |
is an alias assigned to the table, view or subquery. Aliases are generally used in DELETE statements with correlated queries. |
|
|
WHERE condition |
deletes only rows that satisfy the condition. The condition can reference the table and can contain a subquery. See the syntax description in "Conditions". You can delete rows from a remote table or view only if you are using Oracle's distributed functionality. |
|
|
|
If you omit dblink, Oracle assumes that the table or view is located on the local database. If you omit the WHERE clause, Oracle deletes all rows of the table or view. |
|
|
returning_clause |
retrieves the rows affected by the DELETE statement. You can retrieve only scalar, LOB, ROWID, and REF types. See also "The RETURNING Clause". |
|
|
expr |
is any of the syntax descriptions in "Expressions". You must specify a column expression in the RETURNING clause for each variable in the data_item_list. |
|
|
INTO |
indicates that the values of the changed rows are to be stored in the variable(s) specified in data_item_list. |
|
|
data_item |
is a PL/SQL variable or bind variable that stores the retrieved expr value. |
|
|
You cannot use the RETURNING clause with parallel DML or with remote objects. |
||
You can use comments in a DELETE statement to pass instructions, or hints, to the Oracle optimizer. The optimizer uses hints to choose an execution plan for the statement. For more information on hints, see Oracle8 Tuning.
You can place a parallel hint immediately after the DELETE keyword to parallelize both the underlying scan and DELETE operations. For detailed information about parallel DML, see Oracle8 Tuning, Oracle8 Parallel Server Concepts and Administration, and Oracle8 Concepts.
All table and index space released by the deleted rows is retained by the table and index. You cannot delete from a view if the view's defining query contains one of the following constructs:
Issuing a DELETE statement against a table fires any DELETE triggers defined on the table.
The following statement deletes all rows from a table named TEMP_ASSIGN.
DELETE FROM temp_assign;
The following statement deletes from the EMP table all sales staff who made less than $100 commission last month:
DELETE FROM emp WHERE JOB = 'SALESMAN' AND COMM < 100;
The following statement has the same effect as Example II:
DELETE FROM (select * from emp) WHERE JOB = 'SALESMAN' AND COMM < 100;
The following statement deletes all rows from the bank account table owned by the user BLAKE on a database accessible by the database link DALLAS:
DELETE FROM blake.accounts@dallas;
 The following example deletes rows of nested table PROJS where the department number is either 123 or 456, or the department's budget is greater than 456.78:
DELETE THE(SELECT projs FROM dept d WHERE d.dno = 123) AS p WHERE p.pno IN (123, 456) OR p.budgets > 456.78;
You do not need to specify the partition name when deleting values from a partitioned table. However, in some cases specifying the partition name is more efficient than a complicated WHERE clause. To target a single partition of a partitioned table whose values you want to change, specify the PARTITION clause. This syntax is less cumbersome than using a WHERE clause in some cases.
The following example removes rows from partition NOV96 of the SALES table:
DELETE FROM sales PARTITION (nov96) WHERE amount_of_sale != 0;
You can use a RETURNING clause to return values from deleted columns, and thereby eliminate the need to perform a SELECT following the DELETE statement.
You can also use DELETE with a RETURNING clause to delete from views with single base tables.
For host binds, the datatype and size of the expression must be compatible with the bind variable.
The following example returns column SAL from the deleted rows and stores the result in bind array :1:
DELETE FROM emp WHERE job = 'SALESMAN' AND COMM < 100 RETURNING sal INTO :1;
To disable an integrity constraint or all triggers associated with a table:
See also "Using the DISABLE Clause".
A DISABLE clause that disables an integrity constraint can appear in either a CREATE TABLE or ALTER TABLE command. To disable an integrity constraint, you must have the privileges necessary to issue one of these commands. For information on these privileges, see CREATE TABLE and ALTER TABLE.
For an integrity constraint to appear in a DISABLE clause, either
A DISABLE clause that disables triggers can appear only in an ALTER TABLE statement. To disable triggers with a DISABLE clause, you must have the privileges necessary to issue the ALTER TABLE statement. For information on these privileges, see ALTER TABLE. Also, the triggers must be in your own schema or you must have ALTER ANY TRIGGER system privilege.
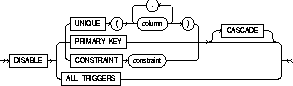
Use the DISABLE clause to disable either:
To disable a single trigger, use the DISABLE option of the ALTER TRIGGER command.
You disable an integrity constraint by naming it in a DISABLE clause of either a CREATE TABLE or ALTER TABLE statement. You can define an integrity constraint with a CONSTRAINT clause and disable it with a DISABLE clause together in the same statement. You can also define an integrity constraint in one statement and subsequently disable it in another.
You can also disable an integrity constraint with the DISABLE keyword in the CONSTRAINT clause that defines the integrity constraint. For information on this keyword, see the CONSTRAINT clause.
If you disable an integrity constraint, Oracle does not enforce it. If you define an integrity constraint and disable it, Oracle does not apply it to existing rows of the table, although Oracle does store it in the data dictionary along with enabled integrity constraints. Also, Oracle can execute data manipulation language (DML) statements that change table data and violate a disabled integrity constraint.
If you disable a UNIQUE or PRIMARY KEY constraint that was previously enabled, Oracle drops the index that enforces the constraint.
You can enable a disabled integrity constraint with the ENABLE clause.
To disable a UNIQUE or PRIMARY KEY constraint that identifies the referenced key of a referential integrity constraint (foreign key), you must also disable the foreign key. To do so, use the CASCADE option of the DISABLE clause.
You cannot enable a foreign key that references a unique or primary key that is disabled.
The following statement creates the DEPT table and defines a disabled PRIMARY KEY constraint:
CREATE TABLE dept (deptno NUMBER(2) PRIMARY KEY, dname VARCHAR2(10), loc VARCHAR2(9) ) DISABLE PRIMARY KEY;
Since the primary key is disabled, you can add to the table rows that violate the primary key. For example, you can add departments with null department numbers or multiple departments with the same department number.
The following statement defines and disables a CHECK constraint on the EMP table:
ALTER TABLE emp ADD (CONSTRAINT check_comp CHECK (sal + comm <= 5000) ) DISABLE CONSTRAINT check_comp;
The constraint CHECK_COMP ensures that no employee's total compensation exceeds $5000. The constraint is disabled, so you can increase an employee's compensation above this limit.
Consider a referential integrity constraint involving a foreign key on the combination of the AREACO and PHONENO columns of the PHONE_CALLS table. The foreign key references a unique key on the combination of the AREACO and PHONENO columns of the CUSTOMERS table. The following statement disables the unique key on the combination of the AREACO and PHONENO columns of the CUSTOMERS table:
ALTER TABLE customers DISABLE UNIQUE (areaco, phoneno) CASCADE;
The unique key in the CUSTOMERS table is referenced by the foreign key in the PHONE_CALLS table, so you must use the CASCADE option to disable the unique key. This option disables the foreign key as well.
You can disable all triggers associated with a table by using the ALL TRIGGERS option in a DISABLE clause of an ALTER TABLE statement. After you disable a trigger, Oracle does not fire the trigger when a triggering statement meets the condition of the trigger restriction.
The following statement disables all triggers associated with the EMP table:
ALTER TABLE emp DISABLE ALL TRIGGERS;
To remove an integrity constraint from the database. See also "Removing Integrity Constraints".
The DROP clause can appear only in an ALTER TABLE statement. To drop an integrity constraint, you must have the privileges necessary to issue an ALTER TABLE statement. For information on these privileges, see ALTER TABLE.
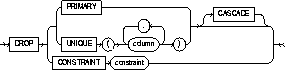
You can drop an integrity constraint by naming it in a DROP clause of an ALTER TABLE statement. When you drop an integrity constraint, Oracle stops enforcing the integrity constraint and removes it from the data dictionary.
You cannot drop a unique or primary key that is part of a referential integrity constraint without also dropping the foreign key. You can drop the referenced key and the foreign key together by specifying the referenced key with the CASCADE option in the DROP clause. If you omit CASCADE, Oracle does not drop the unique or primary key constraint if any foreign key references it.
The following statement drops the primary key of the DEPT table:
ALTER TABLE dept DROP PRIMARY KEY CASCADE;
If you know that the name of the PRIMARY KEY constraint is PK_DEPT, you could also drop it with the following statement:
ALTER TABLE dept DROP CONSTRAINT pk_dept CASCADE;
The CASCADE option drops any foreign keys that reference the primary key.
The following statement drops the unique key on the DNAME column of the DEPT table:
ALTER TABLE dept DROP UNIQUE (dname);
Note that the DROP clause in this example omits the CASCADE option. Because of this omission, Oracle does not drop the unique key if any foreign key references it.
To remove a cluster from the database. See "Restrictions".
The cluster must be in your own schema or you must have DROP ANY CLUSTER system privilege.

Dropping a cluster also drops the cluster index and returns all cluster space, including data blocks for the index, to the appropriate tablespace(s).
You cannot uncluster an individual table. To create an unclustered table identical to an existing clustered table, follow the following steps:
Grants on the old clustered table do not apply to the new unclustered table and must be regranted.
This command drops a cluster named GEOGRAPHY, all its tables, and any referential integrity constraints that refer to primary or unique keys in those tables:
DROP CLUSTER geography INCLUDING TABLES CASCADE CONSTRAINTS;
To remove a database link from the database.
To drop a private database link, the database link must be in your own schema. To drop a PUBLIC database link, you must have DROP PUBLIC DATABASE LINK system privilege. See also "Example" below.

|
PUBLIC |
must be specified to drop a PUBLIC database link. |
|
dblink |
specifies the database link to be dropped. |
You cannot drop a database link in another user's schema and you cannot qualify dblink with the name of a schema. Periods are permitted in names of database links; therefore, Oracle interprets the entire name, such as RALPH.LINKTOSALES, as the name of a database link in your schema rather than as a database link named LINKTOSALES in the schema RALPH.
The following statement drops a private database link named BOSTON:
DROP DATABASE LINK boston;
Use DROP DIRECTORY to remove a directory object from the database. See also "Dropping a Directory" below.
To drop a directory you must have DROP ANY DIRECTORY system privilege.

|
directory_name |
is the name of the directory database object to be dropped. |
Dropping a directory removes the database object, but does not delete the associated operating system directory on the server's file system.
You should not DROP a directory when files in the associated file system are being accessed by PL/SQL or OCI programs.
The following statement drops the directory object BFILE_DIR:
DROP DIRECTORY bfile_dir;
To remove a standalone stored function from the database. See also "Dropping Functions" below.
The function must be in your own schema or you must have DROP ANY PROCEDURE system privilege.

|
schema |
is the schema containing the function. If you omit schema, Oracle assumes the function is in your own schema. |
|
function |
is the name of the function to be dropped. |
When you drop a function, Oracle invalidates any local objects that depend on, or call, the dropped function. If you subsequently reference one of these objects, Oracle tries to recompile the object and returns an error message if you have not re-created the dropped function. For more information on how Oracle maintains dependencies among schema objects, including remote objects, see Oracle8 Concepts.
You can use this command to drop only a standalone function. To remove a function that is part of a package, use one of the following methods:
The following statement drops the function NEW_ACCT in the schema RIDDLEY:
DROP FUNCTION riddley.new_acct;
When you drop the NEW_ACCT function, Oracle invalidates all objects that depend upon NEW_ACCT.
To remove an index from the database. See also "Dropping an Index" below.
The index must be in your own schema or you must have DROP ANY INDEX system privilege.

|
schema |
is the schema containing the index. If you omit schema, Oracle assumes the index is in your own schema. |
|
index |
is the name of the index to be dropped. |
When the index is dropped, all data blocks allocated to the index are returned to the index's tablespace.
This command drops an index named MONOLITH:
DROP INDEX monolith;
To remove an external procedure library from the database.
You must have the DROP LIBRARY system privilege.

|
libname |
is the name of the external procedure library being dropped. |
The following statement drops the EXT_PROCS library:
DROP LIBRARY ext_procs;
To remove a stored package from the database. See also "Dropping a Package" below.
The package must be in your own schema or you must have DROP ANY PROCEDURE system privilege.

When you drop the body and specification of a package, Oracle invalidates any local objects that depend on the package specification. If you subsequently reference one of these objects, Oracle tries to recompile the object and returns an error if you have not re-created the dropped package. For information on how Oracle maintains dependencies among schema objects, including remote objects, see Oracle8 Concepts.
When you drop only the body of a package but not its specification, Oracle does not invalidate dependent objects. However, you cannot call one of the procedures or stored functions declared in the package specification until you re-create the package body.
The DROP PACKAGE command drops the package and all its objects together. To remove a single object from a package, re-create the package without the object using the CREATE PACKAGE and CREATE PACKAGE BODY commands with the OR REPLACE option.
The following statement drops the specification and body of the BANKING package, invalidating all objects that depend on the specification:
DROP PACKAGE banking;
To remove a standalone stored procedure from the database. See also "Dropping a Procedure" below.
The procedure must be in your own schema or you must have DROP ANY PROCEDURE system privilege.

|
schema |
is the schema containing the procedure. If you omit schema, Oracle assumes the procedure is in your own schema. |
|
procedure |
is the name of the procedure to be dropped. |
When you drop a procedure, Oracle invalidates any local objects that depend upon the dropped procedure. If you subsequently reference one of these objects, Oracle tries to recompile the object and returns an error message if you have not re-created the dropped procedure. For information on how Oracle maintains dependencies among schema objects, including remote objects, see Oracle8 Concepts.
You can use this command only to drop a standalone procedure. To remove a procedure that is part of a package, use one of the following methods:
The following statement drops the procedure TRANSFER owned by the user KERNER:
DROP PROCEDURE kerner.transfer
When you drop the TRANSFER procedure, Oracle invalidates all objects that depend upon TRANSFER.
To remove a profile from the database. See also "Dropping a Profile" below.
You must have DROP PROFILE system privilege.

You cannot drop the DEFAULT profile.
The following statement drops the profile ENGINEER:
DROP PROFILE engineer CASCADE;
Oracle assigns the DEFAULT profile to any users currently assigned the ENGINEER profile.
To remove a role from the database. See also "Dropping a Role" below.
You must have been granted the role with the ADMIN OPTION or you must have DROP ANY ROLE system privilege.
|
role |
is the role to be dropped. |
When you drop a role, Oracle revokes it from all users and roles to whom it has been granted and removes it from the database.
To drop the role FLORIST, issue the following statement:
DROP ROLE florist;
To remove a rollback segment from the database. See also "Dropping Rollback Segments" below.
You must have DROP ROLLBACK SEGMENT system privilege.

|
rollback_segment |
is the name the rollback segment to be dropped. |
When you drop a rollback segment, all space allocated to the rollback segment returns to the tablespace.
You can drop a rollback segment only if it is offline. To determine whether a rollback segment is offline, query the data dictionary view DBA_ROLLBACK_SEGS. Offline rollback segments have the value 'AVAILABLE' in the STATUS column. You can take a rollback segment offline with the OFFLINE option of the ALTER ROLLBACK SEGMENT command.
You cannot drop the SYSTEM rollback segment.
The following statement drops the rollback segment ACCOUNTING:
DROP ROLLBACK SEGMENT accounting;
To remove a sequence from the database. See also "Dropping Sequences" below.
The sequence must be in your own schema or you must have DROP ANY SEQUENCE system privilege.

|
schema |
is the schema containing the sequence. If you omit schema, Oracle assumes the sequence is in your own schema. |
|
sequence |
is the name of the sequence to be dropped. |
One method for restarting a sequence is to drop and re-create it. For example, if you have a sequence with a current value of 150 and you would like to restart the sequence with a value of 27, you would:
The following statement drops the sequence ESEQ owned by the user ELLY. To issue this statement, you must either be connected as user ELLY or have DROP ANY SEQUENCE system privilege:
DROP SEQUENCE elly.eseq;
To remove a snapshot from the database. See "Dropping Snapshots" below.
The snapshot must be in your own schema or you must have DROP ANY SNAPSHOT system privilege. You must also have the privileges to drop the internal table, views, and index that Oracle uses to maintain the snapshot's data. For information on these privileges, see DROP TABLE, DROP VIEW, and DROP INDEX.

|
schema |
is the schema containing the snapshot. If you omit schema, Oracle assumes the snapshot is in your own schema. |
|
snapshot |
is the name of the snapshot to be dropped. |
When you drop a simple snapshot that is the least recently refreshed snapshot of a master table, Oracle automatically purges from master table's snapshot log only the rows needed to refresh the dropped snapshot.
When you drop a master table, Oracle does not automatically drop snapshots based on the table. However, Oracle returns an error message when it tries to refresh a snapshot based on a master table that has been dropped.
The following statement drops the snapshot PARTS owned by the user HQ:
DROP SNAPSHOT hq.parts;
To remove a snapshot log from the database. See also "Dropping Snapshot Logs" below.
A snapshot log consists of a table and a trigger. To drop a snapshot log, you must have the privileges listed for DROP TABLE. You must also have the privileges to drop a trigger from the snapshot log's master table. For information on these privileges, see DROP TRIGGER.

After you drop a snapshot log, snapshots based on the snapshot log's master table can no longer be refreshed fast. They must be refreshed completely. For more information on refreshing snapshots, see CREATE SNAPSHOT.
The following statement drops the snapshot log on the PARTS master table:
DROP SNAPSHOT LOG ON parts;
To remove a synonym from the database. See also "Dropping Synonyms" below.
If you want to drop a private synonym, either the synonym must be in your own schema or you must have DROP ANY SYNONYM system privilege. If you want to drop a PUBLIC synonym, either the synonym must be in your own schema or you must have DROP ANY PUBLIC SYNONYM system privilege.

You can change the definition of a synonym by dropping and re-creating it.
To drop a synonym named MARKET, issue the following statement:
DROP SYNONYM market;
To remove a table or an object table and all its data from the database. See also "Dropping Tables" below.
The table must be in your own schema or you must have DROP ANY TABLE system privilege.

When you drop a table, Oracle also automatically performs the following operations:
If you choose to re-create the table, it must contain all the columns selected by the queries originally used to define the views and all the columns referenced in the stored procedures, functions, or packages. Any users previously granted object privileges on the views, stored procedures, functions, or packages need not be regranted these privileges.
If you choose to re-create the table, it must contain all the columns selected by the queries originally used to define the snapshots.
You can drop a cluster and all of its tables using the DROP CLUSTER command with the INCLUDING TABLES clause to avoid dropping each table individually.
The following statement drops the TEST_DATA table:
DROP TABLE test_data;
To remove a tablespace from the database. See also "Dropping Tablespaces" below.
You must have DROP TABLESPACE system privilege. You cannot drop a tablespace if it contains any rollback segments holding active transactions.

You can drop a tablespace regardless of whether it is online or offline. Oracle recommends that you take the tablespace offline before dropping it to ensure that no SQL statements in currently running transactions access any of the objects in the tablespace.
You may want to alter any users who have been assigned the tablespace as either a default or temporary tablespace. After the tablespace has been dropped, these users cannot allocate space for objects or sort areas in the tablespace. You can reassign users new default and temporary tablespaces with the ALTER USER command.
You cannot drop the SYSTEM tablespace.
The following statement drops the MFRG tablespace and all its contents:
DROP TABLESPACE mfrg INCLUDING CONTENTS CASCADE CONSTRAINTS;
To remove a database trigger from the database. See also "Dropping Triggers" below.
The trigger must be in your own schema or you must have DROP ANY TRIGGER system privilege.

|
schema |
is the schema containing the trigger. If you omit schema, Oracle assumes the trigger is in your own schema. |
|
trigger |
is the name of the trigger to be dropped. |
When you drop a database trigger, Oracle removes it from the database and does not fire it again.
The following statement drops the REORDER trigger in the schema RUTH:
DROP TRIGGER ruth.reorder;
 DROP TYPE
To drop the specification and body of an object, a VARRAY, or nested table type. To drop just the body of an object, use the DROP TYPE BODY. See also "Dropping Types" below.
The object, VARRAY, or nested table type must be in your own schema or you must have DROP ANY TYPE system privilege.

Unless you specify FORCE, you can drop only object, nested table, or VARRAY types that are standalone schema objects with no dependencies. This is the default behavior.
|
warning: Oracle does not recommend using the FORCE option to drop types with dependencies. This operation is not recoverable and could cause the data in the dependent tables to become inaccessible. For information about type dependencies, see Oracle8 Application Developer's Guide. |
The following statement removes object type PERSON_T:
DROP TYPE person_t;
 DROP TYPE BODY
To drop the body of an object, a VARRAY, or nested table type. See also "Dropping Type Bodies" below.
To drop the specification of an object, see DROP TYPE.
|
Note: This command is available only if the Oracle objects option is installed on your database server. |
The object type body must be in your own schema, and you must have CREATE TYPE or CREATE ANY TYPE system privilege, or you must have DROP ANY TYPE system privilege.

When you drop a type body, the object type specification still exists, and you can re-create the type body. You can still use the object type, although you cannot call the member functions.
The following statement removes object type body RATIONAL:
DROP TYPE BODY rational;
To remove a database user and optionally remove the user's objects. See also "Dropping Users and Their Objects" below.
You must have the DROP USER system privilege.

|
user |
is the user to be dropped. |
|
CASCADE |
drops all objects in the user's schema before dropping the user. You must specify this option to drop a user whose schema contains any objects. |
Oracle does not drop users whose schemas contain objects. To drop such a user, you must either
If you specify the CASCADE option and drop tables in the user's schema, Oracle automatically drops any referential integrity constraints on tables in other schemas that refer to primary and unique keys on these tables. The CASCADE option also causes Oracle to invalidate, but not drop, the following objects in other schemas:
Oracle does not drop snapshots on tables or views in the dropped user's schema, but if you specify CASCADE, the snapshots can no longer be refreshed.
Oracle does not drop roles created by the user.
If BRADLEY's schema contains no objects, you can drop BRADLEY by issuing the statement:
DROP USER bradley;
If BRADLEY's schema contains objects, you must use the CASCADE option to drop BRADLEY and the objects:
DROP USER bradley CASCADE;
To remove a view or an object view from the database. See also "Dropping Views" below.
The view must be in your own schema or you must have DROP ANY VIEW system privilege.

|
schema |
is the schema containing the view. If you omit schema, Oracle assumes the view is in your own schema. |
|
view |
is the name of the view to be dropped. |
When you drop a view, views and synonyms that refer to the view are not dropped, but become invalid. Drop them or redefine them, or define other views in such a way that the invalid views and synonyms become valid again.
You can change the definition of a view by dropping and re-creating it.
The following statement drops the VIEW_DATA view:
DROP VIEW view_data;
To enable an integrity constraint or all triggers associated with a table:
To enable a single trigger, use the ENABLE option of ALTER TRIGGER.
See also "Enabling and Disabling Constraints".
An ENABLE clause that enables an integrity constraint can appear in either a CREATE TABLE or ALTER TABLE statement. To enable a constraint in this manner, you must have the privileges necessary to issue one of these statements. For information on these privileges, see CREATE TABLE or ALTER TABLE.
If you enable a UNIQUE or PRIMARY KEY constraint, Oracle creates an index on the columns of the unique or primary key in the schema containing the table. To enable such a constraint, you must have the privileges necessary to create the index. For information on these privileges, see CREATE INDEX.
If you enable a referential integrity constraint, the referenced UNIQUE or PRIMARY KEY constraint must already be enabled.
For an integrity constraint to appear in an ENABLE clause, either
An ENABLE clause that enables triggers can appear only in an ALTER TABLE statement. To enable triggers with the ENABLE clause, you must have the privileges necessary to issue the ALTER TABLE statement. For information on these privileges, see ALTER TABLE. Also, the triggers must be in your own schema or you must have ALTER ANY TRIGGER system privilege.
using_index_clause::=
exceptions_clause::=
storage_clause: See the STORAGE clause.
|
VALIDATE |
ensures that all new insert, delete, and update operations on the constrained data comply with the constraint, and that all old data also obeys the constraint. An enabled and validated constraint guarantees that all data is and will continue to be valid. This is the default. See also "How Oracle Validates Integrity Constraints". |
|
NOVALIDATE |
ensures that all new insert, update, delete operations on the constrained data comply with the constraint. Oracle does not verify that existing data in the table complies with the constraint. |
|
UNIQUE |
enables the UNIQUE constraint defined on the specified column or combination of columns. |
|
PRIMARY KEY |
enables the table's PRIMARY KEY constraint. |
|
CONSTRAINT |
enables the integrity constraint named constraint. |
|
using_index_clause |
specifies parameters for the index Oracle creates to enforce a UNIQUE or PRIMARY KEY constraint. Oracle gives the index the same name as the constraint. You can choose the values of the INITRANS, MAXTRANS, TABLESPACE, STORAGE, and PCTFREE parameters for the index. For information on these parameters, see CREATE TABLE. For a description of NOSORT and LOGGING/NOLOGGING, see CREATE INDEX. |
|
|
Use these parameters only when enabling UNIQUE and PRIMARY KEY constraints. |
|
exceptions_clause: |
|
|
EXCEPTIONS INTO |
specifies a table into which Oracle places information about rows that violate the integrity constraint. The table must exist on your local database before you use this option. If you omit schema, Oracle assumes the exception table is in your own schema. See also "How to Identify Exceptions". |
|
ALL TRIGGERS |
enables all triggers associated with the table. You can use this option only in an ENABLE clause in an ALTER TABLE statement, not in a CREATE TABLE statement. See also "Enabling Triggers". |
Constraints can have one of three states:
Taking a constraint from a DISABLE to ENABLE VALIDATE state requires an exclusive lock on the table, because while Oracle is checking all old data for validity, no new data can be entered into the table. Due to this behavior, only one constraint can be enabled at a time and each new constraint must check all existing rows by serial scan. (Placing constraints concurrently in the ENABLE VALIDATE state requires that you issue multiple ALTER TABLE commands from separate sessions.)
To avoid locking the table, place the constraint in the ENABLE NOVALIDATE state. This state ensures that all new DML statements on the table are validated; therefore, Oracle does not need prevent concurrent access to the table.
ENABLE NOVALIDATE also allows you to place several of the table's constraints in the ENABLE VALIDATE state concurrently. Each scan that Oracle performs to validate existing data can also be performed in parallel when possible.
Enabling a primary key or unique key constraint automatically creates a unique index to enforce the constraint. This index is dropped if the constraint is subsequently disabled, thus causing Oracle to rebuild the index every time the constraint is enabled.
To avoid this behavior, create new primary key and unique key constraints initially disabled. Then create nonunique indexes or use existing nonunique indexes to enforce the constraint. Oracle does not drop the nonunique index when the constraint is disabled, so any ENABLE operation on a primary key or unique key constraint occurs almost instantly because the index already exists. This technique also eliminates redundant indexes.
You can enable a constraint when you create it (see CREATE TABLE and ALTER TABLE), or you can enable a disabled constraint with the ENABLE clause. To ensure maximum concurrency and performance, constraints should be created or subsequently enabled as follows:
To enable disabled constraints, you need only perform steps 3 and 4.
Note that constraints are placed in the ENABLE VALIDATE state by default upon creation. Use the procedure outlined above to avoid the default behavior and thereby ensure maximum performance.
When you attempt to place an integrity constraint in ENABLE VALIDATE state, Oracle scans the table and applies the integrity constraint to any existing rows in the table:
Once an integrity constraint is in ENABLE VALIDATE state, Oracle applies the integrity constraint whenever an INSERT, UPDATE, or DELETE statement tries to change table data:
An exception is a row in a table that violates an integrity constraint. You can request that Oracle identify exceptions to an integrity constraint when you attempt to place it in ENABLE VALIDATE state. If you specify an exception table in your ENABLE clause, Oracle inserts a row into the exception table for each exception. A row of the exception table contains the following information:
A definition of a sample exception table named EXCEPTIONS appears in a SQL script available on your distribution medium. Your exception table must have the same column datatypes and lengths as the sample. The common name of this script is UTLEXCPT.SQL; its exact name and location depend on your operating system. You can request that Oracle send exceptions from multiple enabled integrity constraints to the same exception table.
For index-organized tables, rows that violate a constraint are identified by primary key and not by ROWID. This means that the exception table created for index-organized tables uses a different format. Use the BUILD_EXCEPTIONS_TABLE procedure in the DBMS_IOT package to create the EXCEPTIONS table for inserting rows from index-organized tables that violate integrity constraints.
The following example creates the ORDER_EXCEPTIONS table to hold rows from an index-organized table ORDERS that violate integrity constraint CHECK_ORDERS:
CREATE TABLE orders (ord_num NUMBER PRIMARY KEY, ord_quantity NUMBER) ORGANIZATION INDEX; EXECUTE DBMS_IOT.BUILD_EXCEPTIONS_TABLE ('SCOTT', 'ORDERS', 'ORDER_EXCEPTIONS'); ALTER TABLE orders ADD CONSTRAINT CHECK_ORDERS CHECK(ord_quantity > 0) EXCEPTIONS INTO ORDER_EXCEPIONS;
To specify an exception table in an ENABLE VALIDATE clause, you must have the privileges necessary to insert rows into the table. For information on these privileges, see ALTER TABLE. To examine the identified exceptions, you must have the privileges necessary to query the exceptions table. For information on these privileges, see SELECT.
If a CREATE TABLE statement contains both the AS clause and an ENABLE VALIDATE clause with the EXCEPTIONS option, Oracle ignores the EXCEPTIONS option. If there are any exceptions, Oracle does not create the table and returns an error message.
The following statement creates the DEPT table, defines a PRIMARY KEY constraint, and places it in ENABLE VALIDATE state:
CREATE TABLE dept (deptno NUMBER(2) PRIMARY KEY, dname VARCHAR2(10), loc VARCHAR2(9) ) TABLESPACE user_a ENABLE VALIDATE PRIMARY KEY;
The following statement places in ENABLE VALIDATE state an integrity constraint named FK_DEPTNO in the EMP table:
ALTER TABLE emp ENABLE VALIDATE CONSTRAINT fk_deptno EXCEPTIONS INTO except_table;
Each row of the EMP table must satisfy the constraint for Oracle to enable the constraint. If any row violates the constraint, the constraint remains disabled. Oracle lists any exceptions in the table EXCEPT_TABLE. You can query this table with the following statement:
SELECT * FROM except_table;
The output of this query might look like this:
ROW_ID OWNER TABLE_NAME CONSTRAINT ------------------ ----- ---------- ---------- AAAAZzAABAAABrXAAA SCOTT EMP FK_DEPTNO
You can also identify the exceptions in the EMP table with the following statement:
SELECT emp.* FROM emp, except_table WHERE emp.row_id except_table.row_id AND except_table.table_name = 'EMP' AND except_table.constraint = 'FK_DEPTNO';
If there are exceptions to the FK_DEPTNO constraint, the output of this query might look like this:
EMPNo ENAME JOB MGR HIREDATE SAL COMM DEPTNO ---- -------- ----- ------ --------- ------ -------- ------ 8001 JACK CLERK 778 25-AUG-92 1100 70
The following statement tries to place in ENABLE NOVALIDATE state two constraints on the EMP table:
ALTER TABLE emp ENABLE NOVALIDATE UNIQUE (ename) ENABLE NOVALIDATE CONSTRAINT nn_ename;
The preceding statement has two ENABLE clauses:
In this case, Oracle only enables the constraints if both are satisfied by each row in the table. If any row violates either constraint, Oracle returns an error message and both constraints remain disabled.
To place the constraints in Example IV in ENABLE VALIDATE state, issue the following:
ALTER TABLE emp ENABLE VALIDATE UNIQUE (ename) ENABLE VALIDATE CONSTRAINT nn_ename;
This method of enabling constraints allows both constraints to be enabled concurrently, because they were both previously in the ENABLE NOVALIDATE state. This method also allows each constraint to be enabled in parallel.
You can enable all triggers associated with the table by including the ALL TRIGGERS option in an ENABLE clause of an ALTER TABLE statement. After you enable a trigger, Oracle fires the trigger whenever a triggering statement is issued that meets the condition of the trigger restriction. When you create a trigger, Oracle enables it automatically.
The following statement enables all triggers associated with the EMP table:
ALTER TABLE emp ENABLE ALL TRIGGERS;
To determine the execution plan Oracle follows to execute a specified SQL statement. This command inserts a row describing each step of the execution plan into a specified table. If you are using cost-based optimization, this command also determines the cost of executing the statement. See also "Using EXPLAIN PLAN", "EXPLAIN PLAN and Partitioned Tables", and "EXPLAIN PLAN and Parallel DML".
To issue an EXPLAIN PLAN statement, you must have the privileges necessary to insert rows into an existing output table that you specify to hold the execution plan. For information on these privileges, see INSERT.
You must also have the privileges necessary to execute the SQL statement for which you are determining the execution plan. If the SQL statement accesses a view, you must have privileges to access any tables and views on which the view is based. If the view is based on another view that is based on a table, you must have privileges to access both the other view and its underlying table.
To examine the execution plan produced by an EXPLAIN PLAN statement, you must have the privileges necessary to query the output table. For more information on these privileges, see SELECT.
|
SET STATEMENT_ID |
specifies the value of the STATEMENT_ID column for the rows of the execution plan in the output table. If you omit this clause, the STATEMENT_ID value defaults to null. |
|
INTO |
specifies the schema, name, and database containing the output table. This table must exist before you use the EXPLAIN PLAN command. If you omit schema, Oracle assumes the table is in your own schema. |
|
|
The dblink can be a complete or partial name of a database link to a remote Oracle database where the output table is located. For information on referring to database links, see the section, "Referring to Objects in Remote Databases". You can specify a remote output table only if you are using Oracle's distributed functionality. If you omit dblink, Oracle assumes the table is on your local database. |
|
|
If you omit the INTO clause altogether, Oracle assumes an output table named PLAN_TABLE in your own schema on your local database. |
|
FOR statement |
specifies a SELECT, INSERT, UPDATE, or DELETE statement for which the execution plan is generated. |
The definition of a sample output table PLAN_TABLE is available in a SQL script on your distribution media. Your output table must have the same column names and datatypes as this table. The common name of this script is UTLXPLAN.SQL the exact name and location depend on your operating system.
The value you specify in the SET STATEMENT_ID clause appears in the STATEMENT_ID column in the rows of the execution plan. You can then use this value to identify these rows among others in the output table. Be sure to specify a STATEMENT_ID value if your output table contains rows from many execution plans.
The EXPLAIN PLAN command is a data manipulation language (DML) command, rather than a data definition language (DDL) command. Therefore, Oracle does not implicitly commit the changes made by an EXPLAIN PLAN statement. If you want to keep the rows generated by an EXPLAIN PLAN statement in the output table, you must commit the transaction containing the statement.
Do not use the EXPLAIN PLAN command to determine the execution plans of SQL statements that access data dictionary views or dynamic performance tables.
You can also issue the EXPLAIN PLAN command as part of the SQL trace facility. For information on how to use the SQL trace facility and how to interpret execution plans, see Oracle8 Tuning.
This EXPLAIN PLAN statement determines the execution plan and cost for an UPDATE statement and inserts rows describing the execution plan into the specified OUTPUT table with the STATEMENT_ID value of 'Raise in Chicago':
EXPLAIN PLAN SET STATEMENT_ID = 'Raise in Chicago' INTO output FOR UPDATE emp SET sal = sal * 1.10 WHERE deptno = (SELECT deptno FROM dept WHERE loc = 'CHICAGO');
This SELECT statement queries the OUTPUT table and returns the execution plan and the cost:
SELECT LPAD(' ',2*(LEVEL-1))||operation operation, options, object_name, position FROM output START WITH id = 0 AND statement_id = 'Raise in Chicago' CONNECT BY PRIOR id = parent_id AND statement_id = 'Raise in Chicago';
The query returns this execution plan:
OPERATION OPTIONS OBJECT_NAME POSITION ---------------------------------------------------------- UPDATE STATEMENT 1 FILTER 0 TABLE ACCESS FULL EMP 1 TABLE ACCESS FULL DEPT 2
The value in the POSITION column of the first row shows that the statement has a cost of 1.
Information for partitioning is provided in the steps (rows of the Explain table) of the Explain plan for a SQL statement. The information consists of:
The partition_start and partition_stop columns describe how the partitions being accessed are computed by Oracle and provide the range of accessible partitions (if known).
The partition_start column describes the start partition of a range of accessed partitions. It can take one of these values:
The partition_stop column describes the stop partition of a range of accessed partitions. It can take these values:
The partition_id column identifies the step that has computed a pair of values of the partition_start and partition_stop columns.
The PARTITION step describes partition boundaries applicable to a single partitioned object (table or index) or to a set of equi-partitioned objects (a partitioned table and its local indexes). The partition boundaries are provided by the values of partition_start and partition_stop of the PARTITION step. Possible values for partition_start and partition_stop are NUMBER(n), KEY, and INVALID.
The options column of a PARTITION step can take these values:
The TABLE ACCESS and INDEX steps describing access to a partitioned table or index are enhanced to provide partition boundary information in the partition_start, partition_stop, and partition_id columns.
The partition boundaries may have been computed by:
The options column of a TABLE ACCESS step describing access by ROWID to a table may contain the following values:
Assume that STOCKS is a table that is 8-way partitioned according to a STOCK_NUM column, and that a local prefixed index STOCK_IX on column STOCK_NUM exists. The partition HIGHVALUES are 1000, 2000, 3000, 4000, 5000, 6000, 7000, and 8000.
Consider the query:
SELECT * FROM stocks WHERE stock_num BETWEEN 3800 AND: h;
EXPLAIN PLAN executes this query with PLAN_TABLE as the output table. The basic execution plan, including partitioning information, is obtained with the query:
SELECT id, operation, options, object_name, partition_start, partition_stop, partition_id FROM plan_table;
When you use EXPLAIN PLAN to determine the execution of a statement that includes the PARALLEL option, the resulting execution plan will indicate parallel execution. Note, however, that EXPLAIN PLAN actually inserts the statement into the plan table, so that the parallel DML statement you submit is no longer the first DML statement in the transaction. This violates the Oracle restriction of one parallel DML statement per transaction, and the statement will be executed serially.
To maintain parallel execution of the statements, you must commit or roll back the EXPLAIN PLAN command, and then submit the parallel DML statement.
For illustrations, see "Examples".
A filespec can appear in CREATE DATABASE, ALTER DATABASE, CREATE TABLESPACE, or ALTER TABLESPACE commands. You must have the privileges necessary to issue one of these commands. For information on these privileges, see CREATE DATABASE, ALTER DATABASE, CREATE TABLESPACE, and ALTER TABLESPACE.
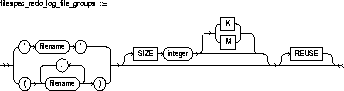
The following statement creates a database named PAYABLE that has two redo log file groups, each with two members, and one datafile:
CREATE DATABASE payable LOGFILE GROUP 1 ('diska:log1.log', 'diskb:log1.log') SIZE 50K, GROUP 2 ('diska:log2.log', 'diskb:log2.log') SIZE 50K DATAFILE 'diskc:dbone.dat' SIZE 30M;
The first filespec in the LOGFILE clause specifies a redo log file group with the GROUP value 1. This group has members named 'DISKA:LOG1.LOG' and 'DISKB:LOG1.LOG', each with size 50 kilobytes.
The second filespec in the LOGFILE clause specifies a redo log file group with the GROUP value 2. This group has members named 'DISKA:LOG2.LOG' and 'DISKB:LOG2.LOG', also with sizes of 50 kilobytes.
The filespec in the DATAFILE clause specifies a datafile named 'DISKC:DBONE.DAT' of size 30 megabytes.
All of these filespecs specify a value for the SIZE parameter and omit the REUSE option, so none of these files can already exist. Oracle must create them.
The following statement adds another redo log file group with two members to the PAYABLE database:
ALTER DATABASE payable ADD LOGFILE GROUP 3 ('diska:log3.log', 'diskb:log3.log') SIZE 50K REUSE;
The filespec in the ADD LOGFILE clause specifies a new redo log file group with the GROUP value 3. This new group has members named 'DISKA:LOG3.LOG' and 'DISKB:LOG3.LOG' with sizes of 50 kilobytes each. Since the filespec specifies the REUSE option, each member can already exist. If a member exists, it must have a size of 50 kilobytes. If it does not exist, Oracle creates it with that size.
The following statement creates a tablespace named STOCKS that has three datafiles:
CREATE TABLESPACE stocks DATAFILE 'diskc:stock1.dat', 'diskc:stock2.dat', 'diskc:stock3.dat';
The filespecs for the datafiles specifies files named 'DISKC:STOCK1.DAT', 'DISKC:STOCK2.DAT', and 'DISKC:STOCK3.DAT'. Since each filespec omits the SIZE parameter, each file must already exist.
The following statement alters the STOCKS tablespace and adds a new datafile:
ALTER TABLESPACE stocks ADD DATAFILE 'diskc:stock4.dat' REUSE;
The filespec specifies a datafile named 'DISKC:STOCK4.DAT'. Since the filespec omits the SIZE parameter, the file must already exist and the REUSE option is not significant.
To grant system privileges and roles to users and roles. To grant object privileges, use the GRANT command (Object Privileges) described in the next section of this chapter. For more information, see "Granting System Privileges and Roles". For illustrations, see "Examples".
To grant a system privilege, you must either have been granted the system privilege with the ADMIN OPTION or have been granted GRANT ANY PRIVILEGE system privilege.
To grant a role, you must either have been granted the role with the ADMIN OPTION or have been granted GRANT ANY ROLE system privilege, or you must have created the role. See also "Other Authorization Methods".

|
system_priv |
is a system privilege to be granted. |
|
|
role |
is a role to be granted. |
|
|
TO |
identifies users or roles to which system privileges and roles are granted. |
|
|
PUBLIC |
grants system privileges or roles to all users. |
|
|
WITH ADMIN OPTION |
grant the system privilege or role to other users or roles. If you grant a role with ADMIN OPTION, the grantee can also alter or drop the role. See also "Granting the ADMIN OPTION". |
|
Use this form of the GRANT command to grant both system privileges and roles to users, roles, and PUBLIC. Table 4-10 indicates which user or role can be given which authorizations:
If you grant a privilege to a user, Oracle adds the privilege to the user's privilege domain. The user can immediately exercise the privilege.
If you grant a privilege to a role, Oracle adds the privilege to the role's privilege domain. Users who have been granted and have enabled the role can immediately exercise the privilege. Other users who have been granted the role can enable the role and exercise the privilege.
If you grant a privilege to PUBLIC, Oracle adds the privilege to the privilege domains of each user. All users can immediately perform operations authorized by the privilege.
If you grant a role to a user, Oracle makes the role available to the user. The user can immediately enable the role and exercise the privileges in the role's privilege domain.
If you grant a role to another role, Oracle adds the granted role's privilege domain to the grantee role's privilege domain. Users who have been granted the grantee role can enable it and exercise the privileges in the granted role's privilege domain.
If you grant a role to PUBLIC, Oracle makes the role available to all users. All users can immediately enable the role and exercise the privileges in the roles privilege domain.
In addition, the following restrictions apply:
Table 4-11 lists system privileges and the operations that they authorize. You can grant any of these system privileges with the GRANT command.
A grant with the ADMIN OPTION supersedes a previous identical grant without the ADMIN OPTION. If you grant a system privilege or role to a user without the ADMIN OPTION, and then subsequently grant the privilege or role to the user with the ADMIN OPTION, the user has the ADMIN OPTION on the privilege or role.
A grant without the ADMIN OPTION does not supersede a previous grant with the ADMIN OPTION. To revoke the ADMIN OPTION on a system privilege or role from a user, you must revoke the privilege or role from the user altogether and then grant the privilege or role to the user without the ADMIN OPTION.
You can authorize database users to use roles through means other than the database and the GRANT statement. For example, some operating systems have facilities that grant operating system privileges to operating system users. You can use such facilities to grant roles to Oracle users with the initialization parameter OS_ROLES. If you choose to grant roles to users through operating system facilities, you cannot also grant roles to users with the GRANT command, although you can use the GRANT command to grant system privileges to users and system privileges and roles to other roles.
For information about other authorization methods, see Oracle8 Administrator's Guide.
To grant the CREATE SESSION system privilege to RICHARD, allowing RICHARD to log on to Oracle, issue the following statement:
GRANT CREATE SESSION TO richard;
To grant the CREATE TABLE system privilege to the role TRAVEL_AGENT, issue the following statement:
GRANT CREATE TABLE TO travel_agent;
TRAVEL_AGENT's privilege domain now contains the CREATE TABLE system privilege.
The following statement grants the TRAVEL_AGENT role to the EXECUTIVE role:
GRANT travel_agent TO executive;
TRAVEL_AGENT is now granted to EXECUTIVE. EXECUTIVE's privilege domain contains the CREATE TABLE system privilege.
To grant the EXECUTIVE role with the ADMIN OPTION to THOMAS, issue the following statement:
GRANT executive TO thomas WITH ADMIN OPTION;
THOMAS can now perform the following operations with the EXECUTIVE role:
To grant privileges for a particular object to users and roles. To grant system privileges and roles, use the GRANT command (System Privileges and Roles) described in the previous section of this chapter. See also "Database Object Privileges". For illustrations, see "Examples".
You must own the object or the owner of the object must have granted you the object privileges with the GRANT OPTION. This rule applies to users with the DBA role.

|
object_priv |
is an object privilege to be granted. You can substitute any of the following values: |
|
|
ALL [PRIVILEGES] |
grants all the privileges for the object that you have been granted with the GRANT OPTION. The user who owns the schema containing an object automatically has all privileges on the object with the GRANT OPTION. (The keyword PRIVILEGES is optional.) |
|
|
column |
specifies a table or view column on which privileges are granted. You can specify columns only when granting the INSERT, REFERENCES, or UPDATE privilege. If you do not list columns, the grantee has the specified privilege on all columns in the table or view. |
|
|
ON |
identifies the object on which the privileges are granted. |
|
|
|
DIRECTORY |
identifies a directory_object on which privileges are granted by the DBA. You cannot qualify directory_object with a schema name. See also "Directory Privileges". See CREATE DIRECTORY. |
|
|
object |
identifies the schema object on which the privileges are granted. If you do not qualify object with schema, Oracle assumes the object is in your own schema. The object can be one of the following types:
|
|
TO |
identifies users or roles to which the object privilege is granted. |
|
|
|
PUBLIC |
grants object privileges to all users. |
|
WITH GRANT OPTION |
allows the grantee to grant the object privileges to other users and roles. The grantee must be a user or PUBLIC, rather than a role. |
|
You can use this form of the GRANT statement to grant object privileges to users, roles, and PUBLIC. Each database object privilege that you grant authorizes the grantee to perform some operation on the object. Table 4-12 summarizes the object privileges that you can grant on each type of object.
If you grant a privilege to a user, Oracle adds the privilege to the user's privilege domain. The user can immediately exercise the privilege.
If you grant a privilege to a role, Oracle adds the privilege to the role's privilege domain. Users who have been granted and have enabled the role can immediately exercise the privilege. Other users who have been granted the role can enable the role and exercise the privilege.
If you grant a privilege to PUBLIC, Oracle adds the privilege to the privilege domain of each user. All users can immediately exercise the privilege.
Table 4-13 lists object privileges and the operations that they authorize. You can grant any of these system privileges with the GRANT command.
| Object Privilege | Allows Grantee to . . . |
|---|---|
|
Table privileges authorize operations on a table. Any one of following object privileges allows the grantee to lock the table in any lock mode with the LOCK TABLE command. |
|
|
ALTER |
allows the grantee to change the table definition with the ALTER TABLE command. |
|
DELETE |
remove rows from the table with the DELETE command. Note: You must grant the SELECT privilege on the table along with the DELETE privilege. |
|
INDEX |
create an index on the table with the CREATE INDEX command. |
|
INSERT |
add new rows to the table with the INSERT command. |
|
REFERENCES |
create a constraint that refers to the table. You cannot grant this privilege to a role. |
|
SELECT |
query the table with the SELECT command. |
|
UPDATE |
change data in the table with the UPDATE command. Note: You must grant the SELECT privilege on the table along with the UPDATE privilege. |
|
View privileges authorizes operations on a view. Any one of the above object privileges allows the grantee to lock the view in any lock mode with the LOCK TABLE command. To grant a privilege on a view, you must have that privilege with the GRANT OPTION on all of the view's base tables. |
|
|
DELETE |
remove rows from the view with the DELETE command. |
|
INSERT |
add new rows to the view with the INSERT command. |
|
SELECT |
query the view with the SELECT command. |
|
UPDATE |
change data in the view with the UPDATE command. |
|
Sequence privileges authorize operations on a sequence. |
|
|
ALTER |
change the sequence definition with the ALTER SEQUENCE command. |
|
SELECT |
examine and increment values of the sequence with the CURRVAL and NEXTVAL pseudocolumns. |
|
Procedure, function, and package privileges authorize operations on procedures, functions, or packages. |
|
|
EXECUTE |
execute the procedure or function or to access any program object declared in the specification of a package. |
|
Snapshot privileges authorize operations on a snapshot. |
|
|
SELECT |
query the snapshot with the SELECT command. |
|
Synonym privileges are the same as the privileges for the base object. See "Synonym Privileges" below. |
|
|
Directory privileges provide secured access to the files stored in the operating system directory. See "Directory Privileges" below. |
|
|
READ |
read files in the directory. |
The object privileges available for a synonym are the same as the privileges for the synonym's base object. Granting a privilege on a synonym is equivalent to granting the privilege on the base object. Similarly, granting a privilege on a base object is equivalent to granting the privilege on all synonyms for the object. If you grant a user a privilege on a synonym, the user can use either the synonym name or the base object name in the SQL statement that exercises the privilege.
The object privileges available for a directory provide secured database access to the files stored in the operating system directory to which the directory object serves as a pointer. The directory object contains the full pathname of the operating system directory where the files reside. Because the files are actually stored outside the database, Oracle8 server processes also need to have appropriate file permissions on the file system server.
Granting object privileges on the directory database object to individual database users, rather than on the operating system, allows Oracle8 to enforce security during file operations.
To grant READ on directory BFILE_DIR1 to user SCOTT, with the GRANT OPTION, issue the following statement:
GRANT READ ON DIRECTORY bfile_dir1 TO scott WITH GRANT OPTION;
To grant all privileges on the table BONUS to the user JONES with the GRANT OPTION, issue the following statement:
GRANT ALL ON bonus TO jones WITH GRANT OPTION;
JONES can subsequently perform the following operations:
To grant SELECT and UPDATE privileges on the view GOLF_HANDICAP to all users, issue the following statement:
GRANT SELECT, UPDATE ON golf_handicap TO PUBLIC;
All users can subsequently query and update the view of golf handicaps.
To grant SELECT privilege on the ESEQ sequence in the schema ELLY to the user BLAKE, issue the following statement:
GRANT SELECT ON elly.eseq TO blake;
BLAKE can subsequently generate the next value of the sequence with the following statement:
SELECT elly.eseq.NEXTVAL FROM DUAL;
To grant BLAKE the REFERENCES privilege on the EMPNO column and the UPDATE privilege on the EMPNO, SAL, and COMM columns of the EMP table in the schema SCOTT, issue the following statement:
GRANT REFERENCES (empno), UPDATE (empno, sal, comm) ON scott.emp TO blake;
BLAKE can subsequently update values of the EMPNO, SAL, and COMM columns. BLAKE can also define referential integrity constraints that refer to the EMPNO column. However, because the GRANT statement lists only these columns, BLAKE cannot perform operations on any of the other columns of the EMP table.
For example, BLAKE can create a table with a constraint:
CREATE TABLE dependent (dependno NUMBER, dependname VARCHAR2(10), employee NUMBER CONSTRAINT in_emp REFERENCES scott.emp(empno) );
The constraint IN_EMP ensures that all dependents in the DEPENDENT table correspond to an employee in the EMP table in the schema SCOTT.
To add rows to:
 an object table
 an object view's base table
For illustrations of inserting, see "Examples".
For you to insert rows into a table, the table must be in your own schema or you must have INSERT privilege on the table.
For you to insert rows into the base table of a view, the owner of the schema containing the view must have INSERT privilege on the base table. Also, if the view is in a schema other than your own, you must have INSERT privilege on the view.
If you have the INSERT ANY TABLE system privilege, you can also insert rows into any table or any view's base table.
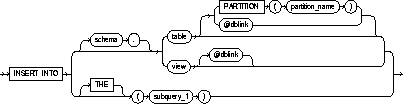

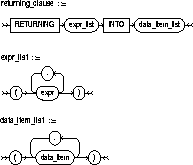
|
schema |
is the schema containing the table or view. If you omit schema, Oracle assumes the table or view is in your own schema. |
|
table / view |
is the name of the table or object table into which rows are to be inserted. If you specify a view or object view, Oracle inserts rows into the view's base table. See also "Inserting Into Views". |
|
PARTITION (partition_name) |
specifies partition-level row inserts for table. The partition_name is the name of the partition within table targeted for inserts. |
|
|
Note: |
|
dblink |
is a complete or partial name of a database link to a remote database where the table or view is located. For information on referring to database links, see "Referring to Schema Objects and Parts". You can only insert rows into a remote table or view if you are using Oracle's distributed functionality. |
|
|
If you omit dblink, Oracle assumes that the table or view is on the local database. |
|
|
informs Oracle that the column value returned by the subquery is a nested table, not a scalar value. A subquery prefixed by THE is called a flattened subquery. See "Using Flattened Subqueries". |
|
subquery_1 |
is a subquery that Oracle treats in the same manner as a view. See "Subqueries". |
|
column |
is a column of the table or view. In the inserted row, each column in this list is assigned a value from the VALUES clause or the subquery. |
|
|
If you omit one of the table's columns from this list, the column's value for the inserted row is the column's default value as specified when the table was created. If you omit the column list altogether, the VALUES clause or query must specify values for all columns in the table. |
|
VALUES |
specifies a row of values to be inserted into the table or view. See the syntax description in "Expressions". You must specify a value in the VALUES clause for each column in the column list. See also "The VALUES Clause and Subqueries". |
|
subquery_2 |
is a subquery that returns rows that are inserted into the table. The select list of this subquery must have the same number of columns as the column list of the INSERT statement. See "Subqueries". |
|
RETURNING |
retrieves the rows affected by the INSERT. You can retrieve only scalar, LOB, ROWID, and REF types. See also "The RETURNING Clause". |
|
expr |
is some of the syntax descriptions in "Expressions". You must specify a column expression in the RETURNING clause for each variable in the data_item_list. |
|
INTO |
indicates that the values of the changed rows are to be stored in the variable(s) specified in data_item_list. |
|
data_item |
is a PL/SQL variable or bind variable that stores a retrieved expr value. |
|
You cannot use the RETURNING clause with Parallel DML or with remote objects. See also "Parallel DML". |
|
An INSERT statement with a VALUES clause adds to the table a single row containing the values specified in the VALUES clause.
An INSERT statement with a subquery instead of a VALUES clause adds to the table all rows returned by the subquery. Oracle processes the subquery and inserts each returned row into the table. If the subquery selects no rows, Oracle inserts no rows into the table. The subquery can refer to any table, view, or snapshot, including the target table of the INSERT statement.
The number of columns in the column list of the INSERT statement must be the same as the number of values in the VALUES clause or the number of columns selected by the subquery. If you omit the column list, then the VALUES clause or the subquery must provide values for every column in the table.
Oracle assigns values to fields in new rows based on the internal position of the columns in the table and the order of the values in the VALUES clause or in the select list of the query. You can determine the position of each column in the table by examining the data dictionary. See Oracle8 Reference.
If you omit any columns from the column list, Oracle assigns them their default values as specified when the table was created. For more information on default column values, see CREATE TABLE. If any of these columns has a NOT NULL constraint, then Oracle returns an error indicating that the constraint has been violated and rolls back the INSERT statement.
Issuing an INSERT statement against a table fires any INSERT triggers defined on the table.
You can place a parallel hint immediately after the INSERT keyword to parallelize an INSERT operation. Parallel DML must also be enabled for the session. See ALTER SESSION for information about enabling parallel DML. For detailed information about Parallel DML, see Oracle8 Tuning, Oracle8 Parallel Server Concepts and Administration, and Oracle8 Concepts.
If a view was created using the WITH CHECK OPTION, then you can insert into the view only rows that satisfy the view's defining query.
If a view was created using a single base table, then you can insert rows into the view and then retrieve those values using the RETURNING clause.
You cannot insert rows into a view if the view's defining query contains one of the following constructs:
An INSERT statement with a RETURNING clause retrieves the rows inserted and stores them in PL/SQL variables or bind variables. Using a RETURNING clause in INSERT statements with a VALUES clause enables you to return column expressions, ROWIDs, and REFs and store them in output bind variables. You can also use INSERT with a RETURNING clause for views with single base tables.
PL/SQL does not allow multiple row inserts; you can retrieve only a single row value into a PL/SQL variable. For information about using the RETURNING clause, see the PL/SQL User's Guide and Reference.
The following statement inserts a row into the DEPT table:
INSERT INTO dept VALUES (50, 'PRODUCTION', 'SAN FRANCISCO');
The following statement inserts a row with six columns into the EMP table. One of these columns is assigned NULL and another is assigned a number in scientific notation:
INSERT INTO emp (empno, ename, job, sal, comm, deptno) VALUES (7890, 'JINKS', 'CLERK', 1.2E3, NULL, 40);
The following statement has the same effect as Example II:
INSERT INTO (select empno, ename, job, sal, comm, deptno from emp) VALUES (7890, 'JINKS', 'CLERK', 1.2E3, NULL, 40);
The following statement copies managers and presidents or employees whose commission exceeds 25% of their salary into the BONUS table:
INSERT INTO bonus SELECT ename, job, sal, comm FROM emp WHERE comm > 0.25 * sal OR job IN ('PRESIDENT', 'MANAGER');
The following statement inserts a row into the ACCOUNTS table owned by the user SCOTT on the database accessible by the database link SALES:
INSERT INTO scott.accounts@sales (acc_no, acc_name) VALUES (5001, 'BOWER');
Assuming that the ACCOUNTS table has a BALANCE column, the newly inserted row is assigned the default value for this column because this INSERT statement does not specify a BALANCE value.
The following statement inserts a new row containing the next value of the employee sequence into the EMP table:
INSERT INTO emp VALUES (empseq.nextval, 'LEWIS', 'CLERK', 7902, SYSDATE, 1200, NULL, 20);
The following example adds rows from LATEST_DATA into partition OCT96 of the SALES table:
INSERT INTO sales PARTITION (oct96) SELECT * FROM latest_data;
The following example returns the values of the inserted rows into output bind variables :BND1 and :BND2:
INSERT INTO emp VALUES (empseq.nextval, 'LEWIS', 'CLARK', 7902, SYSDATE, 1200, NULL, 20) RETURNING sal*12, job INTO :bnd1, :bnd2;
The following example returns the reference value for the inserted row into bind array :1:
INSERT INTO employee VALUES ('Kitty Mine', 'Peaches Fuzz', 'Meena Katz') RETURNING REF(employee) INTO :1;
To lock one or more tables in a specified mode. This lock manually overrides automatic locking and permits or denies access to a table or view by other users for the duration of your operation. See also "Locking Tables".
The table or view must be in your own schema or you must have LOCK ANY TABLE system privilege or you must have any object privilege on the table or view.

|
schema |
is the schema containing the table or view. If you omit schema, Oracle assumes the table or view is in your own schema. |
|
table / view |
is the name of the table to be locked. If you specify view, Oracle locks the view's base tables. |
|
dblink |
is a database link to a remote Oracle database where the table or view is located. For information on specifying database links, see the section, "Referring to Objects in Remote Databases". You can lock tables and views on a remote database only if you are using Oracle's distributed functionality. All tables locked by a LOCK TABLE statement must be on the same database. |
|
|
If you omit dblink, Oracle assumes the table or view is on the local database. |
|
lockmode |
ROW SHARE allows concurrent access to the locked table, but prohibits users from locking the entire table for exclusive access. ROW SHARE is synonymous with SHARE UPDATE, which is included for compatibility with earlier versions of Oracle. ROW EXCLUSIVE is the same as ROW SHARE, but also prohibits locking in SHARE mode. Row Exclusive locks are automatically obtained when updating, inserting, or deleting. SHARE allows concurrent queries but prohibits updates to the locked table. SHARE ROW EXCLUSIVE is used to look at a whole table and to allow others to look at rows in the table but to prohibit others from locking the table in SHARE mode or updating rows. EXCLUSIVE allows queries on the locked table but prohibits any other activity on it. |
|
NOWAIT |
specifies that Oracle returns control to you immediately if the specified table is already locked by another user. In this case, Oracle returns a message indicating that the table is already locked by another user. |
|
|
If you omit this clause, Oracle waits until the table is available, locks it, and returns control to you. |
Some forms of locks can be placed on the same table at the same time; other locks only allow one lock per table. For example, multiple users can place SHARE locks on the same table at the same time, but only one user can place an EXCLUSIVE lock on a table at a time. For a complete description of the interaction of lock modes, see Oracle8 Concepts.
When you lock a table, you choose how other users can access it. A locked table remains locked until you either commit your transaction or roll it back, either entirely or to a savepoint before you locked the table.
A lock never prevents other users from querying the table. A query never places a lock on a table. Readers never block writers and writers never block readers.
The following statement locks the EMP table in exclusive mode, but does not wait if another user already has locked the table:
LOCK TABLE emp IN EXCLUSIVE MODE NOWAIT;
The following statement locks the remote ACCOUNTS table that is accessible through the database link BOSTON:
LOCK TABLE accounts@boston IN SHARE MODE;
To stop auditing previously enabled by the AUDIT command (SQL Statements). To stop auditing enabled by the AUDIT command (Schema Objects), refer to NOAUDIT (Schema Objects). See also "Stopping Auditing".
You must have AUDIT SYSTEM system privilege.
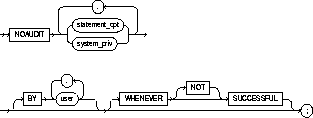
|
statement_opt |
is a statement option for which auditing is stopped. For a list of the statement options and the SQL statements they audit, see Table 4-6 and Table 4-7. |
|
|
system_priv |
is a system privilege for which auditing is stopped. For a list of the system privileges and the statements they authorize, see Table 4-6. |
|
|
BY user |
stops auditing only for SQL statements issued by specified users in their subsequent sessions. If you omit this clause, Oracle stops auditing for all users' statements, except for the situation described in the section that follows. |
|
|
WHENEVER SUCCESSFUL |
stops auditing only for SQL statements that complete successfully. |
|
|
|
NOT |
stops auditing only for statements that result in Oracle errors. |
|
|
|
If you omit the WHENEVER clause entirely, Oracle stops auditing for all statements, regardless of success or failure. |
The NOAUDIT statement must have the same syntax as the previous AUDIT statement. Further, it reverses the effects only of that particular statement. Therefore, if one AUDIT statement (statement A) enables auditing for a specific user, and a second (statement B) enables auditing for all users, then a NOAUDIT statement to disable auditing for all users (statement C) reverses statement B, but leaves statement A in effect and continues to audit the user that statement A specified. For information on auditing specific SQL commands, see the AUDIT (SQL Statements).
The following examples correspond to the first three examples listed in AUDIT (SQL Statements).
If you have chosen auditing for every SQL statement that creates or drops a role, you can stop auditing of such statements by issuing the following statement:
NOAUDIT ROLE;
If you have chosen auditing for any statement that queries or updates any table issued by the users SCOTT and BLAKE, you can stop auditing for SCOTT's queries by issuing the following statement:
NOAUDIT SELECT TABLE BY scott;
The above statement stops auditing only SCOTT's queries, so Oracle continues to audit BLAKE's queries and updates and SCOTT's updates.
To stop auditing on all statements that are authorized by DELETE ANY TABLE system privilege, issue the following statement:
NOAUDIT DELETE ANY TABLE;
To stop auditing previously enabled by the AUDIT command (Schema Objects). To stop auditing enabled by the AUDIT command (SQL Statements), refer to NOAUDIT (SQL Statements). For illustrations, see "Examples".
The object on which you stop auditing must be in your own schema or you must have AUDIT ANY system privilege. In addition, if the object you choose for auditing is a directory, even if you created it, you must have AUDIT ANY system privilege.

|
object_opt |
stops auditing for particular operations on the object. For a list of these options, see Table 4-8. |
|
|
ON |
identifies the object on which auditing is stopped. If you do not qualify object with schema, Oracle assumes the object is in your own schema. |
|
|
object |
identifies the object on which auditing is stopped. The object must a table; view; sequence; stored procedure, function, or package; snapshot; or library. |
|
|
|
For information on auditing specific schema objects, refer to AUDIT (Schema Objects). |
|
|
DIRECTORY directory_name |
identifies the name of the directory on which auditing is being stopped. |
|
|
DEFAULT |
removes the specified object options as default object options for subsequently created objects. |
|
|
WHENEVER SUCCESSFUL |
stops auditing only for SQL statements that complete successfully. |
|
|
|
NOT |
stops auditing only for statements that result in Oracle errors. |
|
|
If you omit the WHENEVER clause entirely, Oracle stops auditing for all statements, regardless of success or failure. |
|
If you have chosen auditing for every SQL statement that queries the EMP table in the schema SCOTT, you can stop auditing for such queries by issuing the following statement:
NOAUDIT SELECT ON scott.emp;
You can stop auditing for such queries that complete successfully by issuing the following statement:
NOAUDIT SELECT ON scott.emp WHENEVER SUCCESSFUL;
This statement stops auditing only for successful queries, Oracle continues to audit queries resulting in Oracle errors.
To specify whether Oracle should execute an operation serially or in parallel. See also "Using the PARALLEL Clause". For illustrations, see "Examples".
This clause can only be used in the following commands:
|
NOPARALLEL |
specifies serial execution of an operation. This is the default. |
|
|
PARALLEL |
specifies parallel execution of an operation. |
|
|
DEGREE |
determines the degree of parallelism for an operation on a single instance-that is, the number of query servers used in the parallel operation. |
|
|
|
integer |
uses integer query servers. |
|
|
DEFAULT |
the default number of query servers used is calculated from the number of CPUs and the number of DEVICES storing tables to be scanned in parallel. |
|
INSTANCES |
determines the number of parallel server instances used in the parallel operation. This keyword is ignored if you do not have a parallel server. |
|
|
|
integer |
uses integer instances |
|
|
DEFAULT |
uses all available instances |
|
|
|
Note: INSTANCES only applies to an instance using the Oracle Parallel Server. See also "Nonpartitioned Tables and Indexes" and "Partitioned Tables and Indexes". |
Use the PARALLEL clause to specify table parallelism in the CREATE TABLE and ALTER TABLE commands. When you specify this clause in a table definition, Oracle uses the clause to determine parallelism of DML statements as well as queries. Explicit parallel hints, however, override the effect of the PARALLEL clauses for that table.
If you do not specify the PARALLEL clause, Oracle determines the type of parallelism to use by the default PARALLEL attributes of the table or index.
For more information on parallelized operations, see Oracle8 Tuning, Oracle8 Concepts, and Oracle8 Parallel Server Concepts and Administration.
Used in a CREATE command, the PARALLEL clause causes the creation of the schema object to be parallelized. If the CREATE command is CREATE TABLE, the PARALLEL clause also sets the default degree of parallelism for queries and DML on the table after creation.
Used in a command to alter an object, the PARALLEL clause changes the default degree of parallelism for queries and DML on the object. In an ALTER DATABASE RECOVER command, the PARALLEL clause causes the recovery to be parallelized.
Specifying PARALLEL (DEGREE 1 INSTANCES 1) is equivalent to specifying NOPARALLEL.
A hint in a query can override a default of NOPARALLEL. Likewise, a hint in a query can override a default of PARALLEL.
The INSTANCES parameter of CREATE TABLE ... AS SELECT and CREATE INDEX determines the number of instances used by the CREATE operation. Instances are chosen for physical affinity to the (first) datafiles underlying the partitions. If the INSTANCES parameter is greater than the number of instances with affinity to the underlying datafiles, additional instances (up to the total number of partitions) are chosen arbitrarily. The DEGREE and INSTANCES parameters, stored in the data dictionary, are used later to compute the default PARALLEL attributes of the schema object.
The following command creates a table using 10 query servers, 5 to scan SCOTT.EMP and another 5 to populate EMP_DEPT:
CREATE TABLE emp_dept PARALLEL (DEGREE 5) AS SELECT * FROM scott.emp WHERE deptno = 10;
The following command creates an index using 10 query servers, 5 to scan SCOTT.EMP and another 5 to populate the EMP_IDX index:
CREATE INDEX emp_idx ON scott.emp (ename) PARALLEL 5;
The following command performs tablespace recovery using 5 recovery processes on 5 instances in a parallel server, for a total of 25 (5 * 5) query servers:
ALTER DATABASE RECOVER TABLESPACE binky PARALLEL (DEGREE 5 INSTANCES 5);
The following command changes the default number of query servers used to query the EMP table:
ALTER TABLE emp PARALLEL (DEGREE 9);
The following command causes the index to be rebuilt from the existing index by using 6 query servers, 3 each to scan the old and to build the new index:
ALTER INDEX emp_idx REBUILD PARALLEL 3;
To perform media recovery.
Use the ALTER DATABASE command with the RECOVER clause if you want to write your own specialized media recovery application using SQL. For other situations, Oracle recommends that you use the Server Manager RECOVER command rather than the ALTER DATABASE command with the RECOVER clause to perform media recovery.
For more information on media recovery, see the Oracle8 Backup and Recovery Guide and Oracle8 Administrator's Guide. For illustrations, see "Examples".
The RECOVER clause must appear in an ALTER DATABASE statement. You must have the privileges necessary to issue this statement. For information on these privileges, see ALTER DATABASE.
In addition:

parallel_clause: See the PARALLEL clause.
|
AUTOMATIC |
automatically generates the names of the redo log files to apply during media recovery. If you omit this option, then you must specify the names of redo log files using the ALTER DATABASE ... RECOVER command with the LOGFILE clause. |
|
FROM |
specifies the location from which the archived redo log file group is read. The value of location must be a fully specified file location following the conventions of your operating system. If you omit this parameter, Oracle assumes the archived redo log file group is in the location specified by the initialization parameter LOG_ARCHIVE_DEST. |
|
STANDBY |
recovers the standby database using the control file and archived redo log files copied from the primary database. For more information, see Oracle8 Administrator's Guide.. |
|
DATABASE |
recovers the entire database. This is the default option. You can use this option only when the database is closed. Note: This option will recover only online datafiles. |
|
UNTIL CANCEL |
performs cancel-based recovery. This option recovers the database until you issue the ALTER DATABASE RECOVER command with the CANCEL clause. |
|
UNTIL TIME |
performs time-based recovery. This parameter recovers the database to the time specified by the date. The date must be a character literal in the format 'YYYY-MM-DD:HH24:MI:SS'. |
|
UNTIL CHANGE |
performs change-based recovery. This parameter recovers the database to a transaction-consistent state immediately before the system change number (SCN) specified by integer. |
|
USING BACKUP CONTROLFILE |
specifies that a backup control file is being used instead of the current control file. |
|
TABLESPACE |
recovers only the specified tablespaces. You can use this option if the database is open or closed, provided the tablespaces to be recovered are offline. |
|
DATAFILE |
recovers the specified datafiles. You can use this option when the database is open or closed, provided the datafiles to be recovered are offline. |
|
LOGFILE |
continues media recovery by applying the specified redo log file. |
|
CONTINUE |
continues multi-instance recovery after it has been interrupted to disable a thread. |
|
CONTINUE DEFAULT |
continues recovery by applying the redo log file that Oracle has automatically generated. |
|
CANCEL |
terminates cancel-based recovery. |
|
parallel_clause |
specifies degree of parallelism to use when recovering. See the PARALLEL clause. |
The following statement performs complete recovery of the entire database:
ALTER DATABASE RECOVER AUTOMATIC DATABASE;
Oracle automatically generates the names of redo log files to apply and prompts you with them. The following statement applies a suggested file:
ALTER DATABASE RECOVER CONTINUE DEFAULT;
The following statement explicitly names a redo log file for Oracle to apply:
ALTER DATABASE RECOVER LOGFILE 'diska:arch0006.arc';
The following statement performs time-based recovery of the database:
ALTER DATABASE AUTOMATIC RECOVER UNTIL TIME '1992-10-27:14:00:00';
Oracle recovers the database until 2:00 pm on October 27, 1992.
The following statement recovers the tablespace USER5:
ALTER DATABASE RECOVER TABLESPACE user5;
To rename a table, view, sequence, or private synonym for a table, view, or sequence. See also "Renaming Objects".
The object must be in your own schema. See also "Restrictions".

|
old |
is the name of an existing table, view, sequence, or private synonym. |
|
new |
is the new name to be given to the existing object. The new name must not already be used by another schema object in the same namespace and must follow the rules for naming schema objects defined in the section "Schema Object Naming Rules". |
Integrity constraints, indexes, and grants on the old object are automatically transferred to the new object. Oracle invalidates all objects that depend on the renamed object, such as views, synonyms, and stored procedures and functions that refer to a renamed table.
To change the name of table DEPT to EMP_DEPT, issue the following statement:
RENAME dept TO emp_dept;
You cannot use this command to rename public synonyms. To rename a public synonym, you must first drop it with the DROP SYNONYM command and then create another public synonym with the new name using the CREATE SYNONYM command.
You cannot use this command to rename columns. You can rename a column using the CREATE TABLE command with the AS clause. For example, the following statement re-creates the table STATIC, renaming a column from OLDNAME to NEWNAME:
CREATE TABLE temporary (newname, col2, col3) AS SELECT oldname, col2, col3 FROM static DROP TABLE static RENAME temporary TO static;
To revoke system privileges and roles from users and roles. To revoke object privileges from users and roles, refer to REVOKE (Schema Object Privileges). For illustrations, see "Examples".
You must have been granted the system privilege or role with the ADMIN OPTION. Also, you can revoke any role if you have the GRANT ANY ROLE system privilege. See also "Limitations".
|
system_priv |
is a system privilege to be revoked. For a list of the system privileges, see Table 4-19. See also "Revoking Privileges". |
|
role |
is a role to be revoked. For a list of the roles predefined by Oracle, see Oracle8 Administrator's Guide.. See also "Revoking Roles". |
|
FROM |
identifies users and roles from which the system privileges or roles are to be revoked. |
|
PUBLIC |
revokes the system privilege or role from all users. |
If you revoke a privilege from a user, Oracle removes the privilege from the user's privilege domain. Effective immediately, the user cannot exercise the privilege.
If you revoke a privilege from a role, Oracle removes the privilege from the role's privilege domain. Effective immediately, users with the role enabled cannot exercise the privilege. Also, other users who have been granted the role and subsequently enable the role cannot exercise the privilege.
If you revoke a privilege from PUBLIC, Oracle removes the privilege from the privilege domain of each user who has been granted the privilege through PUBLIC. Effective immediately, such users can no longer exercise the privilege. However, the privilege is not revoked from users who have been granted the privilege directly or through roles.
If you revoke a role from a user, Oracle makes the role unavailable to the user. If the role is currently enabled for the user, the user can continue to exercise the privileges in the role's privilege domain as long as it remains enabled. However, the user cannot subsequently enable the role.
If you revoke a role from another role, Oracle removes the revoked role's privilege domain from the revokee role's privilege domain. Users who have been granted and have enabled the revokee role can continue to exercise the privileges in the revoked role's privilege domain as long as the revokee role remains enabled. However, other users who have been granted the revokee role and subsequently enable it cannot exercise the privileges in the privilege domain of the revoked role.
If you revoke a role from PUBLIC, Oracle makes the role unavailable to all users who have been granted the role through PUBLIC. Any user who has enabled the role can continue to exercise the privileges in its privilege domain as long as it remains enabled. However, users cannot subsequently enable the role. Note that the role is not revoked from users who have been granted the privilege directly or through other roles.
The REVOKE command can revoke only privileges and roles that were previously granted directly with a GRANT statement. The REVOKE command cannot perform the following operations:
A system privilege or role cannot appear more than once in the list of privileges and roles to be revoked. A user, a role, or PUBLIC cannot appear more than once in the FROM clause.
The following statement revokes DROP ANY TABLE system privilege from the users BILL and MARY:
REVOKE DROP ANY TABLE FROM bill, mary;
BILL and MARY can no longer drop tables in schemas other than their own.
The following statement revokes the role CONTROLLER from the user HANSON:
REVOKE controller FROM hanson;
HANSON can no longer enable the CONTROLLER role.
The following statement revokes the CREATE TABLESPACE system privilege from the CONTROLLER role:
REVOKE CREATE TABLESPACE FROM controller;
Enabling the CONTROLLER role no longer allows users to create tablespaces.
To revoke the role VP from the role CEO, issue the following statement:
REVOKE vp FROM ceo;
VP is no longer granted to CEO.
To revoke the CREATE ANY DIRECTORY system privilege from user SCOTT, issue the following statement:
REVOKE CREATE ANY DIRECTORY FROM scott;
To revoke object privileges for a particular object from users and roles. To revoke system privileges or roles, refer to . REVOKE (System Privileges and Roles). See also "Revoking Object Privileges".
Each object privilege authorizes some operation on an object. By revoking an object privilege, you prevent the revokee from performing that operation. For a summary of the object privileges for each type of object, see Table 4-13. For illustrations, see "Examples".
You must have previously granted the object privileges to each user and role. See also "Revoking Multiple Identical Grants".
|
object_priv |
is an object privilege to be revoked. You can substitute any of the following values: UPDATE |
|
|
ALL PRIVILEGES |
revokes all object privileges that you have granted to the revokee. Note: If no privileges have been granted on the object, Oracle takes no action and does not return an error message. |
|
|
ON DIRECTORY directory_object |
identifies a directory object on which privileges are revoked. You cannot qualify directory_object with schema when using the DIRECTORY option. The object must be a directory. See CREATE DIRECTORY. |
|
|
ON object |
identifies the object on which the object privileges are revoked. This object can be a table; view; sequence; procedure, stored function, or package; snapshot; synonym for a table, view, sequence, procedure, stored function, package, or snapshot; or library. |
|
|
|
If you do not qualify object with schema, Oracle assumes the object is in your own schema. |
|
|
FROM |
identifies users and roles from which the object privileges are revoked. |
|
|
|
PUBLIC |
revokes object privileges from all users. |
|
CASCADE CONSTRAINTS |
drops any referential integrity constraints that the revokee has defined using the REFERENCES privilege or the ALL PRIVILEGES option if the revokee has exercised the REFERENCES privilege to define a referential integrity constraints. See also "Cascading Revokes". |
|
|
FORCE |
revokes EXECUTE object privileges on user-defined type objects with table dependencies. You must use the FORCE option to revoke the EXECUTE object privilege on user-defined type objects with table dependencies. See also "Using FORCE". For detailed information about type dependencies and user-defined object privileges, see Oracle8 Concepts. |
|
If you revoke a privilege from a user, Oracle removes the privilege from the user's privilege domain. Effective immediately, the user cannot exercise the privilege.
If you revoke a privilege from a role, Oracle removes the privilege from the role's privilege domain. Effective immediately, users with the role enabled cannot exercise the privilege. Other users who have been granted the role cannot exercise the privilege after enabling the role.
If you revoke a privilege from PUBLIC, Oracle removes the privilege from the privilege domain of each user who has been granted the privilege through PUBLIC. Effective immediately, all such users are restricted from exercising the privilege. However, the privilege is not revoked from users who have been granted the privilege directly or through roles.
You can use the REVOKE command only to revoke object privileges that you previously granted directly to the revokee. You cannot use the REVOKE command to perform the following operations:
A privilege cannot appear more than once in the list of privileges to be revoked. A user, a role, or PUBLIC cannot appear more than once in the FROM clause.
You must use the FORCE option to revoke the EXECUTE object privilege on user-defined type objects with table dependencies. The FORCE option causes the data in the dependent tables to become inaccessible. Regranting the necessary type privilege will revalidate the table. For detailed information about type dependencies and user-defined object privileges, see Oracle8 Concepts.
Multiple users may grant the same object privilege to the same user, role, or PUBLIC. To remove the privilege from the grantee's privilege domain, all grantors must revoke the privilege. If even one grantor does not revoke the privilege, the grantee can still exercise the privilege by virtue of that grant.
Revoking an object privilege that a user has either granted or exercised to define an object or a referential integrity constraint has the following cascading effects:
You can grant DELETE, INSERT, SELECT, and UPDATE privileges on the table BONUS to the user PEDRO with the following statement:
GRANT ALL ON bonus TO pedro;
To revoke the DELETE privilege on BONUS from PEDRO, issue the following statement:
REVOKE DELETE ON bonus FROM pedro;
To revoke the remaining privileges on BONUS that you granted to PEDRO, issue the following statement:
REVOKE ALL ON bonus FROM pedro;
You can grant SELECT and UPDATE privileges on the view REPORTS to all users by granting the privileges to the role PUBLIC:
GRANT SELECT, UPDATE ON reports TO public;
The following statement revokes UPDATE privilege on REPORTS from all users:
REVOKE UPDATE ON reports FROM public;
Users can no longer update the REPORTS view, although users can still query it. However, if you have also granted UPDATE privilege on REPORTS to any users (either directly or through roles), these users retain the privilege.
You can grant the user BLAKE the SELECT privilege on the ESEQ sequence in the schema ELLY with the following statement:
GRANT SELECT ON elly.eseq TO blake;
To revoke the SELECT privilege on ESEQ from BLAKE, issue the following statement:
REVOKE SELECT ON elly.eseq FROM blake;
However, if the user ELLY has also granted SELECT privilege on ESEQ to BLAKE, BLAKE can still use ESEQ by virtue of ELLY's grant.
You can grant BLAKE the privileges REFERENCES and UPDATE on the EMP table in the schema SCOTT with the following statement:
GRANT REFERENCES, UPDATE ON scott.emp TO blake;
BLAKE can exercise the REFERENCES privilege to define a constraint in his own DEPENDENT table that refers to the EMP table in the schema SCOTT:
CREATE TABLE dependent (dependno NUMBER, dependname VARCHAR2(10), employee NUMBER CONSTRAINT in_emp REFERENCES scott.emp(ename) );
You can revoke the REFERENCES privilege on SCOTT.EMP from BLAKE, by issuing the following statement that contains the CASCADE CONSTRAINTS option:
REVOKE REFERENCES ON scott.emp FROM blake CASCADE CONSTRAINTS;
Revoking BLAKE's REFERENCES privilege on SCOTT.EMP causes Oracle to drop the IN_EMP constraint, because BLAKE required the privilege to define the constraint.
However, if BLAKE has also been granted the REFERENCES privilege on SCOTT.EMP by a user other than you, Oracle does not drop the constraint. BLAKE still has the privilege necessary for the constraint by virtue of the other user's grant.
You can revoke READ privilege on directory BFILE_DIR1 from SUE, by issuing the following statement:
REVOKE READ ON DIRECTORY bfile_dir1 FROM sue;
To undo work done in the current transaction, or to manually undo the work done by an in-doubt distributed transaction. See also "Rolling Back Transactions".
To roll back your current transaction, no privileges are necessary.
To manually roll back an in-doubt distributed transaction that you originally committed, you must have FORCE TRANSACTION system privilege. To manually roll back an in-doubt distributed transaction originally committed by another user, you must have FORCE ANY TRANSACTION system privilege.

|
WORK |
is optional and is provided for ANSI compatibility. |
|
TO |
rolls back the current transaction to the specified savepoint. If you omit this clause, the ROLLBACK statement rolls back the entire transaction. |
|
FORCE |
manually rolls back an in-doubt distributed transaction. The transaction is identified by the 'text' containing its local or global transaction ID. To find the IDs of such transactions, query the data dictionary view DBA_2PC_PENDING. See also "Distributed Transactions". |
|
|
ROLLBACK statements with the FORCE clause are not supported in PL/SQL. |
A transaction (or a logical unit of work) is a sequence of SQL statements that Oracle treats as a single unit. A transaction begins with the first executable SQL statement after a COMMIT, ROLLBACK, or connection to the database. A transaction ends with a COMMIT statement, a ROLLBACK statement, or disconnection (intentional or unintentional) from the database.
Using ROLLBACK without the TO SAVEPOINT clause performs the following operations:
Using ROLLBACK with the TO SAVEPOINT clause performs the following operations:
Oracle recommends that you explicitly end transactions in application programs using either a COMMIT or ROLLBACK statement. If you do not explicitly commit the transaction and the program terminates abnormally, Oracle rolls back the last uncommitted transaction.
The following statement rolls back your entire current transaction:
ROLLBACK;
The following statement rolls back your current transaction to savepoint SP5:
ROLLBACK TO SAVEPOINT sp5;
Oracle's distributed functionality enables you to perform distributed transactions, or transactions that modify data on multiple databases. To commit or roll back a distributed transaction, you need only issue a COMMIT or ROLLBACK statement as you would any other transaction.
If a network failure occurs during the commit process for a distributed transaction, the state of the transaction may be unknown, or in doubt. After consultation with the administrators of the other databases involved in the transaction, you may decide to manually commit or roll back the transaction on your local database. You can manually roll back the transaction on your local database by issuing a ROLLBACK statement with the FORCE clause.
For more information on when to roll back in-doubt transactions, see Oracle8 Distributed Database Systems.
You cannot manually roll back an in-doubt transaction to a savepoint.
A ROLLBACK statement with a FORCE clause only rolls back the specified transaction. Such a statement does not affect your current transaction.
The following statement manually rolls back an in-doubt distributed transaction:
ROLLBACK WORK FORCE '25.32.87';
To identify a point in a transaction to which you can later roll back. See also "Creating Savepoints".
None.

|
savepoint |
is the name of the savepoint to be created. |
Savepoints are used with the ROLLBACK command to roll back portions of the current transaction. For more information, see "Rolling Back Transactions".
Savepoints are useful in interactive programs, because you can create and name intermediate steps of a program. This allows you more control over longer, more complex programs. For example, you can use savepoints throughout a long complex series of updates, so that if you make an error, you need not resubmit every statement.
Savepoints are similarly useful in application programs: if a program contains several subprograms, you can create a savepoint before each subprogram begins. If a subprogram fails, you can easily return the data to its state before the subprogram began and then reexecute the subprogram with revised parameters or perform a recovery action.
Savepoint names must be distinct within a given transaction. If you create a second savepoint with the same identifier as an earlier savepoint, the earlier savepoint is erased. After a savepoint has been created, you can either continue processing, commit your work, roll back the entire transaction, or roll back to the savepoint.
To update BLAKE's and CLARK's salary, check that the total company salary does not exceed 20,000, then reenter CLARK's salary, enter:
UPDATE emp SET sal = 2000 WHERE ename = 'BLAKE' SAVEPOINT blake_sal UPDATE emp SET sal = 1500 WHERE ename = 'CLARK' SAVEPOINT clark_sal SELECT SUM(sal) FROM emp ROLLBACK TO SAVEPOINT blake_sal UPDATE emp SET sal = 1300 WHERE ename = 'CLARK' COMMIT;
To retrieve data from one or more tables, object tables, views, object views, or snapshots.
For you to select data from a table or snapshot, the table or snapshot must be in your own schema or you must have SELECT privilege on the table or snapshot.
For you to select rows from the base tables of a view,
The SELECT ANY TABLE system privilege also allows you to select data from any table or any snapshot or any view's base table.
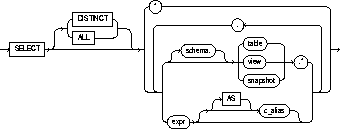
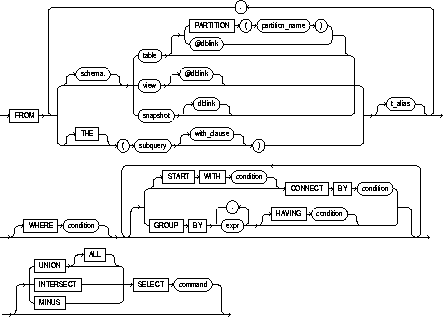
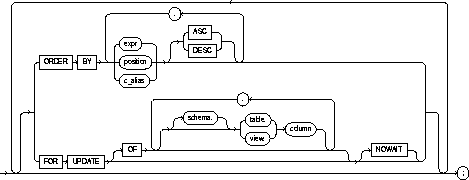
 WITH_clause::=
|
DISTINCT |
returns only one copy of each set of duplicate rows selected. Duplicate rows are those with matching values for each expression in the select list. |
|
|
ALL |
returns all rows selected, including all copies of duplicates. The default is ALL. |
|
|
* |
selects all columns from all tables, views, or snapshots, listed in the FROM clause. |
|
|
table.* |
selects all columns from the specified table, view, or snapshot. You can use the schema qualifier to select from a table, view, or snapshot in a schema other than your own. See also "Joins". |
|
|
expr |
selects an expression. See the syntax description of expr in "Expressions"; see also "Creating Simple Queries". A column name in this list can be qualified only with schema if the table, view, or snapshot containing the column is qualified with schema in the FROM clause. |
|
|
c_alias |
provides a different name for the column expression and causes the alias to be used in the column heading. The AS keyword is optional. The alias effectively renames the select list item for the duration of the query. The alias can be used in the ORDER BY clause, but not other clauses in the query. |
|
|
PARTITION (partition_name) |
specifies partition-level data retrieval. The partition_name parameter may be the name of the partition within table from which to retrieve data or a more complicated predicate restricting retrieval to just one partition of the table. |
|
|
schema |
is the schema containing the selected table, view, or snapshot. If you omit schema, Oracle assumes the table, view, or snapshot is in your own schema. |
|
|
table, view, snapshot |
is the name of a table, view, or snapshot from which data is selected. |
|
|
dblink |
is the complete or partial name for a database link to a remote database where the table, view, or snapshot is located. For more information on referring to database links, see the section "Referring to Objects in Remote Databases". Note that this database need not be an Oracle database. |
|
|
|
If you omit dblink, Oracle assumes that the table, view, or snapshot is on the local database. |
|
|
|
If you apply the keyword THE, the subquery must return a single column value which must be a nested table or an expression that yields a nested table. |
|
|
|
informs Oracle that the column value returned by the subquery is a nested table, not a scalar value. A subquery prefixed by THE is called a flattened subquery. "Using Flattened Subqueries". Note: You cannot use the set operators in a flattened subquery; see set operators below. |
|
|
subquery |
is a subquery that is treated in the same manner as a view. "Subqueries". Oracle executes the subquery and then uses the resulting rows as a view in the FROM clause. |
|
|
t_alias |
provides a different name for the table, view, snapshot, or subquery for evaluating the query and is most often used in a correlated query. Other references to the table, view, or snapshot throughout the query must refer to the alias. |
|
|
WHERE |
restricts the rows selected to those for which the condition is TRUE. If you omit this clause, Oracle returns all rows from the tables, views, or snapshots in the FROM clause. See the syntax description of condition in "Conditions". |
|
|
START WITH ... CONNECT BY |
returns rows in a hierarchical order. See also "Hierarchical Queries". |
|
|
GROUP BY |
groups the selected rows based on the value of expr for each row, and returns a single row of summary information for each group. See also "GROUP BY Clause". |
|
|
HAVING |
restricts the groups of rows returned to those groups for which the specified condition is TRUE. If you omit this clause, Oracle returns summary rows for all groups. See also "HAVING Clause". |
|
|
|
See also the syntax description of expr in "Expressions" and the syntax description of condition in "Conditions". |
|
|
UNION UNION ALL INTERSECT MINUS |
combine the rows returned by two SELECT statements using a set operation. To reference a column, you must use an alias to name the column. The FOR UPDATE clause cannot be used with these set operators.
|
|
|
ORDER BY |
orders rows returned by the statement. |
|
|
|
expr orders rows based on their value for expr. The expression is based on columns in the select list or columns in the tables, views, or snapshots in the FROM clause. |
|
|
|
position orders rows based on their value for the expression in this position of the select list. |
|
|
|
ASC and DESC specify either ascending or descending order. ASC is the default. See also "ORDER BY Clause". |
|
|
FOR UPDATE |
locks the selected rows. |
|
|
|
OF |
Locks the select rows only for a particular table in a join. |
|
|
NOWAIT |
returns control to you if the SELECT statement attempts to lock a row that is locked by another user. If you omit this clause, Oracle waits until the row is available and then returns the results of the SELECT statement. |
|
|
See also "FOR UPDATE Clause". |
|
The list of expressions that appears after the SELECT keyword and before the FROM clause is called the select list. Each expression expr becomes the name of one column in the set of returned rows, and each table.* becomes a set of columns, one for each column in the table in the order they were defined when the table was created. The datatype and length of each expression is determined by the elements of the expression.
If two or more tables have some column names in common, you must qualify column names with names of tables. Otherwise, fully qualified column names are optional, although it is always better to explicitly qualify table and column references. Oracle often does less work with fully qualified table and column names.
You can select rows from a single partition of a partitioned table by specifying the keyword PARTITION in the FROM clause. This SQL statement assigns an alias for and retrieves rows from the NOV96 partition of the SALES table:
SELECT * FROM sales PARTITION (nov96) s WHERE s.amount_of_sale > 1000;
You can use a column alias, c_alias, to label the preceding expression in the select list so that the column is displayed with a new heading. The alias effectively renames the select list item for the duration of the query. The alias can be used in the ORDER BY clause, but not other clauses in the query.
If you use the DISTINCT option to return only a single copy of duplicate rows, the total number of bytes in all select list expressions is limited to the size of a data block minus some overhead. This size is specified by the initialization parameter DB_BLOCK_SIZE.
You can use comments in a SELECT statement to pass instructions, or hints, to the Oracle optimizer. The optimizer uses hints to choose an execution plan for the statement. For more information on hints, see Oracle8 Tuning.
The following statement selects rows from the EMP table with the department number of 30:
SELECT * FROM emp WHERE deptno = 30;
The following statement selects the name, job, salary and department number of all employees except sales people from department number 30:
SELECT ename, job, sal, deptno FROM emp WHERE NOT (job = 'SALESMAN' AND deptno = 30);
The following statement selects from subqueries in the FROM clause and gives departments' total employees and salaries as a decimal value of all the departments:
SELECT a.deptno "Department", a.num_emp/b.total_count "%Employees", a.sal_sum/b.total_sal "%Salary" FROM (SELECT deptno, COUNT(*) num_emp, SUM(SAL) sal_sum FROM scott.emp GROUP BY deptno) a, (SELECT COUNT(*) total_count, SUM(sal) total_sal FROM scott.emp) b ;
If a table contains hierarchical data, you can select rows in a hierarchical order using the following clauses:
Oracle uses the information from the above clause to form the hierarchy using the following steps:
SELECT statements performing hierarchical queries are subject to the following restrictions:
The following sections discuss the START WITH and CONNECT BY clauses.
The START WITH clause identifies the row(s) to be used as the root(s) of a hierarchical query. This clause specifies a condition that the roots must satisfy. If you omit this clause, Oracle uses all rows in the table as root rows. A START WITH condition can contain a subquery.
The CONNECT BY clause specifies the relationship between parent and child rows in a hierarchical query. This clause contains a condition that defines this relationship. This condition can be any condition as described in "Conditions"; however, some part of the condition must use the PRIOR operator to refer to the parent row. The part of the condition containing the PRIOR operator must have one of the following forms:
PRIOR expr comparison_operator expr expr comparison_operator PRIOR expr
To find the children of a parent row, Oracle evaluates the PRIOR expression for the parent row and the other expression for each row in the table. Rows for which the condition is true are the children of the parent. The CONNECT BY clause can contain other conditions to further filter the rows selected by the query. The CONNECT BY clause cannot contain a subquery.
If the CONNECT BY clause results in a loop in the hierarchy, Oracle returns an error. A loop occurs if one row is both the parent (or grandparent or direct ancestor) and a child (or a grandchild or a direct descendent) of another row.
The following CONNECT BY clause defines a hierarchical relationship in which the EMPNO value of the parent row is equal to the MGR value of the child row:
CONNECT BY PRIOR empno = mgr;
In the following CONNECT BY clause, the PRIOR operator applies only to the EMPNO value. To evaluate this condition, Oracle evaluates EMPNO values for the parent row and MGR, SAL, and COMM values for the child row:
CONNECT BY PRIOR empno = mgr AND sal > comm;
To qualify as a child row, a row must have a MGR value equal to the EMPNO value of the parent row and it must have a SAL value greater than its COMM value.
SELECT statements that perform hierarchical queries can use the LEVEL pseudocolumn. LEVEL returns the value 1 for a root node, 2 for a child node of a root node, 3 for a grandchild, etc. For more information on LEVEL, see the section "Pseudocolumns".
The number of levels returned by a hierarchical query may be limited by available user memory.
The following statement returns all employees in hierarchical order. The root row is defined to be the employee whose job is 'PRESIDENT'. The child rows of a parent row are defined to be those who have the employee number of the parent row as their manager number.
SELECT LPAD(' ',2*(LEVEL-1)) || ename org_chart, empno, mgr, job FROM emp START WITH job = 'PRESIDENT' CONNECT BY PRIOR empno = mgr; ORG_CHART EMPNO MGR JOB ------------ ---------- ---------- --------- KING 7839 PRESIDENT JONES 7566 7839 MANAGER SCOTT 7788 7566 ANALYST ADAMS 7876 7788 CLERK FORD 7902 7566 ANALYST SMITH 7369 7902 CLERK BLAKE 7698 7839 MANAGER ALLEN 7499 7698 SALESMAN WARD 7521 7698 SALESMAN MARTIN 7654 7698 SALESMAN TURNER 7844 7698 SALESMAN JAMES 7900 7698 CLERK CLARK 7782 7839 MANAGER MILLER 7934 7782 CLERK
The following statement is similar to the previous one, except that it does not select employees with the job 'ANALYST'.
SELECT LPAD(' ', 2*(LEVEL-1)) || ename org_chart, empno, mgr, job FROM emp WHERE job != 'ANALYST' START WITH job = 'PRESIDENT' CONNECT BY PRIOR empno = mgr; ORG_CHART EMPNO MGR JOB -------------------- ---------- ---------- --------- KING 7839 PRESIDENT JONES 7566 7839 MANAGER ADAMS 7876 7788 CLERK SMITH 7369 7902 CLERK BLAKE 7698 7839 MANAGER ALLEN 7499 7698 SALESMAN WARD 7521 7698 SALESMAN MARTIN 7654 7698 SALESMAN TURNER 7844 7698 SALESMAN JAMES 7900 7698 CLERK CLARK 7782 7839 MANAGER MILLER 7934 7782 CLERK
Oracle does not return the analysts SCOTT and FORD, although it does return employees who are managed by SCOTT and FORD.
The following statement is similar to the first one, except that it uses the LEVEL pseudocolumn to select only the first two levels of the management hierarchy:
SELECT LPAD(' ',2*(LEVEL-1)) || ename org_chart, empno, mgr, job FROM emp START WITH job = 'PRESIDENT' CONNECT BY PRIOR empno = mgr AND LEVEL <= 2; ORG_CHART EMPNO MGR JOB ------------ ---------- ---------- --------- KING 7839 PRESIDENT JONES 7566 7839 MANAGER BLAKE 7698 7839 MANAGER CLARK 7782 7839 MANAGER
Use the GROUP BY clause to group selected rows and return a single row of summary information. Oracle collects each group of rows based on the values of the expression(s) specified in the GROUP BY clause.
If a SELECT statement contains the GROUP BY clause, the select list can contain only the following types of expressions:
Expressions in the GROUP BY clause can contain any columns in the tables, views, and snapshots in the FROM clause, regardless of whether the columns appear in the select list.
The GROUP BY clause can contain no more than 255 expressions. The total number of bytes in all expressions in the GROUP BY clause is limited to the size of a data block minus some overhead. This size is specified by the initialization parameter DB_BLOCK_SIZE.
To return the minimum and maximum salaries for each department in the employee table, issue the following statement:
SELECT deptno, MIN(sal), MAX (sal) FROM emp GROUP BY deptno; DEPTNO MIN(SAL) MAX(SAL) ---------- ---------- ---------- 10 1300 5000 20 800 3000 30 950 2850
To return the minimum and maximum salaries for the clerks in each department, issue the following statement:
SELECT deptno, MIN(sal), MAX (sal) FROM emp WHERE job = 'CLERK' GROUP BY deptno; DEPTNO MIN(SAL) MAX(SAL) ---------- ---------- ---------- 10 1300 1300 20 800 1100 30 950 950
Use the HAVING clause to restrict which groups of rows defined by the GROUP BY clause are returned by the query. Oracle processes the WHERE, GROUP BY, and HAVING clauses in the following manner:
Specify the GROUP BY and HAVING clauses after the WHERE and CONNECT BY clauses. If both the GROUP BY and HAVING clauses are specified, they can appear in either order.
To return the minimum and maximum salaries for the clerks in each department whose lowest salary is below $1,000, issue the following statement:
SELECT deptno, MIN(sal), MAX (sal) FROM emp WHERE job = 'CLERK' GROUP BY deptno HAVING MIN(sal) < 1000; DEPTNO MIN(SAL) MAX(SAL) ---------- ---------- ---------- 20 800 1100 30 950 950
The UNION, UNION ALL, INTERSECT, and MINUS operators combine the results of two queries into a single result. The number and datatypes of the columns selected by each component query must be the same, but the column lengths can be different. For information, see "Set Operators".
If more than two queries are combined with set operators, adjacent pairs of queries are evaluated from left to right. You can use parentheses to specify a different order of evaluation.
The total number of bytes in all select list expressions of a component query is limited to the size of a data block minus some overhead. The size of a data block is specified by the initialization parameter DB_BLOCK_SIZE.
 You cannot use these set operators to combine the results of queries that use the THE or MULTISET keywords.
Use the ORDER BY clause to order the rows selected by a query. Without an ORDER BY clause, it is not guaranteed that the same query executed more than once will retrieve rows in the same order. The clause specifies either expressions or positions or aliases of expressions in the select list of the statement. Oracle returns rows based on their values for these expressions.
You can specify multiple expressions in the ORDER BY clause. Oracle first sorts rows based on their values for the first expression. Rows with the same value for the first expression are then sorted based on their values for the second expression, and so on. Oracle sorts nulls following all others in ascending order and preceding all others in descending order.
Sorting by position is useful in the following cases:
The mechanism by which Oracle sorts values for the ORDER BY clause is specified either explicitly by the NLS_SORT initialization parameter or implicitly by the NLS_LANGUAGE initialization parameter. For information on these parameters, see Oracle8 Reference. You can also change the sort mechanism dynamically from one linguistic sort sequence to another using the ALTER SESSION command. You can also specify a specific sort sequence for a single query by using the NLSSORT function with the NLS_SORT parameter in the ORDER BY clause.
The ORDER BY clause is subject to the following restrictions:
If you use the ORDER BY and GROUP BY clauses together, the expressions that can appear in the ORDER BY clause are subject to the same restrictions as the expressions in the select list, described in the "GROUP BY Clause".
If you use the ORDER BY clause in a hierarchical query, Oracle uses the ORDER BY clause rather than the hierarchy to order the rows.
To select all salesmen's records from EMP, and order the results by commission in descending order, issue the following statement:
SELECT * FROM emp WHERE job = 'SALESMAN' ORDER BY comm DESC;
To select the employees from EMP ordered first by ascending department number and then by descending salary, issue the following statement:
SELECT ename, deptno, sal FROM emp ORDER BY deptno ASC, sal DESC;
To select the same information as the previous SELECT and use the positional ORDER BY notation, issue the following statement:
SELECT ename, deptno, sal FROM emp ORDER BY 2 ASC, 3 DESC;
The FOR UPDATE clause locks the rows selected by the query. Once you have selected a row for update, other users cannot lock or update it until you end your transaction. The FOR UPDATE clause signals that you intend to insert, update, or delete the rows returned by the query, but does not require that you perform one of these operations. A SELECT statement with a FOR UPDATE clause is often followed by one or more UPDATE statements with WHERE clauses.
The FOR UPDATE clause cannot be used with the following other constructs:
The tables locked by the FOR UPDATE clause must all be located on the same database. These locked tables must also be on the same database as any LONG columns and sequences referenced in the same statement.
If a row selected for update is currently locked by another user, Oracle waits until the row is available, locks it, and then returns control to you. You can use the NOWAIT option to cause Oracle to terminate the statement without waiting if such a row is already locked.
 The rows returned from subqueries whose column value is a nested table or a VARRAY, not a scalar value, are not locked. Only the top-level rows of such select lists are locked.
Prior to updating a LOB value, you must lock the row containing the LOB. One way to lock the row is with a SELECT... FOR UPDATE statement.
INSERT INTO t_table VALUES (1, 'abcd'); COMMIT; DECLARE num_var NUMBER; clob_var CLOB; clob_locked CLOB; write_amount NUMBER; write_offset NUMBER; buffer VARCHAR2(20) := 'efg'; BEGIN SELECT clob_col INTO clob_locked FROM t_table WHERE num_col = 1 FOR UPDATE; write_amount := 3; dbms_lob.write(clob_locked, write_amount, write_offset, buffer); END;
The columns in the OF clause only specify which tables' rows are locked. The specific columns of the table that you specify are not significant. If you omit the OF clause, Oracle locks the selected rows from all the tables in the query.
The following statement locks rows in the EMP table with clerks located in New York and locks rows in the DEPT table with departments in New York that have clerks:
SELECT empno, sal, comm FROM emp, dept WHERE job = 'CLERK' AND emp.deptno = dept.deptno AND loc = 'NEW YORK' FOR UPDATE;
The following statement locks only those rows in the EMP table with clerks located in New York; no rows are locked in the DEPT table:
SELECT empno, sal, comm FROM emp, dept WHERE job = 'CLERK' AND emp.deptno = dept.deptno AND loc = 'NEW YORK' FOR UPDATE OF emp.sal;
A join is a query that combines rows from two or more tables, views, or snapshots. Oracle performs a join whenever multiple tables appear in the query's FROM clause. The query's select list can select any columns from any of these tables. If any two of these tables have a column name in common, you must qualify all references to these columns throughout the query with table names to avoid ambiguity.
Most join queries contain WHERE clause conditions that compare two columns, each from a different table. Such a condition is called a join condition. To execute a join, Oracle combines pairs of rows, each containing one row from each table, for which the join condition evaluates to TRUE. The columns in the join conditions need not also appear in the select list.
To execute a join of three or more tables, Oracle first joins two of the tables based on the join conditions comparing their columns and then joins the result to another table based on join conditions containing columns of the joined tables and the new table. Oracle continues this process until all tables are joined into the result. The optimizer determines the order in which Oracle joins tables based on the join conditions, indexes on the tables, and, in the case of the cost-based optimization approach, statistics for the tables.
In addition to join conditions, the WHERE clause of a join query can also contain other conditions that refer to columns of only one table. These conditions can further restrict the rows returned by the join query.
An equijoin is a join with a join condition containing an equality operator. An equijoin combines rows that have equivalent values for the specified columns. Depending on the internal algorithm the optimizer chooses to execute the join, the total size of the columns in the equijoin condition in a single table may be limited to the size of a data block minus some overhead. The size of a data block is specified by the initialization parameter DB_BLOCK_SIZE.
This equijoin returns the name and job of each employee and the number and name of the department in which the employee works:
SELECT ename, job, dept.deptno, dname FROM emp, dept WHERE emp.deptno = dept.deptno; ENAME JOB DEPTNO DNAME ---------- --------- ---------- -------------- CLARK MANAGER 10 ACCOUNTING KING PRESIDENT 10 ACCOUNTING MILLER CLERK 10 ACCOUNTING SMITH CLERK 20 RESEARCH ADAMS CLERK 20 RESEARCH FORD ANALYST 20 RESEARCH SCOTT ANALYST 20 RESEARCH JONES MANAGER 20 RESEARCH ALLEN SALESMAN 30 SALES BLAKE MANAGER 30 SALES MARTIN SALESMAN 30 SALES JAMES CLERK 30 SALES TURNER SALESMAN 30 SALES WARD SALESMAN 30 SALES
You must use a join to return this data because employee names and jobs are stored in a different table than department names. Oracle combines rows of the two tables according to this join condition:
emp.deptno = dept.deptno
The following equijoin returns the name, job, department number, and department name of all clerks:
SELECT ename, job, dept.deptno, dname FROM emp, dept WHERE emp.deptno = dept.deptno AND job = 'CLERK'; ENAME JOB DEPTNO DNAME ---------- --------- ---------- -------------- MILLER CLERK 10 ACCOUNTING SMITH CLERK 20 RESEARCH ADAMS CLERK 20 RESEARCH JAMES CLERK 30 SALES
This query is identical to Example XII except that it uses an additional WHERE clause condition to return only rows with a JOB value of 'CLERK':
job = 'CLERK'
A self join is a join of a table to itself. This table appears twice in the FROM clause and is followed by table aliases that qualify column names in the join condition. To perform a self join, Oracle combines and returns rows of the table that satisfy the join condition.
This query uses a self join to return the name of each employee along with the name of the employee's manager:
SELECT e1.ename||' works for '||e2.ename "Employees and their Managers" FROM emp e1, emp e2 WHERE e1.mgr = e2.empno; Employees and their Managers ------------------------------- BLAKE works for KING CLARK works for KING JONES works for KING FORD works for JONES SMITH works for FORD ALLEN works for BLAKE WARD works for BLAKE MARTIN works for BLAKE SCOTT works for JONES TURNER works for BLAKE ADAMS works for SCOTT JAMES works for BLAKE MILLER works for CLARK
The join condition for this query uses the aliases E1 and E2 for the EMP table:
e1.mgr = e2.empno
If two tables in a join query have no join condition, Oracle returns their Cartesian product. Oracle combines each row of one table with each row of the other. A Cartesian product always generates many rows and is rarely useful. For example, the Cartesian product of two tables, each with 100 rows, has 10,000 rows. Always include a join condition unless you specifically need a Cartesian product. If a query joins three or more tables and you do not specify a join condition for a specific pair, the optimizer may choose a join order that avoids producing an intermediate Cartesian product.
The outer join extends the result of a simple join. An outer join returns all rows that satisfy the join condition and those rows from one table for which no rows from the other satisfy the join condition. Such rows are not returned by a simple join. To write a query that performs an outer join of tables A and B and returns all rows from A, apply the outer join operator (+) to all columns of B in the join condition. For all rows in A that have no matching rows in B, Oracle returns NULL for any select list expressions containing columns of B.
This is the basic syntax of an outer join of two tables:
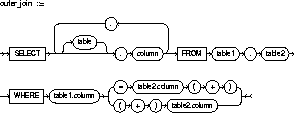
Outer join queries are subject to the following rules and restrictions:
If the WHERE clause contains a condition that compares a column from table B with a constant, the (+) operator must be applied to the column so that Oracle returns the rows from table A for which it has generated NULLs for this column.
In a query that performs outer joins of more than two pairs of tables, a single table can be the NULL-generated table for only one other table. For this reason, you cannot apply the (+) operator to columns of B in the join condition for A and B and the join condition for B and C.
This query uses an outer join to extend the results of Example XIV:
SELECT ename, job, dept.deptno, dname FROM emp, dept WHERE emp.deptno (+) = dept.deptno; ENAME JOB DEPTN DNAME ---------- --------- ---------- -------------- CLARK MANAGER 10 ACCOUNTING KING PRESIDENT 10 ACCOUNTING MILLER CLERK 10 ACCOUNTING SMITH CLERK 20 RESEARCH ADAMS CLERK 20 RESEARCH FORD ANALYST 20 RESEARCH SCOTT ANALYST 20 RESEARCH JONES MANAGER 20 RESEARCH ALLEN SALESMAN 30 SALES BLAKE MANAGER 30 SALES MARTIN SALESMAN 30 SALES JAMES CLERK 30 SALES TURNER SALESMAN 30 SALES WARD SALESMAN 30 SALES 40 OPERATIONS
In this outer join, Oracle returns a row containing the OPERATIONS department even though no employees work in this department. Oracle returns NULL in the ENAME and JOB columns for this row. The join query in Example X selects only departments that have employees.
The following query uses an outer join to extend the results of Example XV:
SELECT ename, job, dept.deptno, dname FROM emp, dept WHERE emp.deptno (+) = dept.deptno AND job (+) = 'CLERK'; ENAME JOB DEPTNO DNAME ---------- --------- ---------- -------------- MILLER CLERK 10 ACCOUNTING SMITH CLERK 20 RESEARCH ADAMS CLERK 20 RESEARCH JAMES CLERK 30 SALES 40 OPERATIONS
In this outer join, Oracle returns a row containing the OPERATIONS department even though no clerks work in this department. The (+) operator on the JOB column ensures that rows for which the JOB column is NULL are also returned. If this (+) were omitted, the row containing the OPERATIONS department would not be returned because its JOB value is not 'CLERK'.
This example shows four outer join queries on the CUSTOMERS, ORDERS, LINEITEMS, and PARTS tables. These tables are shown here:
SELECT custno, custname FROM customers; CUSTNO CUSTNAME ---------- -------------------- 1 Angelic Co. 2 Believable Co. 3 Cabels R Us SELECT orderno, custno, TO_CHAR(orderdate, 'MON-DD-YYYY') "ORDERDATE" FROM orders; ORDERNO CUSTNO ORDERDATE ---------- ---------- ----------- 9001 1 OCT-13-1993 9002 2 OCT-13-1993 9003 1 OCT-20-1993 9004 1 OCT-27-1993 9005 2 OCT-31-1993 SELECT orderno, lineno, partno, quantity FROM lineitems; ORDERNO LINENO PARTNO QUANTITY ---------- ---------- ---------- ---------- 9001 1 101 15 9001 2 102 10 9002 1 101 25 9002 2 103 50 9003 1 101 15 9004 1 102 10 9004 2 103 20 SELECT partno, partname FROM parts; PARTNO PARTNAME ------ -------- 101 X-Ray Screen 102 Yellow Bag 103 Zoot Suit
Note that the customer Cables R Us has placed no orders and that order number 9005 has no line items.
The following outer join returns all customers and the dates they placed orders. The (+) operator ensures that customers who placed no orders are also returned:
SELECT custname, TO_CHAR(orderdate, 'MON-DD-YYYY') "ORDERDATE" FROM customers, orders WHERE customers.custno = orders.custno (+); CUSTNAME ORDERDATE -------------------- -------------- Angelic Co. OCT-13-1993 Angelic Co. OCT-20-1993 Angelic Co. OCT-27-1993 Believable Co. OCT-13-1993 Believable Co. OCT-31-1993 Cables R Us
The following outer join builds on the result of the previous one by adding the LINEITEMS table to the FROM clause, columns from this table to the select list, and a join condition joining this table to the ORDERS table to the WHERE clause. This query joins the results of the previous query to the LINEITEMS table and returns all customers, the dates they placed orders, and the part number and quantity of each part they ordered. The first (+) operator serves the same purpose as in the previous query. The second (+) operator ensures that orders with no line items are also returned:
SELECT custname, TO_CHAR(orderdate, 'MON-DD-YYYY') "ORDERDATE", partno, quantity FROM customers, orders, lineitems WHERE customers.custno = orders.custno (+) AND orders.orderno = lineitems.orderno (+); CUSTNAME ORDERDATE PARTNO QUANTITY -------------------- -------------- ---------- ---------- Angelic Co. OCT-13-1993 101 15 Angelic Co. OCT-13-1993 102 10 Angelic Co. OCT-20-1993 101 15 Angelic Co. OCT-27-1993 102 10 Angelic Co. OCT-27-1993 103 20 Believable Co. OCT-13-1993 101 25 Believable Co. OCT-13-1993 103 50 Believable Co. OCT-31-1993 Cables R Us
The following outer join builds on the result of the previous one by adding the PARTS table to the FROM clause, the PARTNAME column from this table to the select list, and a join condition joining this table to the LINEITEMS table to the WHERE clause. This query joins the results of the previous query to the PARTS table to return all customers, the dates they placed orders, and the quantity and name of each part they ordered. The first two (+) operators serve the same purposes as in the previous query. The third (+) operator ensures that rows with NULL part numbers are also returned:
SELECT custname, TO_CHAR(orderdate, 'MON-DD-YYYY') "ORDERDATE", quantity, partname FROM customers, orders, lineitems, parts WHERE customers.custno = orders.custno (+) AND orders.orderno = lineitems.orderno (+) AND lineitems.partno = parts.partno (+); CUSTNAME ORDERDATE QUANTITY PARTNAME -------------------- -------------- ---------- ------------ Angelic Co. OCT-13-1993 15 X-Ray Screen Angelic Co. OCT-13-1993 10 Yellow Bag Angelic Co. OCT-20-1993 15 X-Ray Screen Angelic Co. OCT-27-1993 10 Yellow Bag Angelic Co. OCT-27-1993 20 Zoot Suit Believable Co. OCT-13-1993 25 X-Ray Screen Believable Co. OCT-13-1993 50 Zoot Suit Believable Co. OCT-31-1993 Cables R Us
To specify, for a particular transaction, whether a deferrable constraint is checked following each DML statement (IMMEDIATE) or when the transaction is committed (DEFERRED). For illustrations, see "Examples".
Setting when a deferrable constraint is checked requires that the table to which the constraint applies must be in your own schema or you must have SELECT privilege on the table.

The following example sets all deferrable constraints in this transaction to be checked immediately following each DML statement:
SET CONSTRAINTS ALL IMMEDIATE;
The following statement checks three deferred constraints when the transaction is committed:
SET CONSTRAINTS unq_name, scott.nn_sal, adams.pk_dept@dblink DEFERRED;
To enable and disable roles for your current session. For illustrations, see "Examples".
You must already have been granted the roles that you name in the SET ROLE statement. See also "Privilege Domains".
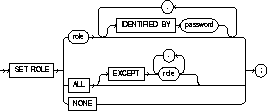
At logon, Oracle establishes your default privilege domain by enabling your default roles. Your default privilege domain contains all privileges granted explicitly to you and all privileges in the privilege domains of your default roles. You can then perform any operations authorized by the privileges in your default privilege domain.
During your session, you can change your privilege domain with the SET ROLE command, which changes the roles currently enabled for your session. You can change your enabled roles any number of times during a session. The number of roles that can be concurrently enabled is limited by the initialization parameter MAX_ENABLED_ROLES.
You can use the SET ROLE command to enable or disable any of the following roles:
You cannot use the SET ROLE command to enable roles that you have not been granted either directly or through other roles.
Your current privilege domain is also changed in the following cases:
If none of the above conditions occur and you do not issue the SET ROLE command, your default privilege domain remains in effect for the duration of your session. In the last two cases, the change in your privilege domain does not take effect until you log on to Oracle again or issue a SET ROLE statement.
You can determine which roles are in your current privilege domain at any time by examining the SESSION_ROLES data dictionary view.
To change your default roles, use the ALTER USER command.
To enable the role GARDENER identified by the password MARIGOLDS for your current session, issue the following statement:
SET ROLE gardener IDENTIFIED BY marigolds;
To enable all roles granted to you for the current session, issue the following statement:
SET ROLE ALL;
To enable all roles granted to you except BANKER, issue the following statement:
SET ROLE ALL EXCEPT banker IV;
To disable all roles granted to you for the current session, issue the following statement:
SET ROLE NONE;
For the current transaction, to:
The operations performed by a SET TRANSACTION statement affect only your current transaction, not other users or other transactions. Your transaction ends whenever you issue a COMMIT or ROLLBACK statement. Note also that Oracle implicitly commits the current transaction before and after executing a data definition language statement.
If you use a SET TRANSACTION statement, it must be the first statement in your transaction. However, a transaction need not have a SET TRANSACTION statement.
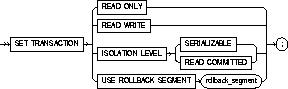
|
READ ONLY |
establishes the current transaction as a read-only transaction. See also "Establishing Read-Only Transactions". |
|
|
READ WRITE |
establishes the current transaction as a read-write transaction. |
|
|
ISOLATION LEVEL |
specifies how transactions containing database modifications are handled. |
|
|
|
SERIALIZABLE |
specifies serializable transaction isolation mode as defined in SQL92. If a serializable transaction contains data manipulation language (DML) that attempts to update any resource that may have been updated in a transaction uncommitted at the start of the serializable transaction, then the DML statement fails. |
|
|
|
Note: The COMPATIBLE initialization parameter must be set to 7.3.0 or higher for SERIALIZABLE mode to work. |
|
|
READ COMMITTED |
is the default Oracle transaction behavior. If the transaction contains DML that requires row locks held by another transaction, then the DML statement waits until the row locks are released. |
|
USE ROLLBACK SEGMENT |
assigns the current transaction to the specified rollback segment. This option also implicitly establishes the transaction as a read-write transaction. |
|
|
|
You cannot use the READ ONLY option and the USE ROLLBACK SEGMENT clause in a single SET TRANSACTION statement or in different statements in the same transaction. Read-only transactions do not generate rollback information and therefore are not assigned rollback segments. See also "Assigning Transactions to Rollback Segments". |
|
The default state for all transactions is statement-level read consistency. You can explicitly specify this state by issuing a SET TRANSACTION statement with the READ WRITE option.
You can establish transaction-level read consistency by issuing a SET TRANSACTION statement with the READ ONLY option. After a transaction has been established as read-only, all subsequent queries in that transaction only see changes committed before the transaction began. Read-only transactions are very useful for reports that run multiple queries against one or more tables while other users update these same tables.
Only the following statements are permitted in a read-only transaction:
INSERT, UPDATE, and DELETE statements and SELECT statements with the FOR UPDATE clause are not permitted. Any DDL statement implicitly ends the read-only transaction.
The read consistency that read-only transactions provide is implemented in the same way as statement-level read consistency. Every statement by default uses a consistent view of the data as of the time the statement is issued. Read-only transactions present a consistent view of the data as of the time that the SET TRANSACTION READ ONLY statement is issued. Read-only transactions provide read consistency is for all nodes accessed by distributed queries and local queries.
You cannot toggle between transaction-level read consistency and statement-level read consistency in the same transaction. A SET TRANSACTION statement can only be issued as the first statement of a transaction.
The following statements could be run at midnight of the last day of every month to count how many ships and containers the company owns. This report would not be affected by any other user who might be adding or removing ships and/or containers.
COMMIT SET TRANSACTION READ ONLY SELECT COUNT(*) FROM ship SELECT COUNT(*) FROM container COMMIT;
The last COMMIT statement does not actually make permanent any changes to the database. It simply ends the read-only transaction.
If you issue a DML statement in a transaction, Oracle assigns the transaction to a rollback segment. The rollback segment holds the information necessary to undo the changes made by the transaction. You can issue a SET TRANSACTION statement with the USE ROLLBACK SEGMENT clause to choose a specific rollback segment for your transaction. If you do not choose a rollback segment, Oracle chooses one randomly and assigns your transaction to it.
SET TRANSACTION lets you to assign transactions of different types to rollback segments of different sizes:
The following statement assigns your current transaction to the rollback segment OLTP_5:
SET TRANSACTION USE ROLLBACK SEGMENT oltp_5;
To specify storage characteristics for tables, indexes, clusters, and rollback segments, and the default storage characteristics for tablespaces. See also "Specifying Storage Parameters".
The STORAGE clause can appear in commands that create or alter any of the following schema objects:
To change the value of a STORAGE parameter, you must have the privileges necessary to use the appropriate create or alter command.
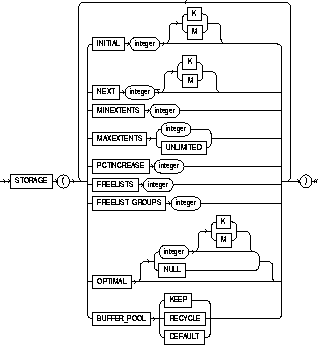
|
INITIAL |
specifies the size in bytes of the object's first extent. Oracle allocates space for this extent when you create the schema object. You can use K or M to specify this size in kilobytes or megabytes. The default value is the size of 5 data blocks. The minimum value is the size of 2 data blocks. The maximum value depends on your operating system. Oracle rounds values up to the next multiple of the data block size for values less than 5 data blocks, and rounds up to the next multiple of 5 data blocks for values greater than 5 data blocks. |
|
|
NEXT |
specifies the size in bytes of the next extent to be allocated to the object. You can use K or M to specify the size in kilobytes or megabytes. The default value is the size of 5 data blocks. The minimum value is the size of 1 data block. The maximum value depends on your operating system. Oracle rounds values up to the next multiple of the data block size for values less than 5 data blocks. For values greater than 5 data blocks, Oracle rounds up to a value that minimizes fragmentation, as described in Oracle8 Concepts. |
|
|
PCTINCREASE |
specifies the percent by which the third and subsequent extents grow over the preceding extent. The default value is 50, meaning that each subsequent extent is 50% larger than the preceding extent. The minimum value is 0, meaning all extents after the first are the same size. The maximum value depends on your operating system. |
|
|
|
You cannot specify PCTINCREASE for rollback segments. Rollback segments always have a PCTINCREASE value of 0. |
|
|
|
Oracle rounds the calculated size of each new extent up to the next multiple of the data block size. |
|
|
MINEXTENTS |
specifies the total number of extents to allocate when the object is created. This parameter enables you to allocate a large amount of space when you create an object, even if the space available is not contiguous. The default and minimum value is 1, meaning that Oracle only allocates the initial extent, except for rollback segments for which the default and minimum value is 2. The maximum value depends on your operating system. |
|
|
|
If the MINEXTENTS value is greater than 1, then Oracle calculates the size of subsequent extents based on the values of the INITIAL, NEXT, and PCTINCREASE parameters. |
|
|
MAXEXTENTS |
specifies the total number of extents, including the first, that Oracle can allocate for the object. The minimum value is 1 (except for rollback segments, which always have a minimum value of 2). The default and maximum values depend your data block size. |
|
|
|
UNLIMITED |
specifies that extents should be allocated automatically as needed. Do not use this option for rollback segments. |
|
|
||
|
FREELIST GROUPS |
for schema objects other than tablespace, specifies the number of groups of free lists for a table, partition, cluster, or index. The default and minimum value for this parameter is 1. Only use this parameter if you are using Oracle with the Parallel Server option in parallel mode. |
|
|
FREELISTS |
for objects other than tablespace, specifies the number of groups of free lists for each of the free list groups for the table, partition, cluster, or index. The default and minimum value for this parameter is 1, meaning that each free list group contains one free list. The maximum value of this parameter depends on the data block size. If you specify a FREELISTS value that is too large, Oracle returns an error message indicating the maximum value. |
|
|
|
You can specify the FREELISTS and the FREELIST GROUPS parameters only in CREATE TABLE, CREATE CLUSTER, and CREATE INDEX statements. |
|
|
OPTIMAL |
is relevant only to rollback segments. It specifies an optimal size in bytes for a rollback segment. You can use K or M to specify this size in kilobytes or megabytes. Oracle tries to maintain this size for the rollback segment by dynamically deallocating extents when their data is no longer needed for active transactions. Oracle deallocates as many extents as possible without reducing the total size of the rollback segment below the OPTIMAL value. |
|
|
|
NULL |
specifies no optimal size for the rollback segment, meaning that Oracle never deallocates the rollback segment's extents. This is the default behavior. |
|
|
The value of this parameter cannot be less than the space initially allocated for the rollback segment specified by the MINEXTENTS, INITIAL, NEXT, and PCTINCREASE parameters. The maximum value depends on your operating system. Oracle rounds values up to the next multiple of the data block size. |
|
|
BUFFER_POOL |
defines a default buffer pool (cache) for a schema object. All blocks for the object are stored in the specified cache. If a buffer pool is defined for a partitioned table or index, then the partitions inherit the buffer pool from the table or index definition, unless overridden by a partition-level definition. Note: BUFFER_POOL is not a valid option for creating or altering tablespaces or rollback segments. For more information about using multiple buffer pools, see Oracle8 Tuning. |
|
|
|
KEEP |
retains the schema object in memory to avoid I/O operations. |
|
|
RECYCLE |
eliminates blocks from memory as soon as they are no longer needed, thus preventing an object from taking up unnecessary cache space. |
|
|
DEFAULT |
always exists for objects not assigned to KEEP or RECYCLE. |
The storage parameters affect both how long it takes to access data stored in the database and how efficiently space in the database is used. For a discussion of the effects of these parameters, see Oracle8 Tuning.
When you create a tablespace, you can specify values for the storage parameters. These values serve as default values for segments allocated in the tablespace.
When you create a cluster, index, rollback segment, snapshot, snapshot log, or table, you can specify values for the storage parameters for the segments allocated to these objects. If you omit any storage parameter, Oracle uses the value of that parameter specified for the tablespace. However, when creating a rollback segment, you cannot specify PCTINCREASE (which is always 0) or MINEXTENTS (which is always 2).
When you alter a cluster, index, rollback segment, snapshot, snapshot log, or table, you can change the values of storage parameters. The new values only affect future extent allocations. For this reason, you cannot change the values of the INITIAL and MINEXTENTS parameter. If you change the value of the NEXT parameter, the next allocated extent will have the specified size, regardless of the size of the most recently allocated extent and the value of the PCTINCREASE parameter. If you change the value of the PCTINCREASE parameter, Oracle calculates the size of the next extent using this new value and the size of the most recently allocated extent.
When you alter a tablespace, you can change the values of storage parameters. The new values serve as default values only to subsequently allocated segments (or subsequently created objects).
It is not good practice to create or alter a rollback segment to use MAXEXTENTS UNLIMITED. Rogue transactions containing inserts, updates, or deletes, that continue for a long time will continue to create new extents until a disk is full.
A rollback segment that you create without specifying the STORAGE option has the same storage parameters as the tablespace that the rollback segment is created in. Thus, if the tablespace is created with MAXEXTENT UNLIMITED, then the rollback segment would also have the same default.
The following statement creates a table and provides storage parameter values:
CREATE TABLE dept (deptno NUMBER(2), dname VARCHAR2(14), loc VARCHAR2(13) ) STORAGE ( INITIAL 100K NEXT 50K MINEXTENTS 1 MAXEXTENTS 50 PCTINCREASE 5 );
Oracle allocates space for the table based on the STORAGE parameter values as follows:
If the table data continues to grow, Oracle allocates more extents, each 5% larger than the previous one.
The following statement creates a rollback segment and provides storage parameter values:
CREATE ROLLBACK SEGMENT rsone STORAGE ( INITIAL 10K NEXT 10K MINEXTENTS 2 MAXEXTENTS 25 OPTIMAL 50K );
Oracle allocates space for the rollback segment based on the STORAGE parameter values as follows:
A subquery is a form of the SELECT command that appears inside another SQL statement. A subquery is sometimes called a nested query. The statement containing a subquery is called the parent statement. The rows returned by the subquery are used by the parent statement. See also "Using Subqueries".
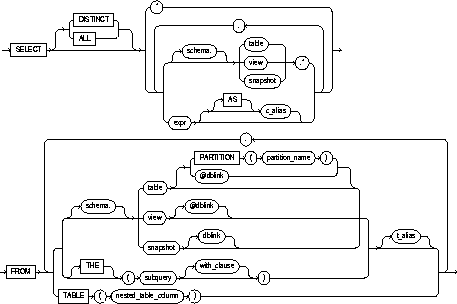

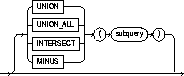
 WITH_clause::=
|
WITH READ ONLY |
specifies that the subquery cannot be updated. |
|
WITH CHECK OPTION |
specifies that, if the subquery is used in place of a table in an INSERT, UPDATE, or DELETE statement, changes to that table that would produce rows excluded from the subquery are prohibited. In other words, the following statement: |
|
|
INSERT INTO (SELECT ename, deptno FROM emp WHERE deptno < 10) VALUES ('Taylor', 20); would be legal, but
would be rejected. |
|
|
informs Oracle that the column value returned by the subquery is a nested table, not a scalar value. A subquery prefixed by THE is called a flattened subquery. "Using Flattened Subqueries". |
|
|
identifies the nested table column correlated to the outer query. |
Other keywords and parameters function as they are described in SELECT. For more information, see "Correlated Subqueries", "Selecting from the DUAL Table", "Using Sequences", and "Distributed Queries".
Use subqueries for the following purposes:
A subquery answers multiple-part questions. For example, to determine who works in Taylor's department, you can first use a subquery to determine the department in which Taylor works. You can then answer the original question with the parent SELECT statement.
A subquery is evaluated once for the entire parent statement, in contrast to a correlated subquery which is evaluated once per row processed by the parent statement.
A subquery can itself contain a subquery. Oracle places no limit on the level of query nesting.
To determine who works in Taylor's department, issue the following statement:
SELECT ename, deptno FROM emp WHERE deptno = (SELECT deptno FROM emp WHERE ename = 'TAYLOR');
To give all employees in the EMP table a 10% raise if they have not already been issued a bonus (if they do not appear in the BONUS table), issue the following statement:
UPDATE emp SET sal = sal * 1.1 WHERE empno NOT IN (SELECT empno FROM bonus);
To create a duplicate of the DEPT table named NEWDEPT, issue the following statement:
CREATE TABLE newdept (deptno, dname, loc) AS SELECT deptno, dname, loc FROM dept;
 To manipulate the individual rows of a nested table stored in a database column, use the keyword THE. You must prefix THE to a subquery that returns a single column value or an expression that yields a nested table. If the subquery returns more than a single column value, a run-time error results. Because the value is a nested table, not a scalar value, Oracle must be informed, which is what THE does.
The following example adds a new row to department 40's nested table stored in column PROJECTS:
INSERT INTO THE(SELECT projects FROM dept WHERE deptno = 40) VALUES(33, 'Install new email system', 14875);
This example increases the budgets for two projects assigned to department 70:
UPDATE THE(SELECT projects FROM dept WHERE deptno = 70) SET budget = budget + 1000 WHERE projno IN (24, 25);
A correlated subquery is a subquery that is evaluated once for each row processed by the parent statement. The parent statement can be a SELECT, UPDATE, or DELETE statement. The following examples show the general syntax of a correlated subquery:
SELECT select_list FROM table1 t_alias1 WHERE expr operator (SELECT column_list FROM table2 t_alias2 WHERE t_alias1.column operator t_alias2.column); UPDATE table1 t_alias1 SET column = (SELECT expr FROM table2 t_alias2 WHERE t_alias1.column = t_alias2.column); DELETE FROM table1 t_alias1 WHERE column operator (SELECT expr FROM table2 t_alias2 WHERE t_alias1.column = t_alias2.column);
This discussion focuses on correlated subqueries in SELECT statements; it also applies to correlated subqueries in UPDATE and DELETE statements.
You can use a correlated subquery to answer a multiple-part question whose answer depends on the value in each row processed by the parent statement. For example, a correlated subquery can be used to determine which employees earn more than the average salaries for their departments. In this case, the correlated subquery specifically computes the average salary for each department.
Oracle performs a correlated subquery when the subquery references a column from a table from the parent statement.
Oracle resolves unqualified columns in the subquery by looking in the tables of the subquery, then in the tables of the parent statement, then in the tables of the next enclosing parent statement, and so on. Oracle resolves all unqualified columns in the subquery to the same table. If the tables in a subquery and parent query contain a column with the same name, a reference to the column of a table from the parent query must be prefixed by the table name or alias. To make your statements easier for you to read, always qualify the columns in a correlated subquery with the table, view, or snapshot name or alias.
In an UPDATE statement, you can use a correlated subquery to update rows in one table based on rows from another table. For example, you could use a correlated subquery to roll up four quarterly sales tables into a yearly sales table.
In a DELETE statement, you can use a correlated query to delete only those rows that also exist in another table.
The following statement returns data about employees whose salaries exceed the averages for their departments. The following statement assigns an alias to EMP, the table containing the salary information, and then uses the alias in a correlated subquery:
SELECT deptno, ename, sal FROM emp x WHERE sal > (SELECT AVG(sal) FROM emp WHERE x.deptno = deptno) ORDER BY deptno;
For each row of the EMP table, the parent query uses the correlated subquery to compute the average salary for members of the same department. The correlated subquery performs these steps for each row of the EMP table:
The subquery is evaluated once for each row of the EMP table.
DUAL is a table automatically created by Oracle along with the data dictionary. DUAL is in the schema of the user SYS, but is accessible by the name DUAL to all users. It has one column, DUMMY, defined to be VARCHAR2(1), and contains one row with a value 'X'. Selecting from the DUAL table is useful for computing a constant expression with the SELECT command. Because DUAL has only one row, the constant is returned only once. Alternatively, you can select a constant, pseudocolumn, or expression from any table.
The following statement returns the current date:
SELECT SYSDATE FROM DUAL;
You could select SYSDATE from the EMP table, but Oracle would return 14 rows of the same SYSDATE, one for every row of the EMP table. Selecting from DUAL is more convenient.
The sequence pseudocolumns NEXTVAL and CURRVAL can also appear in the select list of a SELECT statement. For information on sequences and their use, see CREATE SEQUENCE and "Pseudocolumns".
The following statement increments the ZSEQ sequence and returns the new value:
SELECT zseq.nextval FROM dual;
The following statement selects the current value of ZSEQ:
SELECT zseq.currval FROM dual;
Oracle's distributed database management system architecture allows you to access data in remote databases using Net8 and an Oracle server. You can identify a remote table, view, or snapshot by appending @dblink to the end of its name. The dblink must be a complete or partial name for a database link to the database containing the remote table, view, or snapshot. For more information on referring to database links, see "Referring to Objects in Remote Databases".
Distributed queries are currently subject to the restriction that all tables locked by a FOR UPDATE clause and all tables with LONG columns selected by the query must be located on the same database. For example, the following statement will cause an error:
SELECT emp_ny.* FROM emp_ny@ny, dept WHERE emp_ny.deptno = dept.deptno AND dept.dname = 'ACCOUNTING' FOR UPDATE OF emp_ny.sal;
The following statement fails because it selects LONG_COLUMN, a LONG value, from the EMP_REVIEW table on the NY database and locks the EMP table on the local database:
SELECT emp.empno, review.long_column, emp.sal FROM emp, emp_review@ny review WHERE emp.empno = emp_review.empno FOR UPDATE OF emp.sal;
This example shows a query that joins the DEPT table on the local database with the EMP table on the HOUSTON database:
SELECT ename, dname FROM emp@houston, dept WHERE emp.deptno = dept.deptno;
To remove all rows from a table or cluster and reset the STORAGE parameters to the values when the table or cluster was created. See also "Truncating Tables and Clusters". For illustrations, see "Examples".
The table or cluster must be in your schema or you must have DROP ANY TABLE system privilege. See also "Restrictions".
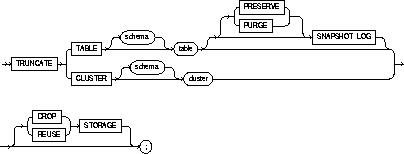
|
schema |
is the schema to contain the trigger. If you omit schema, Oracle creates the trigger in your own schema. |
|
|
TABLE |
specifies the schema and name of the table to be truncated. You can truncate index-organized tables. This table cannot be part of a cluster. |
|
|
|
When you truncate a table, Oracle also automatically deletes all data in the table's indexes. |
|
|
SNAPSHOT LOG |
specifies whether a snapshot log defined on the table is to be preserved or purged when the table is truncated. This clause allows snapshot master tables to be reorganized through export/import without affecting the ability of primary-key snapshots defined on the master to be fast refreshed. To support continued fast refresh of primary-key snapshots the snapshot log must record primary-key information. For more information about snapshot logs and the TRUNCATE command, see Oracle8 Replication. |
|
|
|
PRESERVE |
specifies that any snapshot log should be preserved when the master table is truncated. This is the default. |
|
|
PURGE |
specifies that any snapshot log should be purged when the master table is truncated. |
|
CLUSTER |
specifies the schema and name of the cluster to be truncated. You can only truncate an indexed cluster, not a hash cluster. |
|
|
|
When you truncate a cluster, Oracle also automatically deletes all data in the cluster's tables' indexes. |
|
|
DROP STORAGE |
deallocates the space from the deleted rows from the table or cluster. This space can subsequently be used by other objects in the tablespace. This is the default. |
|
|
REUSE STORAGE |
retains the space from the deleted rows allocated to the table or cluster. Storage values are not reset to the values when the table or cluster was created. This space can subsequently be used only by new data in the table or cluster resulting from inserts or updates. |
|
|
|
The DROP STORAGE and REUSE STORAGE options also apply to the space freed by the data deleted from associated indexes. |
|
You can use the TRUNCATE command to quickly remove all rows from a table or cluster. Removing rows with the TRUNCATE command is faster than removing them with the DELETE command for the following reasons:
The TRUNCATE command allows you to optionally deallocate the space freed by the deleted rows. The DROP STORAGE option deallocates all but the space specified by the table's MINEXTENTS parameter.
Deleting rows with the TRUNCATE command is also more convenient than dropping and re-creating a table because dropping and re-creating:
When you truncate a table, NEXT is automatically reset to the last extent deleted.
You cannot individually truncate a table that is part of a cluster. You must either truncate the cluster, delete all rows from the table, or drop and re-create the table.
You cannot truncate the parent table of an enabled referential integrity constraint. You must disable the constraint before truncating the table. (An exception is that you may truncate the table if the integrity constraint is self-referential.)
You cannot roll back a TRUNCATE statement.
The following statement deletes all rows from the EMP table and returns the freed space to the tablespace containing EMP:
TRUNCATE TABLE emp;
The above statement also deletes all data from all indexes on EMP and returns the freed space to the tablespaces containing them.
The following statement deletes all rows from all tables in the CUST cluster, but leaves the freed space allocated to the tables:
TRUNCATE CLUSTER cust REUSE STORAGE
The above statement also deletes all data from all indexes on the tables in CUST.
The following statements are examples of truncate statements that preserve snapshot logs:
TRUNCATE TABLE emp PRESERVE SNAPSHOT LOG; TRUNCATE TABLE stock;
To change existing values in a table or in a view's base table.
You can use comments in an UPDATE statement to pass instructions, or hints, to the Oracle optimizer. The optimizer uses hints to choose an execution plan for the statement. For more information, see Oracle8 Tuning.
You can place a parallel hint immediately after the UPDATE keyword to parallelize both the underlying scan and UPDATE operations. For detailed information about parallel DML, see Oracle8 Tuning, Oracle8 Parallel Server Concepts and Administration, and Oracle8 Concepts.
For you to update values in a table, the table must be in your own schema or you must have UPDATE privilege on the table.
For you to update values in the base table of a view,
If the SQL92_SECURITY initialization parameter is set to TRUE, then you must have SELECT privilege on the table whose column values you are referencing (such as the columns in a WHERE clause) to perform an UPDATE.
The UPDATE ANY TABLE system privilege also allows you to update values in any table or any view's base table.
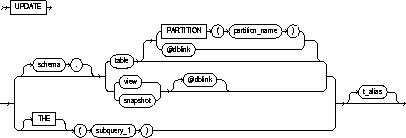
|
schema |
is the schema containing the table or view. If you omit schema, Oracle assumes the table or view is in your own schema. |
|
table / view |
is the name of the table to be updated. Issuing an UPDATE statement against a table fires any UPDATE triggers associated with the table. If you specify view, Oracle updates the view's base table. See also "Updating Views". |
|
PARTITION (partition_name) |
specifies partition-level row updates for table. The partition_name parameter may be the name of the partition within table targeted for update, or a more complicated predicate restricting the update to just one partition. See also "Updating Partitioned Tables". |
|
dblink |
is a complete or partial name of a database link to a remote database where the table or view is located. For information on referring to database links, see "Referring to Objects in Remote Databases". You can use a database link to update a remote table or view only if you are using Oracle's distributed functionality. |
|
|
If you omit dblink, Oracle assumes the table or view is on the local database. |
|
|
informs Oracle that the column value returned by the subquery is a nested table, not a scalar value. A subquery prefixed by THE is called a flattened subquery. See also "Using Flattened Subqueries". |
|
subquery_1 |
is a subquery that Oracle treats in the same manner as a view. See also "Subqueries". |
|
t_alias |
provides a different name for the table, view, or subquery to be referenced elsewhere in the statement. |
|
SET clause |
determines which columns are updated and what new values are stored in them. |
|
column |
is the name of a column of the table or view that is to be updated. If you omit a column of the table from the SET clause, that column's value remains unchanged. |
|
subquery_2 |
is a subquery that returns new values that are assigned to the corresponding columns. See also "Subqueries". |
|
expr |
is the new value assigned to the corresponding column. This expression can contain host variables and optional indicator variables. See the syntax description in "Expressions". |
|
subquery_3 |
is a subquery that returns new values that are assigned to the corresponding columns. See also "Subqueries" and "Correlated Update". |
|
If the SET clause contains a subquery, it must return exactly one row for each row updated. Each value in the subquery result is assigned respectively to the columns in the parenthesized list. If the subquery returns no rows, then the column is assigned a null. Subqueries may select from the table being updated. The SET clause may mix assignments of expressions and subqueries. |
|
|
WHERE |
restricts the rows updated to those for which the specified condition is TRUE. If you omit this clause, Oracle updates all rows in the table or view. See the syntax description of "Conditions". The WHERE clause determines the rows in which values are updated. If the WHERE clause is not specified, all rows are updated. For each row that satisfies the WHERE clause, the columns to the left of the equals (=) operator in the SET clause are set to the values of the corresponding expressions on the right. The expressions are evaluated as the row is updated. |
|
returning_clause |
retrieves the rows affected by the UPDATE statement. You can only retrieve scalar, LOB, ROWID, and REF types. See also "The RETURNING Clause". |
|
expr_list |
is some of the syntax descriptions in "Expressions". You must specify a column expression in the expr_list for each variable in the data_item_list. |
|
INTO |
indicates that the values of the changed rows are to be stored in the data_item variable(s) specified in data_item_list. |
|
data_item |
is a PL/SQL variable or bind variable which stores the retrieved expr value in the expr_list. |
|
You cannot use the returning_clause with parallel DML or with remote objects. |
|
If a view was created with the WITH CHECK OPTION, you can update the view only if the resulting data satisfies the view's defining query.
You cannot update a view if the view's defining query contains one of the following constructs:
When you create a partitioned table, you specify an ordered list of columns that determines into which partition a row or index entry belongs. These columns are the partitioning columns. The values in the partitioning columns of a row are the partitioning key for that row.
CREATE TABLE emp (emp_no NUMBER(5), dept VARCHAR2(2), name VARCHAR2 (30)) STORAGE (INITIAL 100K NEXT 50K) LOGGING PARTITION BY RANGE (emp_no) ( PARTITION acct VALUES LESS THAN (1000) TABLESPACE ts1, PARTITION sales VALUES LESS THAN (2000) TABLESPACE ts2 PARTITION educ VALUES LESS THAN (3000) ); INSERT INTO EMP VALUES (1226, 'sa', 'smith'); INSERT INTO EMP VALUES (2100, 'ed', 'jones');
In the following example, employee SMITH is updated in the EMP table:
UPDATE emp SET emp_no = 1356 WHERE name = 'SMITH';
The following statement is rejected because updating the row would cause JONES to move to another partition:
UPDATE emp SET emp_no = 1500 WHERE name = 'JONES';
Attempting to change the value of one or more columns that are part of the partitioning key would cause the updated row to migrate to another partition, thereby generating an error.
You do not need to specify the partition name when updating values in a partitioned table. However in some cases specifying the partition name can be more efficient than a complicated WHERE clause. To target a single partition of a partitioned table whose values you want to change, specify the PARTITION clause. This syntax can be less cumbersome than using a WHERE clause.
The following example updates values in a single partition of the SALES table:
UPDATE sales PARTITION (feb96) s SET s.account_name = UPPER(s.account_name);
If a subquery refers to columns from the updated table, Oracle evaluates the subquery once for each row, rather than once for the entire update. Such an update is called a correlated update. The reference to columns from the updated table is usually accomplished by means of a table alias.
Potentially, each row evaluated by an UPDATE statement could be updated with a different value as determined by the correlated subquery. Normal UPDATE statements update each row with the same value.
The following statement gives null commissions to all employees with the job TRAINEE:
UPDATE emp SET comm = NULL WHERE job = 'TRAINEE';
The following statement promotes JONES to manager of Department 20 with a $1,000 raise (assuming there is only one JONES):
UPDATE emp SET job = 'MANAGER', sal = sal + 1000, deptno = 20 WHERE ename = 'JONES';
The following statement increases the balance of bank account number 5001 in the ACCOUNTS table on a remote database accessible through the database link BOSTON:
UPDATE accounts@boston SET balance = balance + 500 WHERE acc_no = 5001;
This example shows the following syntactic constructs of the UPDATE command:
UPDATE emp a SET deptno = (SELECT deptno FROM dept WHERE loc = 'BOSTON'), (sal, comm) = (SELECT 1.1*AVG(sal), 1.5*AVG(comm) FROM emp b WHERE a.deptno = b.deptno) WHERE deptno IN (SELECT deptno FROM dept WHERE loc = 'DALLAS' OR loc = 'DETROIT');
The above UPDATE statement performs the following operations:
 The following example updates particular rows of the PROJS table:
UPDATE THE(SELECT projs FROM dept d WHERE d.dno = 123) p SET p.budgets = p.budgets + 1 WHERE p.pno IN (123, 456);
You can use a RETURNING clause to return values from updated columns, and thereby eliminate the need to perform a SELECT following the UPDATE statement.
You can also use UPDATE with a RETURNING clause to update from views with single base tables.
The following example returns values from the updated row and stores the result in PL/SQL variables BND1, BND2, BND3:
UPDATE emp SET job ='MANAGER', sal = sal + 1000, deptno = 20 WHERE ename = 'JONES' RETURNING sal*0.25, ename, deptno INTO bnd1, bnd2, bnd3;
 are available only if the Oracle objects option is installed on your database server.

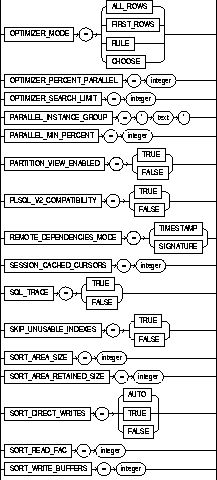
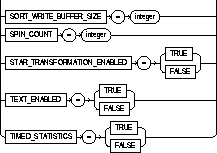

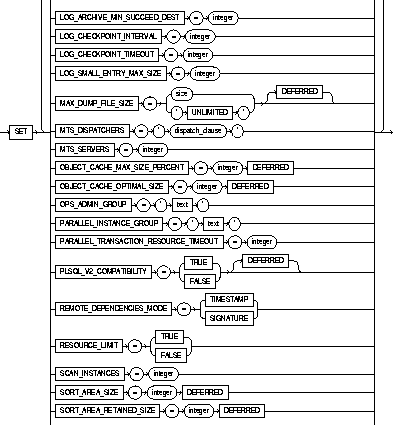
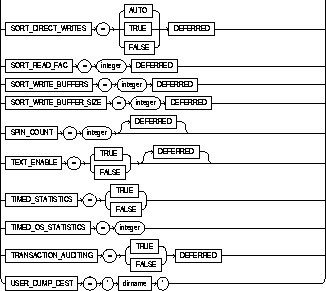
 are available only if the Oracle objects option is installed on your database server.
 NESTED TABLE nested_item STORE AS storage_table
 are available only if the Oracle objects option is installed on your database server.
 are only available if the Oracle objects option is installed on your database server.
 VALIDATE REF UPDATE
 attribute
 are available only if the Oracle objects option is installed on your database server.
 TYPE
TYPE
 GRANT TYPE
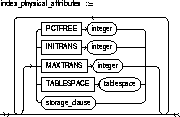
 are available only if the Oracle objects option is installed on your database server.
 You can create an index on a nested table storage table.
 You can create an index on a scalar object attribute column or on the system-defined NESTED_TABLE_ID column of the nested table storage table. If you specify an object attribute column, the column name must be qualified with the table name. If you specify a nested table column attribute, it must be qualified with the outermost table name, the containing column name, and all intermediate attribute names leading to the nested table column attribute. See also
  You can create a synonym for an object table or an object view, but not for object types.
 are available only if the Oracle objects option is installed on your database server.
 OF object_type
 attribute
 Object types, REF object_type, VARRAYs, and nested tables are valid datatypes. See also
  WITH ROWID
 SCOPE IS scope_table_name
 SCOPE FOR... IS...
 REF
REF
 OIDINDEX
 index
index
 NESTED TABLE ... STORE AS ...
 Object tables cannot be part of a cluster.
 For object tables, subquery can contain either one expression corresponding to the table type, or the number of top-level attributes of the table type.
 are available only if the Oracle objects option is installed on your database server.
 object table
 object view
 If the trigger is defined on an object table or view, OLD and NEW refer to object instances.
 You can reference object columns or their attributes, VARRAY, nested table, or LOB columns. You cannot invoke PL/SQL functions or methods in the trigger restriction.
 are available only if the Oracle objects option is installed on your database server.
 You cannot specify an alias when creating an object view.
 OF type_name
 WITH OBJECT OID
 DEFAULT
 attribute
 For object views, the number of elements in the view subquery select list must be the same as the number of top-level attributes for the object type. The datatype of each of the selecting elements must be the same as the corresponding top-level attribute.
 Object types, REF object_type, LOBs, VARRAYs, and nested tables are valid column types.
 are available only if the Oracle objects option is installed on your database server.
 THE
THE

 are available only if the Oracle objects option is installed on your database server.


 are available only if the Oracle objects option is installed on your database server.
 This option is not valid for object tables or object views.
 THE
THE
 are available only if the Oracle objects option is installed on your database server.
 THE
THE
 SELECT statements using THE or MULTISET keywords cannot be used with these set operators. See also
  CURSOR operator
 THE
THE
 TABLE (nested_table_column)
 are available only if the Oracle objects option is installed on your database server.
 THE
THE